New shop build, Doneish but continuing shenanigans

   / New shop build, Doneish but continuing shenanigans
  • Thread Starter
#81  
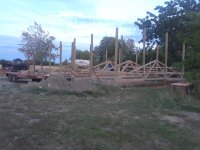
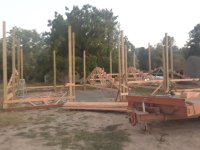
Made progress the last 4 days, took 2 days off work for things to line up and worked my rear off... A friend came over yesterday and helped out, we got 13 of the posts into their holes and just have the one for the lumber hole left to stick in but it will be easier... From there we got the corner posts squared and gravel tamped in those . Today I marked the strings for the center line of the rest of the posts and found out I had measured wrong for the box in the lumber hole and the post would have been right on one of the corners, so I reworked things and added 5 more 80 pound bags of concrete... that makes 58 80 pound bags. Combine that with lifting the posts in by hand I didn't have much left to give today, I did get two more posts set with gravel, so 6 posts are set right now, 8 more to go.

We used the tractor to set one of the posts, the density varied greatly on the posts, the second one we did seemed heavier but we started off hefting them off the ground then pushing them up, the rest we started about 18" up and that seemed to help.

I'll try to get a couple pictures up later.

One question, I'll research it more, but on the skirt boards I have 2x8's and am planning on a 6" slab, would it be better to have the concrete to the top of the skirt board or 2" down?
 
   / New shop build, Doneish but continuing shenanigans #82  
On my pole barn when I pour the floor it will be at the top of the skirt boards because that's the bottom of the man door.... It's a Morton built barn......
 
   / New shop build, Doneish but continuing shenanigans #83  
What we did is we added one to the inside. That also gives you something to strike against when you pour your floor. Ours is not heated and we did not what the concrete grabbing onto the posts. Then we filled that area in with gravel, so in our case we held the skirt board up about 2 inches. However, you do it you do not want any concrete getting under the skirt board or grabbing onto your poles. When the ground freezes that building should stay right where it is, however your floor could move. That is the thought process anyway.
 
   / New shop build, Doneish but continuing shenanigans
  • Thread Starter
#84  
I think I've seen single digit temperatures twice in my lifetime in this area, the frost level is high enough that it isn't in any codes around here... The plans call for nails at every post to attach the posts to the slab so it's the opposite of what you are talking about. The only concern on this property is the ground water level, it is around 5' deep right now, and was at least a foot higher a month ago....
 
   / New shop build, Doneish but continuing shenanigans #85  
Then you are going to want to put a vapor barrier under your concrete! I would then put an inch or two of sand on to level, protecting the plastic and pour on top of that. I wished i would have held my skirt board higher. It is nice to have it at the level to pour your concrete at however two inches above so stuff doesn't slid into outside steal denting it is nice also.
 
   / New shop build, Doneish but continuing shenanigans #86  
I wished i would have held my skirt board higher. It is nice to have it at the level to pour your concrete at however two inches above so stuff doesn't slid into outside steal denting it is nice also.

Install your skit board level with the top of the concrete. Pour your concrete and then add a 2 x 2 screwing it to the skirt board.
 
   / New shop build, Doneish but continuing shenanigans #87  
Morton built our 30x50 pole barn 2 yrs ago. They left it up to me to where i wanted the top of the concrete floor so they knew where to put the 2x8 skirt board. I came down 2" from top of skirt board. I also have the floor sloping to the front on a 1/4" per 10' slope. I just snapped a string line on the skirt board so the concrete crew knew where the top of the floor was. I had a extra add on of 7/16" x 32" OSB panels installed on lower portion of the exterior walls. It keeps the metal siding from getting damaged from inside. The 2x8 skirt boards are rabbited to allow the 7/16" panels to be flush .
 
   / New shop build, Doneish but continuing shenanigans #88  
I'm OCD about water. I'd never want floor water to reach my metal.

Skirt board above concrete. Inner wall covering gapped 1/4" above concrete. Crack caulked.
 
   / New shop build, Doneish but continuing shenanigans #89  
I think I've seen single digit temperatures twice in my lifetime in this area, the frost level is high enough that it isn't in any codes around here... The plans call for nails at every post to attach the posts to the slab so it's the opposite of what you are talking about. The only concern on this property is the ground water level, it is around 5' deep right now, and was at least a foot higher a month ago....
Well if that is the case hold the skirt board high and put a 2 x 4 down 2" won't need nails into the concrete the slab moves it is going to push on that wall for sure.
 
   / New shop build, Doneish but continuing shenanigans
  • Thread Starter
#90  
I've been trying not to post every little step, but I'm making progress and am building vertically now! Two weeks ago I got the skirt boards up, I made a water level with 55' of clear hose and marked all 14 posts with a mark at the same height, then nailed the skirt boards up to the line from that height. Last weekend I got the last of the skirt boards up, the hole drilled for the man door drilled and the post set, got the lumber hole filled to the point where I ran out of gravel (it's about 1' deep now). On Sunday my brother came over, we put up a row of girts and we moved the trusses into the building and stood all but 2 around their posts and attached enough perlins to keep them upright. Right now the outer trusses are just attached to two posts each with some duplex nails.

Tonight I got the perlin boards on one end truss and one of the pairs, tomorrow hopefully the other pair that's standing and the other end truss.

Of course every step gets complicated... I lost most of a Saturday trying to get my secondary air compressor running, turns out I had two bum motors not just one, got a replacement but the Harbor Freight motor had a 7/8" shaft instead of 1/2" being an 1800rpm motor instead of 3450rpm... so I just ended up stringing 200' of air hose from the garage and ordered a pulley on Amazon, now that part works :). Then I had to get the one man post hole digger running, after that had to get the auger working since it's teeth were SHOT, took the easy route and just built up some material with 7018 welding rod since I didn't feel like attempting to find Penko teeth wasting more time...

Progress, I have truss jacks lined up for Saturday, should have the trusses in their home then, will see how far I can get with help on site... the material piles are getting smaller finally!
 
   / New shop build, Doneish but continuing shenanigans #91  
Sounds like very good progress. I'm looking forward to seeing pictures!!!
 
   / New shop build, Doneish but continuing shenanigans #92  
Water level.....i still have one of those. Used it to build my house. I didnt use my transit level on house because the water level is a 1 man operation. Back then, no one could afford a laser level....if it even existed in 1996
 
   / New shop build, Doneish but continuing shenanigans
  • Thread Starter
#93  
Using the hose the way I did it was a 2 man operation, I just bought 54' of hose (what was left on the reel) and went to the ends of one wall and marked the water level on both posts, had the wife sit and watch the level on one end while I took the other to as many posts as the hose would reach and marked them, then moved the hose to the other end where I started and marked the rest of the posts... kind of a pain but I think was easier than the transit I have...

Here's a couple pictures, one from Sunday night and the other from tonight, I got most of the perlin supports up tonight, need to cut a bunch of perlins to length (they are all like 3/4" too long) tomorrow and go from there...
 

Attachments

  • 20200802_204045.jpg
    20200802_204045.jpg
    1.8 MB · Views: 217
  • 20200804_204812.jpg
    20200804_204812.jpg
    1.3 MB · Views: 224
   / New shop build, Doneish but continuing shenanigans #94  
Thanks for the progress pics!!! These projects are good for a man's Soul. :)
 
   / New shop build, Doneish but continuing shenanigans
  • Thread Starter
#95  
Just a teaser since I want to get out and working on it, but I had several friends come over yesterday and we got the roof raised, all the girts up and even the trim boards up!

I'll get a pic or two up tonight.
 
   / New shop build, Doneish but continuing shenanigans
  • Thread Starter
#96  
Ok, here's the promised pictures...

20200804_204812.jpg
20200807_202313.jpg
20200808_210404.jpg
20200809_202335.jpg

This should be in the right timeline... last Tuesday, Friday night, Saturday night and tonight... Not much difference between yesterday and today, I took it easy today since I was going for almost 14 hours yesterday... Friday night I had most of the perlin boards cut to length and sitting in place but not very many were attached, did that first Saturday morning then we put on the truss jacks and lifted the roof assembly then went with all the gerts (who came up with these absurd names? a handful of drunk guys making things up?) then we built up the eaves and put the trim boards up. Today I went slow but got the 18 3/4" bolts in place in the 6 posts that needed them then nailed the door posts in.

Progress! It finally looks like a thing!
 
   / New shop build, Doneish but continuing shenanigans #98  
Congratulations on some great progress!!!

Am I seeing this correctly, you have two trusses attached to either side of the posts, and your roof purlins are on top of those trusses?
 
   / New shop build, Doneish but continuing shenanigans #99  
Very interesting!!! I've never saw a roof assembly done like that!!! Curious about the jacks used as well??? Thanks for the updates and pics!!!
 
   / New shop build, Doneish but continuing shenanigans #100  
Thats how everyone does them up here. They use strap jacks or truss jacks to raise it after its built.
 

Tractor & Equipment Auctions

HYDRAULIC AUGER FOR MINI EXCAVATOR (A58214)
HYDRAULIC AUGER...
2020 CATERPILLAR 242D3 SKID STEER (A60429)
2020 CATERPILLAR...
Unused 2025 CFG Industrial MH12R Mini Excavator (A59228)
Unused 2025 CFG...
Mini Margaritaville Truck (A55853)
Mini...
UNUSED FUTURE SB45 HYD SILENT BREAKER (A52706)
UNUSED FUTURE SB45...
UNUSED FUTURE FT36C STAND ON SKID STEER (A52706)
UNUSED FUTURE...
 
Top