Chain fabrication help

/ Chain fabrication help #1  

powerscol

Veteran Member
Joined
May 25, 2010
Messages
2,328
Location
SW Colorado
Tractor
CT 235
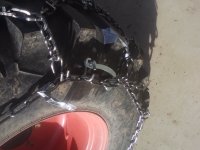
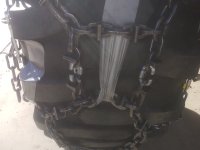
OK folks while it is still warm I am about to embark on installing my rear tire chain kit (quality chain) . I have the center section and side chain's and all the hardware. I can measure on the tire side wall for the starting length and width (they need to sit high for inside clearance), but looking for information on the final install and adjustment or even proper measurement for cutting and fitting. The kit is the V bar pattern similar to this Product Search | Snow Tire Chains from the Largest Tire Chain Wholesaler in North America , but I needed to be a bit narrower for clearance over the stock width, thus the kit. Joe Casper has been a great help so far, but any additional tricks would be helpful.

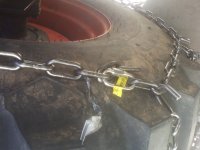
I am aware to be sure before measuring to cut that all the links need to lay flat and that the side chain needs to not be twisted and links measure correctly for the hardware attachment, but any additional instruction are welcome. I did look this up last year, but lost my links and most of Joe's emails when my pooter died, and it got too cold to work outside.

I have seen videos where a rope or wire is used to pull the chain up and over the tire, and the old school of laying the chain flat and driving over it. The wire trick appear to have the chain tighter when pulled around. For those that know what works best?
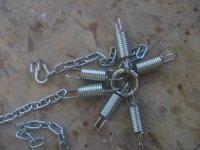
PS I am a bit past 50....well a lot :D, so arm strength is a bit weak. I did get a chain snugger tool for the final hook up and side tension install, but not sure of the actual use. Videos of using it and final chain adjustment would be very helpful. I do plan to take pictures as I fab things up.

Thanks
Keith
 
/ Chain fabrication help #2  
In my opinion, getting chains the correct width, is a "purchase the correct set" thing.
I would never consider changing the width of a set of chains.

As far as install,, the best end result is when you have the same number of links around the perimeter on the inside matching the outside.
If you need to tighten the chains, hopefully, you can shorten one link inside,, AND one outside.

If your tires are not fluid loaded, the best method to get the chains on TIGHT,,
is to deflate the tire, install the chains, then re-inflate the tires.
 
/ Chain fabrication help
  • Thread Starter
#3  
In my opinion, getting chains the correct width, is a "purchase the correct set" thing.
I would never consider changing the width of a set of chains.

As far as install,, the best end result is when you have the same number of links around the perimeter on the inside matching the outside.
If you need to tighten the chains, hopefully, you can shorten one link inside,, AND one outside.

If your tires are not fluid loaded, the best method to get the chains on TIGHT,,
is to deflate the tire, install the chains, then re-inflate the tires.

I went with the kit as I could not find a stock set to fit as they were all too wide and narrow ones wee too short in length. I posted all this last year. I have R4 tires and need the inside side chain to fit high on the sidewall at the base of the lug pattern for inside clearance. The help I need is on fabrication tricks so I dont mess it up and make work for myself. One thing I do plan to do is not tighten the side cross link clips until I have everything set. I am hoping a strip of duct tape will work during the install to hold them in place. Then I can adjust the location for a best fit - thoughts?

BTW - I did get a heavy duty chain link tool for the fabrication and repair down the road, so I do have that to work with.
 
/ Chain fabrication help #4  
Keith, not sure if you have a set of chains that need to be altered, or some sort of "kit" and you need to assemble. It sounds as if you have a clearance issue. Would re-aranging your wheel spacing be a big problem even if only for the winter months? Wish I could offer some help but in my exp., chains will "sit" where they want to and usually that's equal from the tire center. Once you get them "set up", installation become's easier with each install. You'll learn tricks each time you put them on. I have some chains that are long enough to fasten together with the machine on the ground, I just move the machine a 1/2 tire rev. til the fastening links are at the top of the wheel and re tighten.
 
/ Chain fabrication help
  • Thread Starter
#5  
No way to change tire spacing, and yes I am assembling them from scratch. Was hoping someone has done this before that could give out a few tips. My goal is to have the side link chain rest at the bottom of the tire lugs for clearance. Stock sets set lower that that. Dealer did not recommend using spacers with my loaded tires. They have seen issues over the years using aftermarket spacers, which is all that is available for my unit. Ill start on my assembly sometime this week. First I need to get a fencing project done.

Thanks for the thoughts

I did find some install tips on the Quality Chain web site and others, so I have a start.
 
/ Chain fabrication help #6  
No way to change tire spacing, and yes I am assembling them from scratch. Was hoping someone has done this before that could give out a few tips. My goal is to have the side link chain rest at the bottom of the tire lugs for clearance. Stock sets set lower that that. Dealer did not recommend using spacers with my loaded tires. They have seen issues over the years using aftermarket spacers, which is all that is available for my unit. Ill start on my assembly sometime this week. First I need to get a fencing project done.

Thanks for the thoughts

I did find some install tips on the Quality Chain web site and others, so I have a start.


====================================================================

It won't work and your going to tear up the chains.

What type of chains do you have to assemble?? V bar or standard cross link.

Are you intent on having a two link or four link snow and ice chain spacing?


What brand Mule do you have in your stable???? Gear or hydrostatic final drive?, 2 wheel or four wheel drive

For snow, ice and mud chains to sit properly on the rear shoes of a mule the cross link of the chain has to come down the side wall of the tire almost to the lip of the tire rim.

Your chains are going to develop a lot of twisting force and without the chains hugging the sidewalls of the tires it will not work.

Using turnbuckles will not work either if your inside space between the sidewall and the fender distance is limited.
 
/ Chain fabrication help #7  
Its a lot of tedious work, but doable. I would make a template of the tire profile, width size, to make sure your accounting for the natural arc of the tire. You want to measure the arc plus the length of how far down on the lugs the side chain rides. Add a link for wiggle room and that's your width. The two side chain's length are pretty easy by measuring the diameter of the tire and some simple math.

We've always breaking down semi chain's into what we need. It's not hard to put them together.
 
/ Chain fabrication help #8  
My DK35SE HST with R4's seems similar to yours Powerscol. I have just 2" clearance between the sidewall and ROPS frame running up the inside tire well. I had to keep the chains high on the tire to make them work. I managed to fit heavy DUO chains by modifying the end connections (had to use two ladder cross chains to close the end gap) and using tensioners. They worked with no problems for two years. However, the DUO pattern, which skips a link between patterns, was very rough. Also, the end-gap ladder cross chains tended to shift into the tread over time resulting in an even rougher ride and some slippage under load.

The chains worked well but had to be installed "just right". So I decided to modify my DUO's to the H-pattern like the ones you have. That made a huge difference due to the H-pattern's not skipping a link as DUO's do. The tighter pattern made the chains ride higher on the tire wall, and I only needed one ladder chain instead of two at the end gap. Of course that ladder cross chain still eventually managed to disappear in the tread over time. The details are in this thread:

http://www.tractorbynet.com/forums/...ed-modifications-post3150916.html#post3150916

A year later I fixed the troublesome ladder cross chain at the end gap by adding one more DUO pattern that gap as shown here:

http://www.tractorbynet.com/forums/...ed-modifications-post4045498.html#post4045498

I found the pin couplers shown in the link to be easier to work with than other types of links.

I think your chains will work fine. I have not had any trouble with my chains fairly high on the sidewall. Since you have a chain tool it should not take that long to build the chains. Looking through the referenced thread, I see it took me 4 hours to modify my DUO's to the H-pattern. Also, I ordered a continuous length of DUO patterns to make the H-pattern (it was much cheaper than buying single patterns). I had to completely disassemble my existing DUO's plus the additional DUO patterns before building the H-pattern chains. And the DUO's are 9mm instead of H-pattern's 7mm.

If possible, span the end gap with an H-pattern rather than leaving any unfilled gaps. That is, close the side chain normally, but have an H-pattern span that gap to a link in the H-pattern on the opposite side. I found it eliminates potential problems with the chain shifting at the end gap. I have 1 twisted link in the cross-hook and connect the gap-spanning H-pattern to it with the pin coupler. The closing side of the last H-pattern has two less links than other patterns, one of which is in the cross-hook to which the closing pattern connects, and the other is replaced with the pin coupler connecting that single link in the cross-hook and H-pattern together.

If you need to lengthen the end gap so a pattern fits across it correctly, one option is to replace some of the long side chain links with shorter pin couplers , or use the other type with two halves and pins that you pound to lock the two halves together, or the other type that are one piece and squeeze together.

As for mounting chains; I had trouble with a cable over the tread slipping off. Instead I lift the end of the chain to the top of the tire and hold it while my wife presses the HST forward pedal to roll the rest of the chain on the tire. When the front part of the chain is almost to the ground, I spread the chain across the tread as best I can and connect a bungee on the inside from the side chain (that is almost hitting the ground) to the back side chain, that is still coming up the back side of the tire. Then roll ahead again and drive over the front part of the chain after it hits the ground until you are over it and there is a foot or two extending on the ground to the back of the tire. The other end will now be off the ground hanging down the rear of the tire. Distribute everything as best you can on the tread and connect the inside hook. Then connect the outside closing lever, but you likely cannot close it. Move the tractor a bit more so you can distribute and straighten the still fairly loose chain. You should then be able to close the outside lever. Once the chain is mounted drive back and forth a bit, stopping to distribute and straighten it. I did buy one of those closing load-binder things but have never used it.

Then put on tensioners if you need them. I need them on the rear chains but not on the fronts. I made the ones shown here for my rear tires:

http://www.tractorbynet.com/forums/tires/299418-tire-chain-tensioners-post3588210.html#post3588210

..... because I had all the parts from tearing apart the bulk DUO patterns. The photo in this thread was before I figured out closing the end gap with an H-pattern. Now I just use three tensioners instead of six.

You have all the pieces so it should not be too hard to start building one chain and see how it fits. It may be a good idea to squeeze things just enough so you can test the chain and it is not too hard to get it apart if you decide you need to shorten the cross pattern.
 
/ Chain fabrication help #9  
Why not just put chains on the FRONT tires,,, forget the back tires,,,
 
/ Chain fabrication help #10  
I had a set of HEAVY DUTY tractor chains for my previous tractor - Ford 1700 4WD. The rear tires were filled with a salt solution but by rotating the valve to high noon I could let air out - install the chains - then air back up. It would result in the chains being "drum tight". I would jack up one rear tire - off the ground - and then go about the installation process. Same with the other side.

Even with the rear chains being so tight - I noticed, after time, the chains would center themselves. I think it will be fairly difficult to keep any set of chains "offset" even with added tensioner hardware. Natural forces will want to center the chains and after a certain amount of use - they will be centered.
 
/ Chain fabrication help #11  
I've built chains in the past and have modified several sets as well. Generally it's been hard to find affordable 3/8" link chains for 10x16 and 12x16 tires so I've taken to buying tractor chains and then modifying them to fit.

Generally when I make tire chains I don't use a tape measure. There is enough error in the link spacing and tire shape that the chains can be very hard to accurately measure. Instead, I'll dismount the tire and then drape the chains across the tread to determine what the cross chain length should be. Don't forget to allow for the side clips. I then flip the tire on it's side and do my best to mock up the side chain. The side chain need to be set far enough down the sidewall so the chains can't twist around sideways. This can be tricky because of the take-up mechanism so I will add 6-8 links to the calculated ideal length. I'd prefer to throw away a couple of waste links instead of throwing away several feet of chain because I cut it too short. It's much easier to install chains and keep them tight if you put adjusters on both the inside and the outside of the tire.

The job will require a set of tire chain plyers. I can't see how you'd do it without them.

As to installing, I've found the best way to install chains is with the tires up in the air. You can now slide the chains around and actually get them to fit the tire. It's not the only way, it's just the way that seem to work best for me. As for tensioning, I use several bungee cords positioned across the tire to keep the chains tight. I don't bother with cords on the inside because clearances are often too tight. I tried a set of spring adjusters and they seem to be lasting better than the bungie cords. Didn't care for the chain system that was used to set the spring tension, but unrefined in my opinion. After running the chains for a little while I'll go back and set the adjusters one link shorter. After the second tensioning they seem to run out just fine for the rest of the season.
 
/ Chain fabrication help
  • Thread Starter
#12  
Why not just put chains on the FRONT tires,,, forget the back tires,,,

I have them for the front, but on ice and cross slope the back slides down. I use my big box blade as a counter weight or the tiller which is heavier.

kco - thank for the tips. I plan to go old school and tape a rope around the tire for the side chain length, and again across the top for a total cross length including the hooks. The center section is extra long, so I should be able to fit up a full pattern and no gaps. I have snaps and swivel D rings to adjust. I also bough a good set of chain tensioners to keep things snug. I used to do a lot of off roading in the Colorado high country and had a set of logging truck chains just in case. To get them on I used a cross link through the wheel and spun them in place. Sometimes that is all I needed to get out of the hole. Unfortunately the hub on the Bobcat is solid, but there may be a way to get baling wire to hook into the lugs.

I played around with the set today, and the only question I came up with is presetting the H pattern out to get the side chains set. I think I have it figured out, but tomorrow I will clean up the tractor (caked with mud) and drape them over the tire for a final check on width and H pattern set up for length.

leonz - I learned a long time ago from my grandmother, that if you never try something in life, you will never know if you can do it or like it, and if you fail, pick you britches up off the ground and try again. She lived to be 102 and went around the world with the Peace Corps, Vista, and on her own. During the late 70s she was in Russia (without a visa), teaching a Russian General English during a port of call. General was a friend of the Portuguese tramp steamer Captain she was traveling on teaching the crew English for her passage. She spent a year with them going around the world. She was never wrong in her advice. She said it only took gray hair and a smile to go anywhere in the world and she did it. Be safe my friend.

In my case I have the smile, but only half the gray hair. I am a bit shiny upstairs, thanks to my grandpa on the other side of the family.

I should get to it by the end of the week and will take pictures, may not be the best, but could make folks laugh.
 
Last edited:
/ Chain fabrication help
  • Thread Starter
#13  
Well I started on the measurements today using the rope and tape method. I did not stretch the rope out, just snug, I will add a few links from this dimension as a start. I measured the center circumference and the length for the side chain. I also used the rope to measure across for width. I will need to adjust it for the side chain dimension. I have enough lug above the chosen location to hold them in place using chain tensioners.
1008161522.jpg1008161527.jpg1008161532a.jpg

The reason I am high on the sidewall at the base of the lugs is due to a clearance problem. I only have 3" free.

Next the layout and fabrication.

Thoughts and observations are welcome
 

Attachments

  • 1008161533.jpg
    1008161533.jpg
    190.7 KB · Views: 161
  • 1008161533a.jpg
    1008161533a.jpg
    398.7 KB · Views: 164
/ Chain fabrication help #14  
If you're gonna run them that high, you'd better plan on keeping some bungies on them. If you don't, the chains will twist around sideways.
 
/ Chain fabrication help
  • Thread Starter
#15  
If you're gonna run them that high, you'd better plan on keeping some bungies on them. If you don't, the chains will twist around sideways.

I have a heavy duty set of spring tensioners like this Adjusters Tensioners for Tire Chains the extra large set, so hopefully I will be good. I also got the tool to do them correctly.

I have marked up the cuts needed, but before I do I plan to jack up a rear tire and drape the set over and assemble on the tire for the first fitting. Should be fun. I have lots of baling wire to tie things together for a start :)
 
/ Chain fabrication help
  • Thread Starter
#16  
I am attaching photos of the test fit. It appears got the exact length needed, no extra, unless I did something wrong. I used a clevis on the inside instead of the cam lever tighter thought on this? Took up less room, but I may get a slightly bigger one for strength.

For width I used 3 links each side. If I go less I think I will end up short in the center. I may try 2 on the inside and 3 side links to the clip on the outside before I do any final cutting. I ended up with every 8th link for the side connections. I do have spring tensioners for the outside. Ant thoughts from the experts here. In this configuration it is snug at the center, but not tight I could just get the c-clips in the last H pattern using the lever ratchet. I will be setting the roll pin during the final install To install I draped over and connected the end to the tire using duct tape, then rolled forward, centering as I went. I did do a short test drive and everything stayed put so with the tensioners I should be good. It appear I still have good clearance with them setting at is.

Would appreciate feed back before I starting cutting and crimping.
 

Attachments

  • 1029161604d.jpg
    1029161604d.jpg
    210.7 KB · Views: 167
  • 1029161604c.jpg
    1029161604c.jpg
    314.9 KB · Views: 160
  • 1029161604b.jpg
    1029161604b.jpg
    265.6 KB · Views: 153
  • 1029161604a.jpg
    1029161604a.jpg
    198.5 KB · Views: 166
  • 1029161604.jpg
    1029161604.jpg
    251.2 KB · Views: 166
  • 1029161614.jpg
    1029161614.jpg
    350.5 KB · Views: 154
/ Chain fabrication help #17  
Do you have fluid in the tires,, or can you do the deflate-inflate thing to tighten the chains??
 
/ Chain fabrication help #18  
I think the easiest way to install chains is with the wheel in the air. Allows you to tug at the chain and work the slack around the tire. I've never used a tensioner to take the slack out. Personally, having a adjuster on the inside and the outside has worked the best. That and some bungies on the outside to help keep them tight.

I run wheel spacers on my skidsteer and havn't had a single problem with them. Trust, me I've loaded that machine and a skidsteer has a significantly higher side load than what you'll see with any tractor. The steel spacers would be stronger than the aluminum ones so go with the steel spacers if you any concerns.

As for making chains, this really isn't hard to do. Just time consuming. Layout your cross chains, put the end links on and then layout the side chains. Make sure the chains are laid out correctly and start bending the side links closed. Every time you bend the side link you'll move the chain so there is no reason to lay out the whole chain at once. Just do one cross link at a time. Once you get all the cross links attached to the side chains, put your adjusters on and then drape the assembly over the tire. Now you can determine the final length of the side chains.
 
/ Chain fabrication help #19  
For chain tensioners I simply cut up an inner tube and make big elastics and add 2 "S" hooks, Usually I install 3 on outer side of the wheel and some times 2 on the inside.
Sure prevents that 'clang clang' when driving around.
 
/ Chain fabrication help
  • Thread Starter
#20  
Tires are filled so lowering the air and refiling is out. Wheel spacers are not recommended for this tractor and I have some implements that just clear the tire now. From what I can tell I have good clearance as is. Tomorrow I will try and narrow the fit to get them to ride a bit higher on the side wall. Ill take up one more side link. I still want to connect the last H pattern when all is said and done. Today I learned to do that first before tightening the side chains. It worked, but is probably backwards from the instructions I have found online. For connecting the H pattern, is there a better method than what I am using?

Thanks
 

Marketplace Items

Ford 8210 (A60462)
Ford 8210 (A60462)
2024 DEVELON DL250-7 WHEEL LOADER (A59823)
2024 DEVELON...
2015 Chevrolet Silverado 1500 Crew Cab Pickup Truck (A59228)
2015 Chevrolet...
MTL Forks (A60463)
MTL Forks (A60463)
Iranch IRET13 (A60463)
2012 Kenworth T800 T/A Day Cab Truck Tractor (A55973)
2012 Kenworth T800...
 
Top