Flail Mower Let's talk flail mowers

   / Let's talk flail mowers #1,101  
Dang... I knew I should have taken a picture. There are four pins on the mower itself that are holding two levers. Those two levers connect to the lifting arms. If I leave both pins in, the levers can not move up or down and the mower never touches the ground. If I take one pin out of each lever, the mower will now touch the ground.

My question is if this is okay to remove the pin, and just have one per lever on the mower.

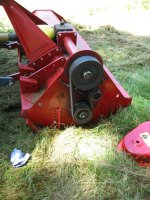
I think you are describing the clevis pins that hold the lower 3PT arm attachment points. See photo below. They are at the extreme left side of the photo.

I don't know why your mower won't touch the ground but it sounds more like a problem with your tractor 3PT lower arms not going low enough. You can see that on my tractor the mower is on the ground and the pins are attached normally (2 clevis pins installed). The little tabs holding the Cat 1 pin can jiggle a bit but don't really move. Are you sure you don't have a stop or something like check chains preventing the 3PT arms from lowering?
 

Attachments

  • IMG_0214.JPG
    IMG_0214.JPG
    408.5 KB · Views: 495
   / Let's talk flail mowers #1,102  
Okay I got my new Caroni fail mower attached to my LS 4047 tractor, but ran into an issue with the 3pt attachemnt. The pins for the lifting arms are attached to the mower with two pins. Problem is I have to pull the front pin in order to get the mower to touch the ground. It looks like this should be fine, but I wanted to see if I am makinga big mistake... Any advice is appreciated

Can you post a picture or two ?
I got the side shift kit with mine and don't have a problem with it on any of my tractors.
I still have all the parts for the non-side shift assembly, so I might be able to understand what you are running into.
I vaguely remember some "opportunities for incorrect assembly" due to slightly ambiguous instructions/diagrams, but please post pictures.
 
   / Let's talk flail mowers #1,103  
Island tractor, thank you for the picture, and you nailed what I am talking about. I am going to try o elongate my lift rods to see if I can make up the difference. Between and Italian mower and a Korean tractor, these instructions are far from clear... Why do I get this bad feeling that this is only the beginning of my issues with this combo!

I guess I am still wondering why the those tabs (with the two clevis pins) are in a heavy duty housing that looks like it is designed to allow movement.
 
   / Let's talk flail mowers #1,104  
Island tractor, thank you for the picture, and you nailed what I am talking about. I am going to try o elongate my lift rods to see if I can make up the difference. Between and Italian mower and a Korean tractor, these instructions are far from clear... Why do I get this bad feeling that this is only the beginning of my issues with this combo!

I guess I am still wondering why the those tabs (with the two clevis pins) are in a heavy duty housing that looks like it is designed to allow movement.

OK, I now see the 2 clevis pins at each lower arm connection point; forgot it was set up like that. You should definitely not have to remove one of those pins to get the flail to sit right, including lowering it all the way onto the ground.

You need to adjust your tractor's 3 point hitch arms. Look at the back of your tractor where the 3 point hitch arms pivot. Now look out along the arms to where the vertical (or near vertical) rods lift those arms. Somewhere around there on the lift arms should be a way to adjust them, so that the height range your 3 point hitch can travel now can be lowered. After making this adjustment, your 3 point hitch won't go as high, but it will go lower. And if you need to put it back for another implements, you can do so. I had to do this to get an auger to drop all the way down. Before adjustment, the auger would only dig about a 1-foot deep hole, due to the 3 point hitch being adjusted to a higher range position. After adjusting it down, the auger would dig a 3' deep hole, maybe even a little deeper than that. A small adjustment of the 3 point hitch arms can make a big difference in how high or low your 3 point hitch can go.
 
   / Let's talk flail mowers #1,105  
Island tractor, thank you for the picture, and you nailed what I am talking about. I am going to try o elongate my lift rods to see if I can make up the difference. Between and Italian mower and a Korean tractor, these instructions are far from clear... Why do I get this bad feeling that this is only the beginning of my issues with this combo!

I guess I am still wondering why the those tabs (with the two clevis pins) are in a heavy duty housing that looks like it is designed to allow movement.

Don't worry about being alone in having trouble setting things up. I had the topping lift structure mounted backwards for a year before I figured out it was wrong!

I suspect that the clevis pins are used (which makes the tabs free to wiggle just a little) because it allows quicker set up when you choose to offset the mower (note there is a second set of recepticles). However, as the topping lift structure is secured by about a dozen or more bolts, you need a wrench and socket set to move it anyway so I don't understand the benefit of making only the tabs easier to move. I suppose it might be possible to leave the topping lift structure in place and just quickly move the tabs but I've never tried that. I suspect that is what the hydraulic shift kit does (functionally) as I am pretty sure the lift kit doesn't move the whole topping lift structure. But, this begs the question of why there are two settings for the topping lift structure.... Who knows?

In any case, I think the solution to your immediate problem is with the setting of your lower control arms on the tractor. Bebbington is on the right track.
 
   / Let's talk flail mowers #1,106  
image-2698221842.png

Finally have it up and running... I am having a blast with this mower so far!
 
   / Let's talk flail mowers #1,107  
Island tractor, thank you for the picture, and you nailed what I am talking about. I am going to try o elongate my lift rods to see if I can make up the difference. Between and Italian mower and a Korean tractor, these instructions are far from clear... Why do I get this bad feeling that this is only the beginning of my issues with this combo!

I guess I am still wondering why the those tabs (with the two clevis pins) are in a heavy duty housing that looks like it is designed to allow movement.

you CAN run with only one pin. it is setup like that so the mower can articulate side to side independantly of the tractor. I.E. one rear tire drops in a hole and with it pinned rigid the mower will either dip too or lift the other side up. with one pin it can "float" indepandantly of the tractor.
My Frontier RFM is set up similarly.
 
   / Let's talk flail mowers #1,108  
Ah, flail mowers.


Don't worry about being alone in having trouble setting things up. I had the topping lift structure mounted backwards for a year before I figured out it was wrong!

I suspect that the clevis pins are used (which makes the tabs free to wiggle just a little) because it allows quicker set up when you choose to offset the mower (note there is a second set of recepticles). However, as the topping lift structure is secured by about a dozen or more bolts, you need a wrench and socket set to move it anyway so I don't understand the benefit of making only the tabs easier to move. I suppose it might be possible to leave the topping lift structure in place and just quickly move the tabs but I've never tried that. I suspect that is what the hydraulic shift kit does (functionally) as I am pretty sure the lift kit doesn't move the whole topping lift structure. But, this begs the question of why there are two settings for the topping lift structure.... Who knows?


Flail mowers, My favorite subject.


Hello Island Tractor, Are you getting any snow yet? Things look rather wet for Boston.

I believe the two settings are for the front mount option which would be lower in use than the rear mount due to the lower ground clearance for the front mount with the P.T.O. shaft under the front axle of a standard row crop tractor with a mid or front mount/flywheel P.T.O., option.
++++++++++++++++++++++++++++++++++++++++++++++++++++++++++++++++++++++++++++++++++++++++++++++++++++++++++++++++++++++++++++++++++++++++++++++++++++++++++++++++++++++++++++++


In any case, I think the solution to your immediate problem is with the setting of your lower control arms on the tractor. Bebbington is on the right track.
 
   / Let's talk flail mowers #1,109  
View attachment 235316

Finally have it up and running... I am having a blast with this mower so far!


Welcome to the Flail Mower Nation.

Only 17,993 mowers to go.


_________________________________________________________________
Once you go flail you never go back:thumbsup::licking::drool:
 
   / Let's talk flail mowers #1,110  
View attachment 235316

Finally have it up and running... I am having a blast with this mower so far!


I bet you were real happy whacking the weeds close to the water line.

I forgot to ask you if your wheel tracks disappeared after two days.

You will be able to plant/spread grass seed to make the turf even
better if the snow melts quickly this week-assuming you have snow
in Lyme.


_________________________________________________________________
Once you go flail you never go back:thumbsup::licking::drool:


Tractor & Equipment Auctions

2014 Jeep Cherokee Latitude SUV (A50324)
2014 Jeep Cherokee...
220 bu Gravity Wagon (A50515)
220 bu Gravity...
2003 Maverick Pathfinder 2200V Center Console Fishing Boat with T/A Boat Trailer (A50324)
2003 Maverick...
Unused 2025 CFG QK20R Mini Excavator (A50322)
Unused 2025 CFG...
2019 Ford F-350 XL (A50120)
2019 Ford F-350 XL...
2018 Chevrolet Malibu Sedan (A50324)
2018 Chevrolet...
 
Top