Engine Overhaul Kama 554

/ Engine Overhaul Kama 554 #61  
I'd still like to know about using gasket sealer on the head gasket, or not.

I have never had any new head gaskets that called for sealant of any kind.
I am not saying none require it.

My latest Diesel head gaskets were constructed of two very thin laminations
of steel, held together with a few rivets. What are yours made of?

Looks great, Rob!
 
Last edited:
/ Engine Overhaul Kama 554 #62  
I'd still like to know about using gasket sealer on the head gasket, or not.

First: Is there a copper or aluminum crush ring that sits in the block counterbore for the liner?

Back in the day it was mandatory to soak asbestos/copper laminated gaskets in water overnight, wipe dry and brush on a coat of gasket shellac (Indian Head brand) before installation. This allowed the asbestos to "equalize" with the crush of torquing. If the gasket you are installing is a copper/composite (asbestos is gone) laminate it will not hurt to use the gasket shellac, especially if the castings are particularly porous. Convoluted stamped steel single plate gaskets usually will already have a coat of shellac or similar sealer already on them.
 
/ Engine Overhaul Kama 554 #63  
Like bob said I agree with that, there are some other products on the market as well, some are spray on, (think spray paint) that is a slip lubricant material that lets the gasket move slightly as the compression squeezes it down. I'm familiar with the type used when installing aluminum heads onto cars which is seem like a aluminum colored spray paint to me...

I'm not sure about diesels as I have never done heads on one of them. also not sure about Lube for the threads if that is different from gas engines, some require a thread sealant on them as they pass into/through water/oil passages on different cars. It has always been worth while to me to buy engine specific books when I'm repairing one of the cars/trucks as there are a lot of small details that can get lost easily when you dont do this type of work daily... I've done maybe 10 engine head jobs and 2 rebuilds & all of them on mild compression cars. I can say one thing I dont think i would want to try & lift out the crank on one of these :) (one on my 400cdi ford was bad enough & I crushed a finger nail with the 460 ford crank. :eek:...)

Mark
 
/ Engine Overhaul Kama 554
  • Thread Starter
#64  
My new gasket is the same as the old one.
It has steel crush rings that seal onto the liners. There is also one small copper liner on one corner of the gasket. The rest is a fibrous gasket material?
-In the first photo you can see the new gasket on the right side of my desk. (Zoom in maybe?)
-Second photo is of the engine block where you can see impressions of the old gasket before I cleaned it.
-Third photo is of the head before cleaning. It still has the old head gasket on it. Parts of it had to be scraped off, but it did come off mostly in one piece.
Maybe you can tell me from those photos below?

On Edit after Mark's reply:
The head bolts are to be reinstalled with a little oil on the threads per the manual.

 
/ Engine Overhaul Kama 554 #65  
OK, the liner is held in the counterbore with the built in crushable alloy fire ring (correct term) on the head gasket which is indexed on each liner by the liner's projection above the deck. It appears that your gasket is not the laminated type but a rigid composite type similar to "Victacore". The copper eyelet is the larger main coolant passage at the rear of the block to assist in more even flow at the rear which is furthest away from the jacket water pump.
The surfaces on the new gasket will require some type of wetting or bonding agent because they are not coated or "filmed". The spray-on type sealer will work (not the HY-Tack adhesive type), or the brushable Indian Head gasket shellac will work too.

Here is a good substitute for the Indian Head brand.
 

Attachments

  • CC.jpg
    CC.jpg
    32.8 KB · Views: 179
Last edited:
/ Engine Overhaul Kama 554
  • Thread Starter
#66  
OK Bob,
Thanks very much for the reply!
I made more progress today and will post some photos later this evening or tomorrow morning.
 
/ Engine Overhaul Kama 554 #67  
Wish i saw this topic earlier to answer a few questions about the valve measurements.
One thing a lot of guys do not think about when checking valve installed specs is what is called the installed spring height. When a valve pounds into the seat the stem comes out the other side farther. Geometry is not as much of a concern as the spring installed height is because grinding the tip of the valve will not change the installed spring height. Checking installed spring height is done by installing the valve and spring retainer without the spring and measuring the distance from the bottom of the retainer to the head surface to get what the spring length would be when the valve is closed. This is important because the longer that measurement is the lower your spring pressure will be at closed position, keeping in mind the spring pressure is not linear and the closed valve position is the lowest and not too far longer it drops off fast. The adjustment is easy, you add shims between the spring and head, or in worst case, you have new seats installed and start over. But when installing new seats and grinding the angles, the amount you grind down is to get the installed spring height set. once spring height is set the other two angles are put in to get the seat width and position on the valve set but the installed height will no longer change once the main contact angle is cut.
Like I said, spring height is often ignored but very much a starting point for a proper valve job.
The measurement they were giving you was not so much for installed height as it was for piston to valve clearence. Kind of odd they had you check that though, i wouldnt think this would be that close of a clearence engine to worry about that. Did they give an installed height dimension?
 
Last edited:
/ Engine Overhaul Kama 554 #68  
I'd still like to know about using gasket sealer on the head gasket, or not.

QUOTE]


How ya doing Rob.......... hope all you finger nails are still the same color ?.

I am blind in one eye and can't see out of the other....... so that makes me limited to what I can see in a picture.

If your new head gasket feels slick to touch ??? .... kinda like silicone slick. Then I would not use a sealer on the head gasket.


Ronald
Ranch Hand Supply
 
/ Engine Overhaul Kama 554 #69  
If your new head gasket feels slick to touch ??? .... kinda like silicone slick. Then I would not use a sealer on the head gasket.
Ronald
Ranch Hand Supply
I concur. If the gasket feels as Ronald implies then it is pre-coated.
 
/ Engine Overhaul Kama 554 #70  
Like I said, spring height is often ignored but very much a starting point for a proper valve job.
That is very true. It's been a long time since I've done any valve work on small engines and it completly slipped my mind. I always started with .030" spring shims. And technically, you should also check the valve springs for correct height and resiliency with a torque wrench and spring test stand.
This is why, with all of the different qualifiers involved, it is worth my time to just take the head to a good machine shop and let them do their job too and leave me to do all of the R&R work (which can be just as technical and critical).
 
/ Engine Overhaul Kama 554
  • Thread Starter
#71  
Hi guys,
Well, below is a better photo of the new gasket and it did feel slick.
But too late, it's already on and I used a thin film of sealer. I don't think it should hurt. Ron, I hope your eyes are OK. I used to get like that on Friday nights at the bowling alley.:D


To answer schmalts question, I didn't check the spring pressure either.
It was brought up with a friend but after a discussion, and knowing the low hours and low rpm, we thought they were (probably) ok as is. I'm not sure about the dimension you asked for...the installed spring height. I did not see any reference in the manual about it.

So like I said above, I did get some progress done.
I got one of those ring closing things to install the rings and pistons into the engine block. They rings were pretty springy so I'm glad I got it. I slid the pistons in using that apparatus. BTW, I learned it was better to turn the crank so the journal was up when inserting the pistons. I insert one piston with the crank journal down and the bearing on the connecting rod fell off.

 
/ Engine Overhaul Kama 554
  • Thread Starter
#72  
I have an S&K 1/2" drive 250ft/lb torque wrench.
It's a fairly decent wrench where you can dial the desired torque. It has both N/m and ft/lb scales on it.


I went underneath to put on the bearing caps and torque in 3 steps to spec.
I put the oil pan back on which has a re-usable rubber gasket. It was in good shape. Then I re-installed the front drive shaft. So now the entire bottom end is done and buttoned up.
After that I put the head on, and the rocker arm assembly. I torqued the head to spec in steps using a small amount of oil on the bolts as stated in the Manual. But I just snugged/tightened the rocker arm assembly.


I'm not sure if there is a torque value for the rocker arm assembly?
Somewhere I had written down like 65/70ft/lbs, but I couldn't find a torque spec in the manual for that. Right now they are just snugged up. Does anyone know the torque value for that?
Anyway, I'm making progress slowly.
I still have a lot of cleaning and other re-assembly to do today, so I will check the forum this afternoon before I set the valve lash.
Please let me know that torque value...
 
/ Engine Overhaul Kama 554 #73  
Looks great Rob. I agree with you on the spring heights. Not a big concern, unless the seats were cut deep, or high hour engine. Just get-er-finished up. Bleed the injector lines. Fire-er-up. it's going to run sweet. :D
 
/ Engine Overhaul Kama 554 #74  
Maybe I should have mentioned earlier, or maybe you already knew about making sure the piston rings were installed correct side up. On some engines it does make a big difference. Usually the rings are marked with a dot or the word "up".
 
/ Engine Overhaul Kama 554 #75  
Hello Rob,
Great work as usual, when you keep talking about the manual, are you referring to the Chinese manual, because I can barely understand mine.
Thanks and once again, great thread
Rick
 
/ Engine Overhaul Kama 554 #76  
RRL wrote:

I'm not sure if there is a torque value for the rocker arm assembly?
Somewhere I had written down like 65/70ft/lbs, but I couldn't find a torque spec in the manual for that. Right now they are just snugged up. Does anyone know the torque value for that?
Anyway, I'm making progress slowly.
I still have a lot of cleaning and other re-assembly to do today, so I will check the forum this afternoon before I set the valve lash.
Please let me know that torque value...[/QUOTE]

Hi Rob,

I have just looked at the manual for the engine in my Jinma 554 - same size engine so I assume similar values for torques.

I couldn't find anything for the specific valve train securing bolts, but did find this chart. Just use the size closest to the bolt you are concerned with and it will give you a torque range. The bolt on my rocker gear is around 7/16" or 1/2" dia. Using the metric equivalent puts you at the figures you have , but in Nm.

Bolt sizes (mm) Torque (Nm)

M6 6 ~ 12
M8 16 ~ 26
M10 37 ~ 52
M12 60 ~ 75
M14 80 ~ 92
M16 90 ~ 120

I don't know the grade of these bolts but would think at least grade 5 maybe 8

HTH

Cheers

Jim
 
/ Engine Overhaul Kama 554
  • Thread Starter
#77  
Thanks Jim,
I got that information and torqued them accordingly.
I think they were M-10 but the head is cast, so I torqued to 40ft/lbs.

Rick,
Yes, I'm talking about that Chinglish Engine manual.
You have to read everything twice to be sure you're doing what they suggest. Some parts are clear though.

Bob,
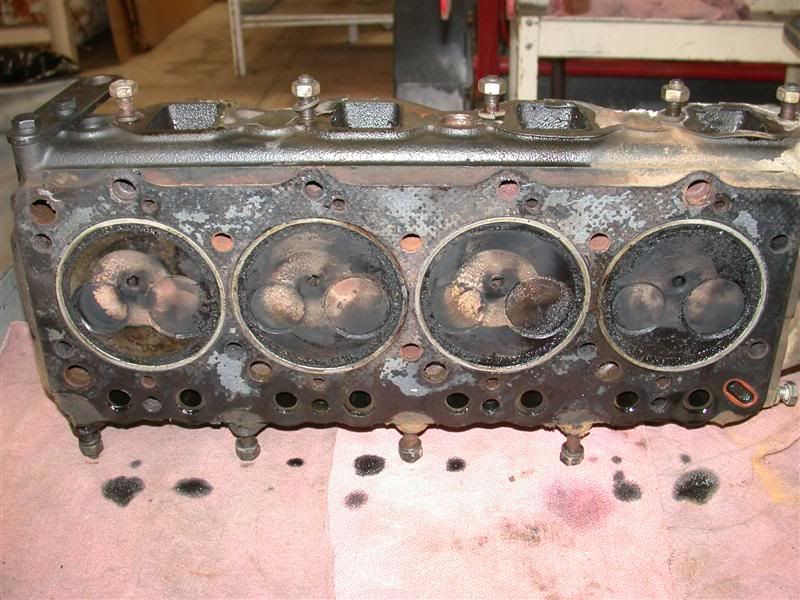
There were instructions about which way was up for the rings.
I made sure I got them all correct. Also the orientation of one ring gap to the other.

IH3444,
Yeah, that's just what I did.
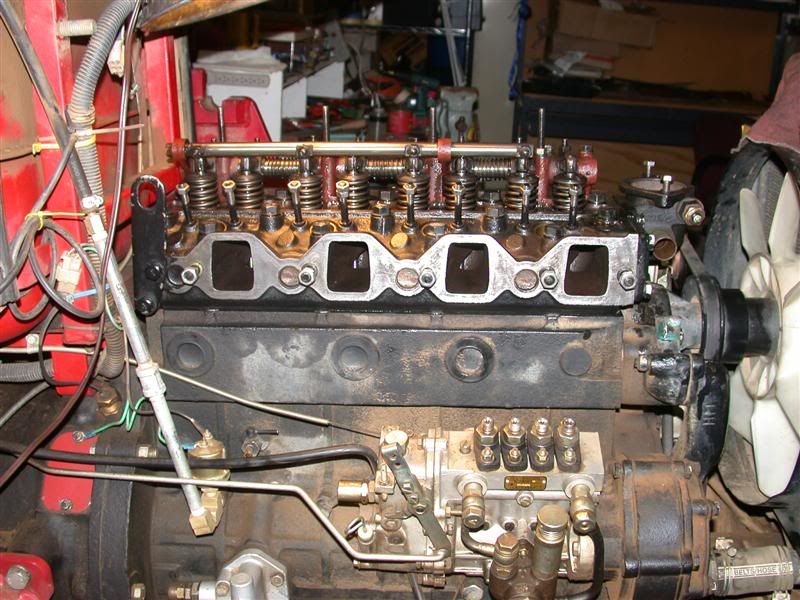
I put it all together tonight and started it up. Here's some photos.
-Set the valves
-Filled it with oil
-Filled the radiator with Fleet Charge
-Filled the diesel tank
-Put the hood back on


And fired it up.
I cranked it for about a minute with the decompression lever. I also used the hand pump on the injection pump just prior to that. It wanted to start but maybe there was not enough fuel in it yet. So I waited a couple minutes and did the same thing.
It caught and started running ... very smooth too.
I am jazzed!!!


I went through the recommend start up...
5 minutes low rpm
5 minutes medium rpm and
5 minutes full rpm

Looks like I got my Christmas present early.
I want to thank ya'll for helping out wo much with this project. It's all done now. All I have to do is put on the fel and I can start working on the pond project again.
Many thanks and Merry Christmas!!!
 
/ Engine Overhaul Kama 554 #78  
Great news. The only other thing I was thinking, that with your machine shop right there, was to weight the pistons, and besure they all weight within 1 gram of each other. Then also do the connecting rods the same way. This makes a difference with the smoothness of the engine also. You just put the piston, with the rings removed into the lathe, connecting rod end outwards for machining. Then just trim a bit off from inside the piston if necessary. The rods are a bit different if trimming is needed. A rod balancer is not necessary, but helps. Then you trim the bottom end cap if necessary, and then if necessary to bring the rod back into balance, the top of the rod, and a bit under the wrist pin boss. Sounds like you didn't need to do any of this. I rebuilt the engine in my Jetta diesel, and did the above practice, but I made the pistons all weight within 0.1gram, (well, exactly the same to be completely honest) and the same for the connecting rods. It's a smooth running puppy, with some pep. Great job Rob, and done in a timely fashion, without cutting any corners. Excellent work!;)
 
/ Engine Overhaul Kama 554 #79  
Hi Rob,

Great to read that you have finished the job and now have it running. Ya gets a good feeling when it bursts into life again, doncha :D:D:D

Thanks for taking the time and effort into doing the write up. It is both interesting and very informative to those that need that little extra help - you have just made their life a little easier.

Well, once you have the FEL back on, you should be ready to go outside and do a few doughnuts and wheelies eh :eek::eek::eek: That machine of yours is sure gonna last a long time now it has been rebuilt - all that is left now is the transmission - right :)

Another good job well done.

Jim
 
/ Engine Overhaul Kama 554 #80  
Congratulations Rob on a job well done. It brought back memories when I worked on a 6 cyl engine in a Ford Falcon in my twentys. I'm in my sixtys now so I doubt I'll ever do it again. Took that car from an oil burner to a car that could burn rubber. Thanks for the memories.

MERRY CHRISTMAS AND HAPPY NEW YEAR TO YOU AND LORETTA.

PAGUY
 

Marketplace Items

Year: 2003 Make: Ford Model: Ranger Vehicle Type: Pickup Truck Mileage: 139746 miles Plate: Body (A61568)
Year: 2003 Make...
1987 FORD F-700 FUEL TRANSPORT TRUCK (A58214)
1987 FORD F-700...
1999 WEST WIND 30FT PINDLE FLATBED DOVETAIL TRAILER (A58216)
1999 WEST WIND...
New/Unused Wolverine Mini Skid Steer 3 in 1 Bucket (A61166)
New/Unused...
Spreader Attachment (A56859)
Spreader...
2018 Roadtec RP190E Wheel Asphalt Paver (A61567)
2018 Roadtec...
 
Top