patrick_g
Elite Member
I have a 30 plus year old metal shop/barn with 14 foot wide 14 foot high overhead doors at opposite long ends and a small office room on the side in the middle on the north side sticking out like a wart on a pickle.
There are three regular size (people) doors in the building proper on the south, east, and north sides. The door on the north side opens into the office which has yet another door on its north side. The building is situated with the long dimension running E-W.
There is a HD jib crane in the middle of the south wall with an electric hoist on a rolling car.
This building is located on state highway frontage a quarter mile from my house and its attached metal and wood shops.
I have prepared a pad to receive this building. This is located just east of my 3 car garage approximately in line with the long dimension of my house. There are 10 each 6 5/8 OD pipe columns supporting 5 trusses plus there are C purlin columns framing the doors and taking a small load.
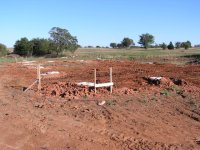
The pad has been prepared with 14 piers that are 18 inches in diameter and 12-15 feet deep with larger (flat topped mushroom shaped) upper ends affixed with weld plates set into the top of the rebar reinforced piers with J bolts. The weld plates are were adjusted by LASER level to the same height.
When the building is moved it will be set down on these piers. There is no slab floor at the new location and there may never be one. As the existing slab has provision for the siding to extend a few inches down lower than the top of the slab (for rain shedding and weather seal) I will have to extend the columns sufficiently to not "CRUNCH" the siding when lowering the building into place.
The building movers came and placed large I beams through the building as wide as the 14 ft door opening would allow. Then they placed I beams transverse to those with one under each of the trusses except the center truss which got to transverse beams.
The top of the transverse beams is in contact with a horizontal pipe welded with its bottom extent at 25 inches above the slab. These horizontal braces encircle the entire periphery of the building connecting all the vertical columns. In addition I have welded 20 ft pipe/braces from near the top of the wall to the transverse I beams. That is 10 diagonal braces. Another brace runs horizontal about 5 feet above the transverse beams and has two triangulating braces down from it to the transverse I beams. The mover requested the diagonal braces but I added the additional horizontal brace with 2 each diagonal triangulating braces to reduce the flex of the transverse I beams near the center of the span.
The vertical columns are cut about 70% of the way through at the level of the top of the slab. We will cut the rest of the way through just prior to lifting the building as it is not prudent in Oklahoma to hope for a long period of light wind and just take your chances.
The movers will jack up the bottom beams and insert sets of wheels. They wile then drive across the pasture 1/4 mile south and set the bld with long dimension again running E-W but turned 180 degrees so what was the south side will face north. The office has been cut free and will not be moved. I will disassemble it for materials. The siding will be used to patch the holes cut for the over length transverse beams.
For those of you who are still awake... there are some attached photos.
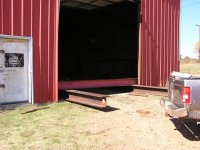
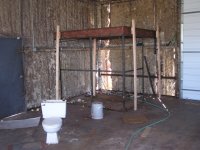
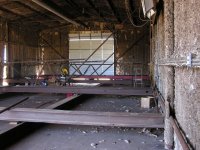
The picture showing red siding is of the east overhead door opening. You can see the I beams which will be used to lift the bld. The "cage" in the picture with the photogenic toilet was the angle iron frame of the bathroom after the walls were removed. (New location will not have water and no toilet but will have electricity.)
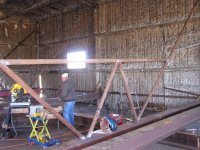
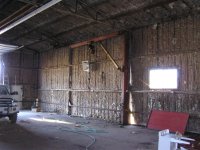
The picture with the glaring window in the middle shows the "W" bracing between the 20 foot diagonal braces.
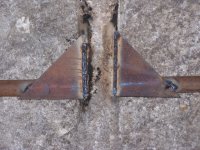
The close up of the two triangles shows the details of how the horizontal pipe braces were attached. The gussets and the bottom of the pipes are both at 25 inches above the top of the slab and provide the point at which the lifting I beams will contact the bld.
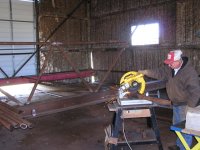
The guy with the red and white cap is a helper who was cutting angles on the ends of the pipes to make welding easier. We used a Harbor Freiight electronic protractor to set up the saw and check the cut ends and so forth. It works really good.
The picture with the white rectangle in the center (overhead door 14x14 feet) also shows some of the bracing we welded in.
The picture of the south wall shows the jib crane as well as the horizontal bracing 25 inches above the slab.
The next installment will be pix of the building being lifter, hauled and positioned over the piers. Later we will weld the bld to the weld plates of the piers and cut all the braces loose so the mover can have his beams back.
Given the difficulty of getting good trustworthy labor to disassemble and reassemble the building, I found it to be less risk and maybe less $ to move it intact. I got bids differing by a factor of 2 for this job. First contractor dropped out and did not do the deed, another wanted twice as much, but the third guy seems to want to do a good job and is only a few $ over the low (non performing) bidder.
Pat
There are three regular size (people) doors in the building proper on the south, east, and north sides. The door on the north side opens into the office which has yet another door on its north side. The building is situated with the long dimension running E-W.
There is a HD jib crane in the middle of the south wall with an electric hoist on a rolling car.
This building is located on state highway frontage a quarter mile from my house and its attached metal and wood shops.
I have prepared a pad to receive this building. This is located just east of my 3 car garage approximately in line with the long dimension of my house. There are 10 each 6 5/8 OD pipe columns supporting 5 trusses plus there are C purlin columns framing the doors and taking a small load.
The pad has been prepared with 14 piers that are 18 inches in diameter and 12-15 feet deep with larger (flat topped mushroom shaped) upper ends affixed with weld plates set into the top of the rebar reinforced piers with J bolts. The weld plates are were adjusted by LASER level to the same height.
When the building is moved it will be set down on these piers. There is no slab floor at the new location and there may never be one. As the existing slab has provision for the siding to extend a few inches down lower than the top of the slab (for rain shedding and weather seal) I will have to extend the columns sufficiently to not "CRUNCH" the siding when lowering the building into place.
The building movers came and placed large I beams through the building as wide as the 14 ft door opening would allow. Then they placed I beams transverse to those with one under each of the trusses except the center truss which got to transverse beams.
The top of the transverse beams is in contact with a horizontal pipe welded with its bottom extent at 25 inches above the slab. These horizontal braces encircle the entire periphery of the building connecting all the vertical columns. In addition I have welded 20 ft pipe/braces from near the top of the wall to the transverse I beams. That is 10 diagonal braces. Another brace runs horizontal about 5 feet above the transverse beams and has two triangulating braces down from it to the transverse I beams. The mover requested the diagonal braces but I added the additional horizontal brace with 2 each diagonal triangulating braces to reduce the flex of the transverse I beams near the center of the span.
The vertical columns are cut about 70% of the way through at the level of the top of the slab. We will cut the rest of the way through just prior to lifting the building as it is not prudent in Oklahoma to hope for a long period of light wind and just take your chances.
The movers will jack up the bottom beams and insert sets of wheels. They wile then drive across the pasture 1/4 mile south and set the bld with long dimension again running E-W but turned 180 degrees so what was the south side will face north. The office has been cut free and will not be moved. I will disassemble it for materials. The siding will be used to patch the holes cut for the over length transverse beams.
For those of you who are still awake... there are some attached photos.
The picture showing red siding is of the east overhead door opening. You can see the I beams which will be used to lift the bld. The "cage" in the picture with the photogenic toilet was the angle iron frame of the bathroom after the walls were removed. (New location will not have water and no toilet but will have electricity.)
The picture with the glaring window in the middle shows the "W" bracing between the 20 foot diagonal braces.
The close up of the two triangles shows the details of how the horizontal pipe braces were attached. The gussets and the bottom of the pipes are both at 25 inches above the top of the slab and provide the point at which the lifting I beams will contact the bld.
The guy with the red and white cap is a helper who was cutting angles on the ends of the pipes to make welding easier. We used a Harbor Freiight electronic protractor to set up the saw and check the cut ends and so forth. It works really good.
The picture with the white rectangle in the center (overhead door 14x14 feet) also shows some of the bracing we welded in.
The picture of the south wall shows the jib crane as well as the horizontal bracing 25 inches above the slab.
The next installment will be pix of the building being lifter, hauled and positioned over the piers. Later we will weld the bld to the weld plates of the piers and cut all the braces loose so the mover can have his beams back.
Given the difficulty of getting good trustworthy labor to disassemble and reassemble the building, I found it to be less risk and maybe less $ to move it intact. I got bids differing by a factor of 2 for this job. First contractor dropped out and did not do the deed, another wanted twice as much, but the third guy seems to want to do a good job and is only a few $ over the low (non performing) bidder.
Pat
Attachments
Last edited: