You are using an out of date browser. It may not display this or other websites correctly.
You should upgrade or use an alternative browser.
You should upgrade or use an alternative browser.
YAPB (yet another pole barn)
- Thread starter skid mark
- Start date
- Views: 11870
More options
Who Replied?
/ YAPB (yet another pole barn)
#41
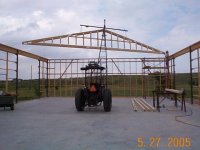
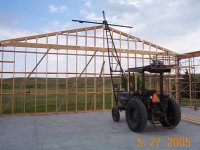
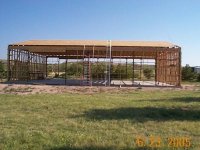
We quickly found that lifting the rafters in place was no big deal. Took maybe ten minutes to go get the rafter, walk it into the shop and set in place. What took the most time was squaring it up and then putting the temporary and later, permanent bracing in place. This took, on average, about an hour per rafter.
It took us about ten days to put up the first 31 trusses. Then we had to stop working on that for a while and build the front gable wall which was necessary to support the last (gable) rafter.
It took us about ten days to put up the first 31 trusses. Then we had to stop working on that for a while and build the front gable wall which was necessary to support the last (gable) rafter.
Attachments
I'm overdue for an update. Need to get the pictures processed quicker!
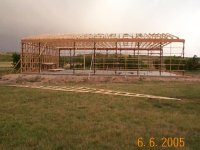
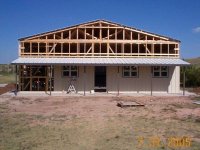
We've made lots of progress over the last month or so and are getting close to having it dried in.
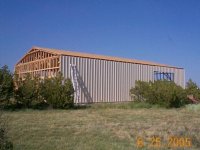
In this picture, we are putting up the last rafter after framing out the front wall on the gable end of the shop.
We've made lots of progress over the last month or so and are getting close to having it dried in.
In this picture, we are putting up the last rafter after framing out the front wall on the gable end of the shop.
Attachments
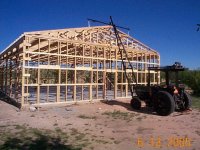
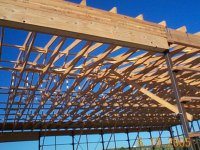
Next was 88 sheets of OSB to deck the roof. Thought about using 2x4 purlins but went with the OSB because it would do a tremendous job of bracing the roof rafters, and would (with 30# felt on top) quiet down rain noise on the roof. We're going to have a mini apartment/office inside so the second consideration was a big one as our metal roofed barn can sure be noisy!
To get the OSB on the roof, I found that the easiest way was to push them up the extension ladder in front of me as I climed the ladder and once I got to the top, give them a shove and flop them onto the roof. Used the same system later to lift the 21 foot long R panels on the roof, but used two ladders and two lifters (myself and my hard working wife!).
To get the OSB on the roof, I found that the easiest way was to push them up the extension ladder in front of me as I climed the ladder and once I got to the top, give them a shove and flop them onto the roof. Used the same system later to lift the 21 foot long R panels on the roof, but used two ladders and two lifters (myself and my hard working wife!).
Attachments
Over the next couple weeks, we put 30# felt down on the roof and then R panels over that. Finished the rear gable end wall and also had two driveways and a wraparound sidewalk poured.
Added in edit: I had wanted to use a "concealed fastener" roofing panel, but they were not available when I needed them. Went with R panels instead...
Added in edit: I had wanted to use a "concealed fastener" roofing panel, but they were not available when I needed them. Went with R panels instead...
Attachments

During this time, I rented a walk behind trencher and put in a buried service entrance for the elect service. So far I've only put in a couple outlets. One 220V to plug a big honkin 220/110 "extension cord" that can reach anywhere in and around the shop and also put in the ever important 110V outlet to run the mini fridge off of!
With a well stocked fridge and some surplus 1970's office chairs to lounge around on, my productivity has slipped a little bit! /forums/images/graemlins/smile.gif
With a well stocked fridge and some surplus 1970's office chairs to lounge around on, my productivity has slipped a little bit! /forums/images/graemlins/smile.gif
Attachments

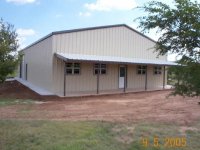
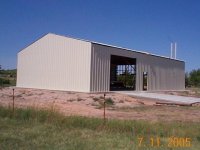
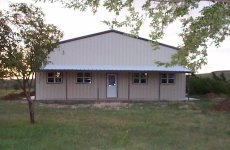
Finished up the front wall!
All that remains now is the two garage doors. I'm actually getting started on them now so it won't be long to get them installed. Then I'll trim them out and the outside will finally be complete!
I'll then move inside and start working on electricity and insulation...
All that remains now is the two garage doors. I'm actually getting started on them now so it won't be long to get them installed. Then I'll trim them out and the outside will finally be complete!
I'll then move inside and start working on electricity and insulation...
Attachments
EddieWalker
Epic Contributor
That's some very nice work you've done there!!! The porch really sets things off and lood quite inviting.
Can't wait to see how the rest of it turns out.
Eddie
Can't wait to see how the rest of it turns out.
Eddie
Jagmandave
Veteran Member
Man, that's a big workshop! Should be able to get lots of projects done in there. Nice building, well done too. Gonna put gutters on that front overhang? It'll keep the mud splashing down on the front sidewalk..........putting a walkway all the way around is a good idea too!
Thanks for the complements, guys. It is nice to have the wost of the work done. Looking forward to getting started on phase II pretty soon as time and $$$ allow.
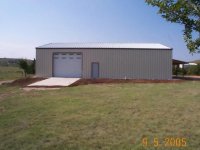
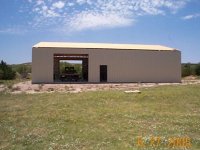
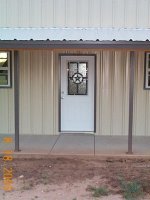
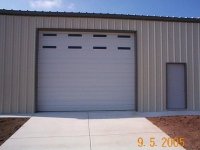
I finished the install of the garage doors (14'W x 11.5'H, one on each side of shop). Hanging the doors, springs, etc, took me a lot longer than a it would a pro, but they turned out fine. The doors were made by a local company and are insulated with styrofoam panels that are covered with a layer of plastic to protect them a little.
Here's the north side door. South side is similar, but minus the man door.
Attachments
Had 24 yards of topsoil delivered to raise the grade up to the level of the sidewalks, etc and to give the grass something nicer than the fill dirt which the grass seems to hate and the weeds seem to love!
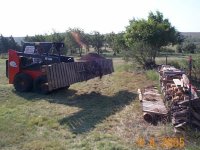
Since my tractor does not have an FEL, I rented a little skid steer from Home Depot. In this picture, I was doing a little cleanup by picking up sections of a small bridge that washed out during a big rain we received earlier this summer.
Side note: Boy did I hate spending the day in that skid steer. Makes the old tractor feel like a Cadillac!