Let's see your welds...

/ Let's see your welds... #81  
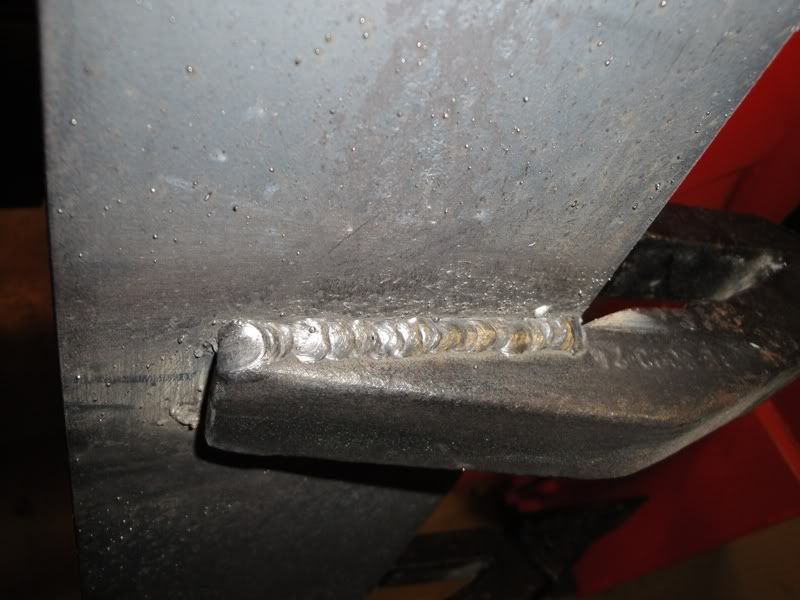
Here are some pictures of open root pipe Tig welding I did this morning. These are far from the perfect "Wedding Band" that everybody shoots for. Most likely these would not pass a visual inspection, unless the inspector was going to cut a lot of slack to an old blind structural hand:D. They are just to inconsistent!

2 1/2 inch sch 80 pipe, 37 1/2 degree bevel, knife edge, 3/32 inch gap, 1/8 inch filler. Welded in the 5-G position. For anybody that doesn't understand what they're looking at, this is the inside of the pipe, that was welded from the outside. I've never got a straight answer on how much reenforcement is allowed, maybe Gary can give his opinion?

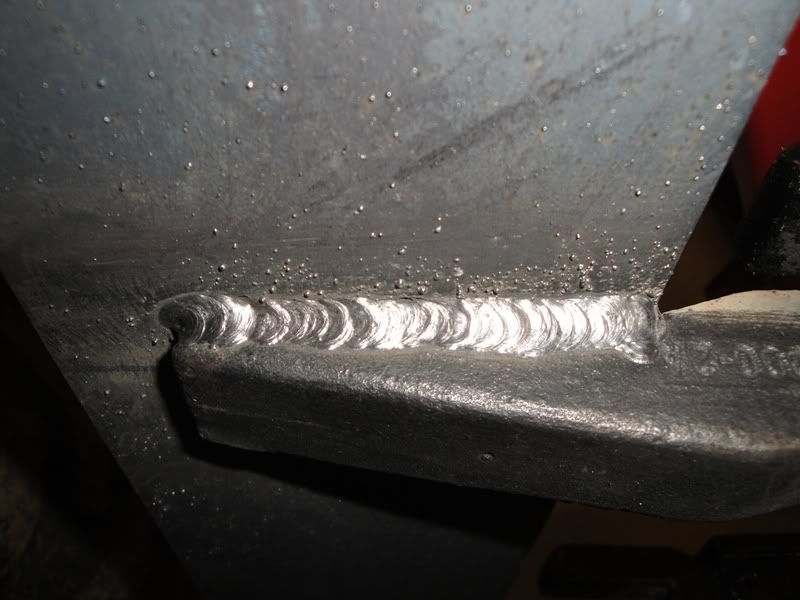
The last picture is a 6-G Tig weld I did a long time ago, it is more consistent. 6-G Tig welding can be a real PITA, because you have to weld with both hands!
 

Attachments

  • A Tig.JPG
    A Tig.JPG
    189.4 KB · Views: 256
  • BTig.JPG
    BTig.JPG
    177.7 KB · Views: 212
  • CTig.JPG
    CTig.JPG
    189.7 KB · Views: 197
  • DTig.JPG
    DTig.JPG
    231.6 KB · Views: 251
  • 6G.jpg
    6G.jpg
    222.3 KB · Views: 632
/ Let's see your welds... #82  
Ok I'll show mine. First though, I don't claim to be a pro and I know my skills are not to the level you guys with certifications have, by any means. I got my welder practically new from my BIL who wasn't using it, for $100.

I'm making a toothbar (by the way thanks sheild arc for the reply to my other thread).

DSC03292.jpg


DSC03290.jpg


I've seen worse than mine, not that I'm bragging but I've seen my own that look worse than these! All you pros might scoff at me but here's what I use to weld with (because it's all I have)...

DSC03294.jpg


I am well aware that the machine is not very powerful, but I crank it up and I make the puddles really burn in as deep as I can, which throws the breaker a lot. I just watch the puddle and do the best I can. I try not to heap the welds up and I do my best to make sure the edges of the puddle "etch in" to the metal, rather than "pile up" at the edge. Like I said I'm not a pro but I'm pretty sure these aren't going to come off!
 
/ Let's see your welds... #83  
Lets see what some of the pro's say, but I think they look good, seem to be tied in to the parent metal pretty well. I am not a welder just a hobbyist so take this for what it is worth:)

James K0UA
 
/ Let's see your welds... #84  
HiTechTed I'm not a pro either, but I've run a few rolls of wire. I think your welds look great!
But if I just had to throw a stone at them, try to never leave a crater at the end of the material. In this case you could have made a short weld on the back side of that tooth, and wrapped around covering the crater. Or stated at one end weld to the center, stop, and start at the other end, and weld to the center making sure to fill the crater. A crater is a very weak spot in a weld. When using an under powered machine, you can pre heat the material to help.

What brand and type of wire did you use?
 
/ Let's see your welds... #85  
HiTechTed I'm not a pro either, but I've run a few rolls of wire. I think your welds look great!
But if I just had to throw a stone at them, try to never leave a crater at the end of the material. In this case you could have made a short weld on the back side of that tooth, and wrapped around covering the crater. Or stated at one end weld to the center, stop, and start at the other end, and weld to the center making sure to fill the crater. A crater is a very weak spot in a weld. When using an under powered machine, you can pre heat the material to help.

What brand and type of wire did you use?

I have seen a lot of your work on here, and if you aren't a pro I'm not sure what a pro is! And thanks for the compliment!

I haven't finished welding yet so the back side you see in the pic will get welded too (got called in for dinner and gave up for the night)! I try not to leave craters because I think it looks bad, but I didn't know it was a weak point...makes sense though and thanks for the tip.

When you say pre heat, you probably mean with a "real" torch and not my little Bernz-o-matic map gas torch, right?! I wish I had a good torch setup for cutting if nothing else.

The wire I'm using is Lincoln .035 Innershield NR-211-MP. I don't know what everything after "innershield" means but that's what it says on the roll!
 
/ Let's see your welds... #86  
if you aren't a pro I'm not sure what a pro is!

My understanding of the word professional, is someone who receives pay for a task. If that is true, then I'm not a pro.;)

A weed burner hooked to a propane tank works great for preheat.

I have run tons of NR-211. Just about the time NR-212 came out, (Mid 1990's) I went into management, I have run some of it here at home, I think I like it a little better than 211. I probably by far run more of Hobart's FabShield 21-B. Can't remember ever having to test with 211, but have taken hundreds of AWS D1.1, 1 inch thick tests with 21-B, never failed a test. Which is remarkable in a few cases, because I just butchered a few of them:eek:, but still passed! :confused3:

The first picture is 21-B, the second picture is NR-212.
 

Attachments

  • 21B.JPG
    21B.JPG
    146.4 KB · Views: 342
  • NR212A.JPG
    NR212A.JPG
    137 KB · Views: 2,110
/ Let's see your welds... #87  
My understanding of the word professional, is someone who receives pay for a task. If that is true, then I'm not a pro.;)

A weed burner hooked to a propane tank works great for preheat.

I have run tons of NR-211. Just about the time NR-212 came out, (Mid 1990's) I went into management, I have run some of it here at home, I think I like it a little better than 211. I probably by far run more of Hobart's FabShield 21-B. Can't remember ever having to test with 211, but have taken hundreds of AWS D1.1, 1 inch thick tests with 21-B, never failed a test. Which is remarkable in a few cases, because I just butchered a few of them:eek:, but still passed! :confused3:

The first picture is 21-B, the second picture is NR-212.

I have a weed burner and propane...too bad I didn't come in here and ask questions before I started my project!

I see the NR-212 wire is intended for use with thicker metal than the NR-211. Do you have any other reason that you prefer using it?
 
/ Let's see your welds... #88  
In the work I followed 3/8 inch thick material was considered thin. Before the Northridge earthquake in California it seemed as if Lincoln was hiding the limitation thickness of NR-211. I can't remember hearing of anyone taking a bend test with 211. Soon as the dust started to settle over the earthquake Lincoln came out with NR-211-MP, and NR-212, but made a huge effort to publishes the thickness limitations. And also noted that neither wire was suitable for applications requiring Charpy V-Notch properties! And a CV welding machine was recommended.
In a seismic zone the most popular flux core self shielded wires are NR-232, NR-233, and ESAB's Correshield 8. But for us weekend warriors, NR-211, and 212 will work just fine for general fab work. I really don't have reason for preferring 212 over 211, maybe it's as simple as it runs a little smother. But I'd much ratter run 21-B

Flux Cored Wire, Northridge Earthquake Facts
 
/ Let's see your welds... #89  
I always liked this picture

DSC01514.jpg


another one from that project -splicing some 3" channel together
DSC01410.jpg


I was pleased with myself for getting these ports water tight on the first try
DSC01436.jpg


other stuff
DSC03470.jpg


DSC03471.jpg
 
/ Let's see your welds... #90  
I would show you my latest welds except I now have to grind them off. was working with my son putting on a set of brackets on a buck I built and told him to hold the 1" mark on the center mark then I failed to add an inch. I tacked checked ten times for square in all directions and proceeded to burn wire in stitches. Then and only then did I realize I was off by an inch.

My son who is 21 giggled and called me a dumba$$ and said it wasn't his fault. he is right it was mine

Measure twice weld once grind never is the new rule :ashamed:
 
/ Let's see your welds... #91  
Finally got a chance tonight to play around with my new mig. Millermatic 211, I bought it for its portability, and first spoolgun for aluminum that I ever personally owned. Nice machine, very happy with it so far.

ForumRunner_20120228_193033.png


ForumRunner_20120228_193100.png
 
/ Let's see your welds... #92  
So Mike how does that puppy do with vertical up? Say with some .035, will that machine run .045?
 
/ Let's see your welds... #93  
Finally got a chance tonight to play around with my new mig. Millermatic 211, I bought it for its portability, and first spoolgun for aluminum that I ever personally owned. Nice machine, very happy with it so far.

View attachment 253566


View attachment 253567

If I remember correctly the 211 has the MVP plug, does it not? It's one of the few things I'd like to have as an option on my Miller 180. As far as power goes, the 180 has enough for the MIG work I do, but the flexibility of 110-220 is nice.

The Miller spool gun that comes with the 180 (and I think the 211 is the same) isn't bad. I've used mine a few times with no real problems, other than melting a few contact tips until I got the hang of running a longer stick-out.

Mike, do you find you get more spatter with the Miller than you'd expect? I've used mine quite a bit, and I find that welding anything more than 1/8 material gets pretty messy as far as spatter is concerned. I'm using a tri-mix gas and solid 0.030 wire.

Have you tried the Auto-Set feature? I thought it was going to be a gimmicky thing, but it's actually quite good.

Sean
 
/ Let's see your welds... #94  
Mike, do you find you get more spatter with the Miller than you'd expect? I've used mine quite a bit, and I find that welding anything more than 1/8 material gets pretty messy as far as spatter is concerned. I'm using a tri-mix gas and solid 0.030 wire.

I'd like to get my hands on your welding machine. Hard to believe it has so much splatter!:confused: What tri-mix are you running? You may cut down on the splatter by switching to 75% argon & 25% Co2. If it's not an issue with gas, brand of wire, I just can't believe it's a problem with the brand of machine:confused:, Miller makes some of the best welding equipment on the planet. If none of the above corrects the splatter problem I'd have to say you don't have the machine adjusted correctly.
 
/ Let's see your welds... #95  
Shield Arc said:
So Mike how does that puppy do with vertical up? Say with some .035, will that machine run .045?

Welds real nice vertical uphill, and down hill. Very happy with my new purchase, the only thing I miss .shield is that quality thump I get when I pull the trigger on my old millermatic 185, but they have to save the weight somewhere I guess. Still not a bad complaint tho, nice little machine. It will run .045 flux core. Chilly im sure shield arc answered your questions for ya bud. Try a %75%25 mix and fine tune that baby and you should be good.

ForumRunner_20120229_170735.png


ForumRunner_20120229_170758.png

Left one uphill, and right one down hill. Ill play more with fine tuning over the weekend, but happy for now. The autoset I havent played with yet and dont believe I would ever have too, but one day when I have time ill see what it does.
 
/ Let's see your welds... #96  
I don't think I've ever run one of those Miller Mig machines. I think the closest would be the old Airco machines. I've heard nothing but great things about the 211. I understand Miller really dropped the ball with the 250, went back to the drawing board and came out with the 251, then the 252. I understand with the 250 the sweet spot was very narrow, and only very experienced weldors could find it.
I just can't get my mind around an auto set machine! Does that make me a control freak?:laughing:

I've done a little Mig welding with my new Invertec, and my LN-25, but next to none with the LF-72 feeder. Here is a vertical up with the Invertec and LN-25.
 

Attachments

  • V-up.JPG
    V-up.JPG
    193.1 KB · Views: 552
/ Let's see your welds... #97  
Shield Arc said:
I don't think I've ever run one of those Miller Mig machines. I think the closest would be the old Airco machines. I've heard nothing but great things about the 211. I understand Miller really dropped the ball with the 250, went back to the drawing board and came out with the 251, then the 252. I understand with the 250 the sweet spot was very narrow, and only very experienced weldors could find it.
I just can't get my mind around an auto set machine! Does that make me a control freak?:laughing:

I've done a little Mig welding with my new Invertec, and my LN-25, but next to none with the LF-72 feeder. Here is a vertical up with the Invertec and LN-25.

Nice job uphill with your LN25 shield. Yeah I dont get the whole thing with the auto set either, im almost embarrased to try it. Jeez theres a chart inside the machine, but to each his own. Im a big fan of the miller stuff its all ive ever owned, but ive used everything under the sun, and theres alot of good equipment out there, specially these days. In this industry its just like the chevy ford dodge debate, just comes down to preferance(for the most part).
 
/ Let's see your welds... #98  
Well I went out and bought a Lincoln pro 140 MIG welder last week. Today I tried it out by welding a couple of links on the top of my bucket. This was the first time I ever used a MIG welder and I think it worked ok. I watched several videos on utube, read the book a couple times and followed the settings in the chart on the machine. Its been 40 years since I last welded anything and that was with a Montgomery Ward 220 volt stick machine and I never quite got the hang of it. I used the .030 flux core wire that came with it and set it at range D, speed 4.5. I have no idea what that equates to in amps or speed but it seemed to work. Here are pictures of how it came out. Perhaps I could get a critique? I'm sure I need more practice - its hard to move slow and even.

P.S. My wife came out to look at what I was doing and asked if those were handles for riding in the bucket?

John C.
 

Attachments

  • DSCN2429.JPG
    DSCN2429.JPG
    188.2 KB · Views: 266
  • DSCN2431.JPG
    DSCN2431.JPG
    171.2 KB · Views: 272
  • DSCN2435.JPG
    DSCN2435.JPG
    166.4 KB · Views: 238
  • DSCN2436.JPG
    DSCN2436.JPG
    166.9 KB · Views: 245
/ Let's see your welds... #99  
Well I went out and bought a Lincoln pro 140 MIG welder last week. Today I tried it out by welding a couple of links on the top of my bucket. This was the first time I ever used a MIG welder and I think it worked ok. I watched several videos on utube, read the book a couple times and followed the settings in the chart on the machine. Its been 40 years since I last welded anything and that was with a Montgomery Ward 220 volt stick machine and I never quite got the hang of it. I used the .030 flux core wire that came with it and set it at range D, speed 4.5. I have no idea what that equates to in amps or speed but it seemed to work. Here are pictures of how it came out. Perhaps I could get a critique? I'm sure I need more practice - its hard to move slow and even.

P.S. My wife came out to look at what I was doing and asked if those were handles for riding in the bucket?

John C.

Those don't look too bad at all, I've seen a lot worse. It'd be nice to have some more attachment at the back of the links, but the shape of the bucket doesn't lend itself to easily doing that.

The trick to moving slow and even is not to concentrate on how fast you're moving, but to watch the puddle of molten steel. I used to think I had to control my speed to get a good weld, and although you do have to be steady, the weld puddle dictates how fast you travel. I use my stick welder more than the MIG these days, I always find myself having to speed up using the MIG now.

My rule of thumb is to keep the electrode in the front 1/3 of the weld puddle, different folks will have different opinions, I'm sure. Did you use a "push" motion or "drag" with the gun?

What happens to me if I travel too fast and the electrode starts to come out of the puddle is the bead turns "stringy" and narrow, if I'm too slow and sit in the middle of the puddle I get a "bunched up" and lumpy looking weld, or get burn-through on thin stock.

There are a couple ways I've found to eliminate craters at the end of the weld. One is to back stitch an inch or so before stopping, another is to re-visit the cratered spot and deposit a bit more filler metal if I don't realize there's a hole until I chip away slag. The second method is more cosmetic than anything else.

Sean
 
/ Let's see your welds... #100  
Thanks for the reply Chilly.
I was pushing the puddle mostly.
I first tacked each side and pushed from the front back
except I stopped a couple times to look and then restarted
Where I stopped and restarted are the parts that look the
worst. At least to me. They are strong. Just for grins I hooked my chain up
to a 300 pound anchor that I am refurbishing for our community center and
shook it a couple times. No problem and the links even still open and close.

John C.
 

Marketplace Items

2018 Chevy Traverse 3rd Row Seating (A61307)
2018 Chevy...
2009 IC Corporation PB105 School Bus (A60352)
2009 IC...
2017 Load Trail 3.5 Ton T/A Equipment Tilt Trailer (A61568)
2017 Load Trail...
2013 FORD F-350 SERVICE TRUCK(INOPERABLE) (A60736)
2013 FORD F-350...
500 BBL FRAC TANK (A58214)
500 BBL FRAC TANK...
1006 (A61166)
1006 (A61166)
 
Top