International 444, 1968. Progress Thread, Getting Going

   / International 444, 1968. Progress Thread, Getting Going #61  
   / International 444, 1968. Progress Thread, Getting Going
  • Thread Starter
#62  
Thanks for the link.

We went to O'Reiley this evening and got a couple to try. One has 2 terminals, the other has 4. I was thinking maybe the 4 terminal one would have different resistance values. However, it looks like the pairs are individual and dont connect. I can check with my multimeter tomorrow.

When I dug in to the distributor clocking earlier I took the valve cover off to see the valves and lifters. I lined up the #1 piston on the compression stroke, clocked the fan belt pulley on the crankshaft to TDC, and guess what - the rotor was pointed to the #4 cylinder/3ord to fire. Go figure.

Needless to say, I got that corrected.

WIth the clocking correct I was able to get the engine to run a bit. Major milestone.

The down side to it is I found the ballast resistor was not working very well.

With my relay method I was able to get battery voltage to the ignition coil with the starter engaged. However, the engine would die without the starter engaged. Checking the voltage it was under 2v through the ballast resistor.

So I jumped the leads going to the ballast resistor to get straight battery voltage with ignition on and I wasnt having any luck at all.

These are the ballast resistors I got to try:


   / International 444, 1968. Progress Thread, Getting Going #63  
A sneaky way to get 12V to the coil would be to run a wire from the terminal on the side of the starter solenoid that energizes the solenoid. That way you only have 12V to coil when engaging the starter. In the schematic, I think I'm seeing a wire running from part #61 to the input side of the coil. Not sure what exactly that is, since Case/IH took away the description since they don't handle that part anymore. I have sent emails to the sites guru's telling them it would have been so much simpler to put N/A in the description, rather than eliminate the part description/number itself. It apparently fell on deaf ears, and why I have purchased several hard copies of parts manuals for some tractors I have. A necessity if looking for used parts, whether at salvage yards, or places like ebay.

You sort of lost me where you're picking up the 2V. Is the on the output side of the old ballast resistor, or at the terminal on the side of the distributor..?? If you removed the wires from the ballast resistor and jumped it completely, you should show 12V going into the coil. Now you need to check voltage going into the distributor. If it's still showing 12V the coil does not have an internal resistor. If it's showing 6V, it does. If it in fact does show 6V, then once the starter is released, and current is running through a functioning ballast resistor with output of 6V may be reduced even further going through a coil with a built-in resistor I'm thinking would reduce voltage even further, but not sure.

With the distributor cap off, do note the direction of rotation of the rotor button to get the proper firing order of 1-3-4-2. Not all IH distributors turn the same direction, but it should tell you in your manual.

It's probably a good thing you were only getting 2V with firing order out 180º, or you'd have more than likely gotten a big "KER-POW" firing on the intake stroke. Don't ask how I know... Let's just say it was a lesson learned many moons ago, and something you don't forget. But they will also do that with a cracked cap, or having a carbon trace between lugs inside the distributor cap.

If the new ballast resistor does solve those issues, might be an idea to get a spare, and put it where you know where it is. They have a tendency to burn out at any time with no rhyme or reason. I had one burn out of my old Case 310B backhoe that someone had converted to 12V. I put a new one on it but thought if it was going to be a problem, I'd better get a spare. With my luck at times, if it does burn out, it's 5 minutes after the parts store closes and I really need it at that moment.

It does sound like you're making progress, just stick with it. All the diagnostics you're doing will come in handy in the future if something happens. For a gas engine to run it boils down to 3 basic items. Air, spark, and fuel, in proper amounts and timing. Check the easy stuff first, usually spark and fuel.
 
   / International 444, 1968. Progress Thread, Getting Going
  • Thread Starter
#64  
You sort of lost me where you're picking up the 2V. Is the on the output side of the old ballast resistor, or at the terminal on the side of the distributor..?? If you removed the wires from the ballast resistor and jumped it completely, you should show 12V going into the coil. Now you need to check voltage going into the distributor. If it's still showing 12V the coil does not have an internal resistor. If it's showing 6V, it does. If it in fact does show 6V, then once the starter is released, and current is running through a functioning ballast resistor with output of 6V may be reduced even further going through a coil with a built-in resistor I'm thinking would reduce voltage even further, but not sure.

The 2v was at the input to the ignition coil.

The "hot start" 12v power, normally, comes as passed through the starter solenoid. Before I started working on anything I photo documented everything for future reference/to see how it was "together". The wire going to the ignition coil terminated at this same tap on the starter solenoid, as does the wire from the ballast resistor.

What I understand to happen is when the start signal from the key switch energizes the start solenoid to engage the starter - that same engagement of the starter trips the power to the tap going to the ignition coil - just like a relay output. The other day this is where I was getting the under 2v, indicating that there is an issue with this tap on the starter solenoid (I assume grounding out, though there is no issue with the power going to the starter - it cranks strong).

When I bypassed the terminal on the starter solenoid I used a 20a rated automotive cube relay (5 pin - 2 coil and 3 for NO/NC contacts). I have it wired in to the same power and signal wires going to the start solenoid. The lead to the ignition coil has the addition of the lead from the ballast resistor.

What I found in that wiring method was when the starter was engaged I had battery voltage at the ignition coil when the starter was engaged, but it dropped to under 2v through the ballast resistor in "ignition on", without the starter engaged.

So I bypassed the ballast resistor yesterday and joined the wires that would have gone to the ballast resistor together so as to get straight battery voltage to the ignition coil with simply "ignition on" to try to get it to go. It did, a couple times.

Now I have some ballast resistors to try so I will get that straightened out as I work on it today.
 
   / International 444, 1968. Progress Thread, Getting Going
  • Thread Starter
#65  
We got the tractor running - finally.

When I had it "running" the other day apparently the distributor rotor - brand new with the rebuild I did - disintegrated. A buddy of mine came over with a timing light and some other gizmos to help out and we went tracing things and poking around. He pulled the cap off the distributor and the rotor had no contacts on it. I later found the blade in the gravel under the tractor. I have yet to locate the wiper contact.

We put the old one back on and it fired right up.

I hooked to our brush hog and gave it a little bit of a run. It did great and the engine just sings. Nothing better than a smooth running machine!

We had family over today and my step dad said it purrs like a kitten. Its hard to believe it didn't run for years and runs this well now.

I'll see if I can get a video clip of it and post it when I get a chance. I am going to fuel up tomorrow and try to do some more brush hogging to open up the yard here finally. And maybe a path back through the rest of the acreage so we can at least get back there.

For what it is worth, we didn't have to touch the timing. I was close enough on how I set it we just eyeballed it with the light. If anything it might be able to be advanced a hair, but it is so smooth right now I don't think its worth it, nor did my buddy.
 
   / International 444, 1968. Progress Thread, Getting Going #66  
Good deal..!! Glad to hear you got it running. You've gained some valuable information/experience to pass on to others now.

Curious if it have live PTO, or a 2 stage clutch PTO can be engaged before tractor starts moving). I'm seeing they were available with either.
 
   / International 444, 1968. Progress Thread, Getting Going
  • Thread Starter
#67  
2 stage clutch. So far I like it. I dont have any complaints about it. I am going to be doing a lot of reverse brush hogging starting this evening so maybe my opinion on it will change. We'll see.

I will say, though, that low range 1st gear is too fast to brush hog here for a good bit of the ground. That kind of stinks = lots of riding the clutch, unfortunately.
 
   / International 444, 1968. Progress Thread, Getting Going
  • Thread Starter
#68  
Update from this evening's work.

I ran for around 2 hours with the brush hog. The latter 45 minutes or so the muffler fell off.

This tractor has the low exhaust under the machine, not a stack sticking up.

When the muffler fell off I immediately noticed and stopped brush hogging. I worked the tractor out of the swath I was cutting and found the muffler, kicked it out a ways so I wouldnt run it over, and the machine died in me. It would not re-start.

I took a break, got my multimeter, and went to troubleshooting. I had the proper voltages on the ignition coil input and I had fuel through the filter (can see it move with the fuel pump). So I thought maybe it got too hot. I tried it again and this time it fired up.

I cut the last bit of that section of acreage, shut off the PTO, shifed gears to head back to the barn and just after I got moving the same thing - it died on me.

At this point we took a break for dinner. Then afterwards I went back out to try again and it fired right up and stayed running smooth all the way in to the barn.

Any ideas on this one?

With the re-wiring I did if there is a "temp sensor" that would kill the ignition it would not have any affect on the rewiring. Is there some kind of mechanical action? Like a temperature controlled over-ride to the governor that will force the throttle plate closed? That makes no sense to me, but ya never know.

What does make sense to me is it sounds like it is loosing fire entirely - like no ignition or no fuel. It doesn't even sputter. It just "turns off" when it dies

After sitting and re-starting - when it fires it just goes, there is no "several attempts to start".

Im a bit at a loss on this one.
 
   / International 444, 1968. Progress Thread, Getting Going
  • Thread Starter
#69  
Another issue I did see coming is exhaust fumes as the manifold is cracked. I have some high-temp JB Weld to try to seal this with before I run it next time.

However, that only solves one issue. With the exhaust exiting under the tractor it isn't getting up and away - especially going backwards. I'm wondering if, since the muffler and exhaust pipe need work now already, it might be better to convert to a vertical exhaust.

However, with the cracked manifold I am doubting it can support that load for long. Manifolds aren't cheap, and aftermarket is the only way it appears to get a "new" one. OEM used ones are more expensive and quite rotten - just like mine, minus cracks.
 
   / International 444, 1968. Progress Thread, Getting Going
  • Thread Starter
#70  
More stewing on the engine quitting issue -

With the cracked manifold - is it possible the temperature of running heavy is expanding the cracks causing more leakage - both exhaust and intake (I'm pretty sure all 8 ports, 4 intake/4 exhaust, are cracked)? I could see where an expanded crack on the intake side would lower vacuum through the carb. However, that wouldn't eliminate it = I could see a loss in power, but running OK to a complete "dead stick" I can't see from this scenario.
 
   / International 444, 1968. Progress Thread, Getting Going #71  
Have you tried running it with the gas cap loose? The vent may be plugged.
 
   / International 444, 1968. Progress Thread, Getting Going #72  
Do I recall you had a spark tester, hopefully pocket type..?? If so, I'd carry it along if it does it again. Spark needs to be tested right then and there to determine if it is ignition problems, or fuel. Heck, pulling a plug wire will work if not. Even though you checked a bit afterwards and had voltage, things can cool off and work differently. But being it fired up after testing would lead me to believe it is a fuel issue. As mentioned, try running with the cap loose. I'm sure it will need to be worked hard like you were to get it to do it again. Leve the fuel level where it is if there is enough to work it a while, causing more air space for vacuum.

You mentioned fuel filter, is that an added inline filter..?? Personally, if I was going to add one, it'd be on the vacuum side of the fuel pump. I just checked (Google can be your friend) that the fuel pump delivers 4.5 psi. If filter is on the pressure side, if ever a connection would come loose, or line burst, pulled off for some reason, you're going to be pumping fuel on a hot engine which spells disaster.

If it is a fuel issue sounds like you're going to have to work it hard to get it to do it again. Before going back out, I'd visually inspect the inside of the fuel outlet and area around it. Could be a piece of debris floating around in there and will clog the outlet. Something like the tail end of a Bee is a perfect plug. Dad found that out back in the late 50's when driving his Farmall A home from the place he bought it. They will sort of float around in there until it gets over the outlet and get drawn in. When vacuum is relieved, they will float away. Being you have a fuel pump, and it may have been lower on fuel in the tank makes it more probable to happen.

From that point all the way to the carb and look for places for fuel restriction. Sediment bowl screen, outlet out of sediment bowl, inline filter, elbow strainer going into the carb. Maybe even drain the carb. bowl if there is a plug on the bottom and check for sediment/debris.

Again, it's probably something simple, just have to figure out what it is.
 
   / International 444, 1968. Progress Thread, Getting Going
  • Thread Starter
#73  
I spent another couple hours in the field this evening. The tractor ran perfect the whole time. I was ready to diagnose at a moments notice but had no need to. I suppose that is good, but it doesnt bring any conclusion to the conundrum yesterday yet.

On a side note - even at 42hp with our 5.5' brush hog the brush is so thick in places the tractor still lugs heavy in 1st gear low range. I had someone tell me that 17-20hp would be plenty to run this brush hog. Not out here. This is ridiculus growth. Once we get past the 1st cut and in to maintenance mowing then we wont need the HP, but still good to have for sure.

I think we did great on this one - size tractor with a loader for what we paid.

It took me about 20 minutes per lap to mow a trail around our back acreage. I made 2 laps for a fairly wide trail. The area I am tilling up for next year's garden I mowed. The rest of the acreage is just going to take a long time so we'll just pick at it. Then for the 2026 growing season I can look at opening more ground next year.
 
   / International 444, 1968. Progress Thread, Getting Going
  • Thread Starter
#74  
Heres a quick video of it running, not doing anything but running.

And some pictures of what it's been up to the past 3 days now.

This is the area we're opening up for planting next spring. They uploaded backwards. It may get expanded more - I want a 1/4 acre so I'll measure and lay out what I can and go from there.

20241001_192543.jpg
20241001_184029.jpg
 
   / International 444, 1968. Progress Thread, Getting Going
  • Thread Starter
#75  
And cutting the trail:
20241001_190019.jpg


20241001_190046.jpg
 
   / International 444, 1968. Progress Thread, Getting Going #76  
Well, that's good news I guess, at least for now. If you've suffered drought conditions like here those stemmy weeds are really tough. Once you get it tamed down and mowing more tender weeds & grass, it should handle it much better. About all you can do now is take a smaller swath, except on an opening swath, then pick it up a bit making a first round, then drop down to the cutting level you're at.

Most rotary cutter blades looking from the top turn CCW, so if you take 2/3-3/4 swath, with the 1/3-1/4 swath side running on what has already been cut may help unload debris to the side instead of carrying it around to the rear to discharge. Taking a full swath, some of those long stemmy weeds may have to go around twice before getting chopped up enough to be discharged. But taking a partial swath as mentioned may not chop up the stemmy weeds as fine as you want, being your planning on planting in it next year.

Blade sharpness makes a big difference too, but in that stemmy Golden Rod and Marestail, and saplings you don't want them real sharp, or it will leave mini bungee sticks which can get rough on tires. If the blades are dubbed off some, it should be leaving battered ends on the ends of those stemmy weeds.

Not sure what tillage tools you plan to use to work the ground, but those long stems could give you fits with a moldboard plow (my preferred method). Hopefully over the winter they will get brittle, and coulters will cut through or break them up.

I can tell you you've got quite a seed bank built up there. Be prepared to do a LOT of cultivating and hoeing for more than several years. Do a Google search for the seed viability for what you're seeing out there, you'll be amazed.

Personally, when I cultivate, I only cultivate the top 2"-2-1/2". Any deeper and you're just bringing more weed seeds to the top to germinate. Anything deeper than that more than likely won't germinate but may when you roll it over the following year.

Might be an idea to get a soil sample this Fall and send it in and see what you need. You can get sample bags at your County Extension Office. You should also get a sheet along with it and you can select what results you want back. At least get the basics for N-P-K and PH levels. I did get an additional Organic Matter level for my hay field several years back just to see what it was but cost extra. Basic test was $8.50. With the price of fertilizer, it beats guessing at what you need. You get your samples, then you mail them off to the University of KY. Results usually take 10-14 days. Your Extension Agent will go over them with you when they/you get the results back. Looking at the growth you're mowing off, I'd guess you're close, or even high in phosphorous.

If the PH needs adjusted, lime could be applied now to start working.

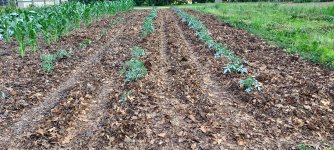
Not sure what set plants you plan on growing, but I mulch around mine with leaves. I collect from neighbors and know a couple guys that have and work for lawn services that do leaf pickup in the Fall that are more than happy to drop their loads of leaves here, rather than paying to dump them at a compost facility. Just a little FYI if you know of any lawn services close that provide that service. The season is nearly upon us for that, if you have plenty of room for them to dump. Here are a couple pics of my tomatoes this year. I mulched them mid-June, second pic is 2 weeks ago. Nearly weed free, and this year was a life saver with the drought retaining what little moisture they did get. Held them over until we got the 3-1/2" of rain from Helene, now they are back going like gangbusters, while everyone else's in the area are long dried up. Going out and pick a couple bushel's this morning.

I'm getting way ahead of the game here, better quit...
 

Attachments

  • 20240621_192945.jpg
    20240621_192945.jpg
    8.1 MB · Views: 101
  • 20240918_152018.jpg
    20240918_152018.jpg
    6 MB · Views: 101
   / International 444, 1968. Progress Thread, Getting Going
  • Thread Starter
#77  
I am hoping to get the garden area at least measured and staked to mark it tonight. I have a single tine ripper to break the compaction/pull up some roots.

What you say about the weed seeds is something Ive been concerned with ever since we started looking at this property. I presume that will be a battle. Im not sure what the best approach is, however we are wanting to stay away from chemicals if possible.

Additional tillage tools to come - 2 bottom plow with coulters and a disk maybe around 8ft wide. I want to do the initial turning over with the plow then level and maintain with the disk.
 
   / International 444, 1968. Progress Thread, Getting Going
  • Thread Starter
#78  
So a new conundrum of sorts - I think...

With the brush hog this wasnt a huge issue, but was noticeable - the 3pt draft arms swing freely side to side. There is a retaining "chain" on each one to prevent either from swinging out too far.

However, I have not figured out how to tighten things up to prevent the swinging.

I hooked the ripper up tonight and got to thinking about this - I dont want the tillage tools swinging side to side, I dont think. That would make it impossible to be even reasonably accurate with where the tillage is occurring.

Thoughts?
 

Attachments

  • 20241002_201506.jpg
    20241002_201506.jpg
    9.9 MB · Views: 112
   / International 444, 1968. Progress Thread, Getting Going #79  
Not familiar with the chain set up on it, but normally where the chains attach to the connection point on the tractor is usually a "U" shaped clevis with a pin through it. Remove the clevis, and drop some links sliding dropped links back, so the clevis goes through and pulls on the front of the loop of a link in chain.

You can limit swing, but you don't want it rigid either. It does need some sideways movement to allow if you hit a rock, or just a slight turn of the steering wheel, while really not realizing it. A tillage implement if set up right should follow the central draft of the tractor. I'd try it as is for now and see how it does. On that subsoiler the main thing is to have your lift arms equal so the subsoiler shank is plumb. Once in the ground, it should follow the center draft of the tractor.

You'll probably have to play with the top link adjustment to get the subsoiler set to pull itself into the ground. Also enough to get it to pull down on the rearend of the tractor to provide extra traction when ripping. Those pull hard, especially if you're ripping through old hardpan if it has been farmed before, moldboard plowing.

Not sure on how deep you plan to rip, but if more than 14"-15" you'll want to maybe make 2 passes. Not that it may not pull it, but a buddy of mine has one just like that and bent the shank with a 50 hp tractor. Those shanks aren't tempered steel and although heavy, they will bend in the right ground conditions. He waited until it was really too dry to run his through a low spot he grows in and hold water.

Also, not sure what type of soil you have, but always remember there may be a big rock under the surface somewhere. Just be prepared to come to a sudden stop at any time.
 
   / International 444, 1968. Progress Thread, Getting Going
  • Thread Starter
#80  
I thought I updated this thread here but it appears I didn't. In any event, I got the ripping done. The lowest I could get it was about a foot. That was as low as the 3pt would drop. I am suspecting the size of the tractor has a lot to do with that - it is a bigger machine for that type/size of tool.

That said - it has me questioning other tools like a 2 bottom plow and a disk. If I were to guess - those sized for the machine would be "bigger" implements anyway so the drop of t he 3pt, I would not think, would matter. But it is a question I'll pose and see what others here think/suggest.

Here are some pictures.

This is the ground as it was being prepped with brush hogging so you get a sense of what we were starting with.

20241001_184029.jpg

This as we were ripping:

20241003_185332.jpg


20241003_185359.jpg


20241003_185405.jpg


And the finished product - 1/8 acre to start with. This will be plowed under next (at some point - need to acquire a plow first). Then disked.

20241003_193850.jpg
 

Tractor & Equipment Auctions

2018 JOHN DEERE 333G SKID STEER (A60429)
2018 JOHN DEERE...
excavator trenching bucket- one bucket per lot (A56438)
excavator...
500BBL SKIDDED FRAC TANK (A58214)
500BBL SKIDDED...
2014 CATERPILLAR 627K SCRAPER (A60429)
2014 CATERPILLAR...
Mower deck storage axles
Mower deck storage...
Toro (A56857)
Toro (A56857)
 
Top