Front Axle Pumpkin Vent

/ Front Axle Pumpkin Vent #41  
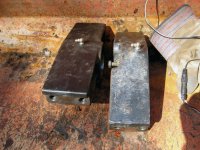
That's why I have a pnumatic grease gun.

That's a good solution.

I don't have "bearing buddies" on my trailer, but I am very careful about
never driving in water that can get into the wheel bearings. In the old
days, I would drive my 4x4 PU through rivers in the desert, but also
knew that I had to repack the hubs when I got home....about 8-oz of
grease in each front hub.
 
/ Front Axle Pumpkin Vent
  • Thread Starter
#42  
Sorry for the delay. Didn't know I'd be partying all night. :D

An interesting development in the axle pivot bushings......

I started drilling the pivot and was expecting it to get real painful real quick when all of a sudden I had a hole all the way through. And it took less than twenty seconds. Hmm, strange. Then I noticed this grey-ish dust. Hmm, stranger still.

See if you can figure it out from the pictures before reading the next post.
 

Attachments

  • axlepivothole1.jpg
    axlepivothole1.jpg
    182.6 KB · Views: 226
  • axlepivothole2.jpg
    axlepivothole2.jpg
    200.4 KB · Views: 258
/ Front Axle Pumpkin Vent
  • Thread Starter
#43  
The bushing isn't hardened steel at all!!!! Must be carbon fiber or kevlar! Didn't see that coming... did you?

So how come I couldn't tell before? You can see the petrified grease I removed with every swipe of the towel for ten to twelve swipes per bushing. There was no sign of the fiber pattern until the muck was gone.

You can also see the burrs lefts by drilling. I used my el cheapo $5.99 HF rotary tool to clean it up and chamfer the hole. (I finally found something this thing is actually capable of doing without bogging down under mild pressure.)
 

Attachments

  • axlepivotbushing1.jpg
    axlepivotbushing1.jpg
    150.8 KB · Views: 268
  • axlepivotdirt1.jpg
    axlepivotdirt1.jpg
    210.5 KB · Views: 195
  • axlepivothole3.jpg
    axlepivothole3.jpg
    184.5 KB · Views: 204
  • axlepivothole4.jpg
    axlepivothole4.jpg
    192.3 KB · Views: 241
/ Front Axle Pumpkin Vent
  • Thread Starter
#44  
At this point I was debating whether or not I even wanted to add a grease fitting to the other pivot. But in the end my thought process went like this: I don't know how fiber bushings wear in comparison to steel ones, Deere greased it from the factory, Deere added seals intending for the grease to stay there, and it would still be easier to grease via a fitting then the alternative.

The pictures are of the installed fittings. They came out very well, I think.

[And yes, that is an orange tractor bucket there. Had to use the neighbor's tractor to carry all the stuff to his shop and back. Wowsers.... the fit, finish, NHV, and ergonomics are terrible in comparison to my 4200.]
 

Attachments

  • axlepivotzerk3.jpg
    axlepivotzerk3.jpg
    283.3 KB · Views: 215
  • axlepivotzerk2.jpg
    axlepivotzerk2.jpg
    188.4 KB · Views: 251
  • axlepivotzerk1.jpg
    axlepivotzerk1.jpg
    219.9 KB · Views: 214
/ Front Axle Pumpkin Vent #45  
At this point I was debating whether or not I even wanted to add a grease fitting to the other pivot. But in the end my thought process went like this: I don't know how fiber bushings wear in comparison to steel ones, Deere greased it from the factory, Deere added seals intending for the grease to stay there, and it would still be easier to grease via a fitting then the alternative.

The pictures are of the installed fittings. They came out very well, I think.

[And yes, that is an orange tractor bucket there. Had to use the neighbor's tractor to carry all the stuff to his shop and back. Wowsers.... the fit, finish, NHV, and ergonomics are terrible in comparison to my 4200.]

Looks good!
I'd like to see the Deere parts exploded view. Are those fiber bushing replaceable?

Rob
 
/ Front Axle Pumpkin Vent
  • Thread Starter
#46  
Rob, the parts breakdown is the PDF on page two. I'll have to investigate whether the bushings are inside the pivots or on the axle housing. I'm guessing its the pivots as they look replaceable (middle picture in post #44). I'll clean the axle in the next day or two and know for sure.
 
/ Front Axle Pumpkin Vent #47  
First lesson learned: no way is the power steering cylinder not going to move while removing the axle with the wheels still on. I'm thinking there is no way not to move it no matter how you get the ends off. The fluid shot out like out of a cannon. Its wasn't under much pressure but it did a good job drenching most of the underside of the tractor. Sigh. Good thing I have plenty of kitty litter. Next time... drain the steering cylinder before removing the axle.

Also some pictures of the wife holding the removed axle and the tractor ready for narrow row crop duty.

I aways plug/cap lines, hoses, fittings, etc. Mainly to keep dirt out, but also the fluid in.
 
/ Front Axle Pumpkin Vent
  • Thread Starter
#48  
Time for some updates....

I cleaned out the axle housing and applied Ultra Black RTV to the pumpkin mating surface. Gotta make sure the side bolt holes get RTV all around as they penetrate the housing (unlike the top and bottom holes which are enclosed).

Cleaned the pumpkin mating surface really well too. Again, you can see how nice the gear wear pattern is.
 

Attachments

  • pumpkinhousing1.jpg
    pumpkinhousing1.jpg
    209.8 KB · Views: 250
  • pumpkinhousing2.jpg
    pumpkinhousing2.jpg
    220.5 KB · Views: 298
/ Front Axle Pumpkin Vent
  • Thread Starter
#49  
Next I installed the rear axle pivot bracket. I lubed it well. I lubed the axle housing pivots well too. You can see the new seal too. Its also well lubed. Theres a running theme here. :D

I installed the rear bracket on two bolts only. I tilted it down some and pushed the axle into it. Then titled everything back up and positioned the front axle pivot bracket in place. Positioned is putting it kindly. I had to gently sledge hammer the bracket to make it squeeze between the frame rails.

The pivot adjusting bolt must be removed for installation. Otherwise you're compressing air and the bracket won't fully seat on the axle housing pivot. You can see the excess grease getting pushed out. You can see the sledge hammer marks too. And you can see how nicely the installation of the grease zerks came out.
 

Attachments

  • axlepivotgrease4.jpg
    axlepivotgrease4.jpg
    157.2 KB · Views: 204
  • axlepivotgrease3.jpg
    axlepivotgrease3.jpg
    170.1 KB · Views: 218
  • axlepivotgrease2.jpg
    axlepivotgrease2.jpg
    244 KB · Views: 192
  • axlepivotgrease1.jpg
    axlepivotgrease1.jpg
    150 KB · Views: 215
/ Front Axle Pumpkin Vent
  • Thread Starter
#50  
There is no torque spec for the axle pivot bracket bolts. I should have searched better as there are 22 of these bolts installed on the frame. I'm sure the rest have torque specs. So I stupidly chose 215 ft-lbs based on the stronger bolts holding the spindle housing to the axle housing. Unrelated parts, unrelated bolts, unrelated problem created.

The first one torqued to 215 ft-lbs. The second one was taking an awful long time to get there. As I was thinking, "wow this is taking way too long," the bolt snapped in half.

Turning it out with a screw extractor wasn't working well because of the Loctite but it was slowly coming out. My neighbor wanted me to try his "new style" extractors. So I did. Those didn't have any elasticity at all and wham, a little too much torque and it broke off in the hole. So out came the axle pivot. Grrr.

I cut a slit in the bolt and welded a flat-head screwdriver bit into the slit. Then I ratcheted out the broken bolt.

Those bolts happen to be $4.57 each at Deere. At least they stock them. I chose 120 ft-lbs as the new torque spec. No problem there.

Lesson learned: Black & Decker isn't better quality than Harbor Freight.
 

Attachments

  • axlepivotbolt1.jpg
    axlepivotbolt1.jpg
    147.3 KB · Views: 188
  • axlepivotbolt2.jpg
    axlepivotbolt2.jpg
    92.5 KB · Views: 234
  • axlepivotbolt3.jpg
    axlepivotbolt3.jpg
    116.8 KB · Views: 213
/ Front Axle Pumpkin Vent
  • Thread Starter
#51  
Back to actual assembly. Again, RTV on the spindle housing mounting surface. You can see it getting squeezed out.

And RTV one more time on the steering cylinder mounting surfaces. These bolt holes go right through the axle housing so they need sealant all the way around.

Normally I would use Loctite on these bolts but I've found that RTV works really well as a blue Loctite (as in, is prevents bolts from loosening due to vibration).
 

Attachments

  • steeringmounting2.jpg
    steeringmounting2.jpg
    239.8 KB · Views: 168
  • steeringmounting1.jpg
    steeringmounting1.jpg
    199.6 KB · Views: 208
  • spindlehousing1.jpg
    spindlehousing1.jpg
    172.5 KB · Views: 202
/ Front Axle Pumpkin Vent
  • Thread Starter
#52  
Some random pics. I liked dfkrug's pic of the fill plug inside the axle so much I took my own. I'm still shocked by how much fluid goes inside this axle. Still, as we learned from Sam Marsh... you'd better keep the fluid in there or you will destroy the portal gears.

Next a pic of the new square end spindle housing drain plugs. Easier to destroy, but also easier to removed when destroyed.

And finally the cleaned up tie rod. My one tie rod was all messed up. The threads were hose-monkeyed and the nut was cross-threaded. It actually looked like it was cross-threaded twice in its life! I can only guess the problem was air tools from the previous owner. Which is why I don't use them for any installations.

I didn't take any pics but it took me two days to selectively grind away the bad threads without removing too much to make it entirely useless. Very painful.

I removed the tie-rod boot in the process of figuring out what was wrong. Very easy to remove. Near impossible to put back on. I do not recommend EVER removing this boot to anyone. I can pretty much guarantee I will be replacing this tie-rod in the near future thanks to there being a poor seal on the reinstalled boot which will push out all the grease every time I use the tractor.

I'll have pictures of the vent hose and it all sewn up shortly.
 

Attachments

  • axlefillplug1.jpg
    axlefillplug1.jpg
    152 KB · Views: 213
  • spindledrainplug1.jpg
    spindledrainplug1.jpg
    136.1 KB · Views: 204
/ Front Axle Pumpkin Vent #53  
I'll have pictures of the vent hose and it all sewn up shortly.

Nice pivot zerks, ARRABIL!

I would have used a square-headed drain plug like you did, but I had
already bought a replacement. Yours is superior to the OEM socket-
headed plug because even if you hit it with a rock, you can still grab
it to remove it.

Now everyone....go out an check your axle pivots!
 
/ Front Axle Pumpkin Vent
  • Thread Starter
#54  
Nice pivot zerks, ARRABIL!
Thank you. I lifted the front end by the pumpkin and pumped some grease in today. Worked like a charm.

Now everyone....go out an check your axle pivots!
Thats no joke. With 1000 hours on mine, the pivots were just at the wrong end of shot. The fiber was fraying, the lube was gone, the seals were useless. Another couple hundred hours and it would have been loose and then the problems start at the driveshaft, the pinion shaft, the pinion bearings, the tie rods, etc. And who knows how much side force the driveshaft connection in the rear of the tractor can take.

For anyone who is concerned.... the seals tell the tale. Get a flashlight and some kind of poker that isn't sharp and see what the seals look like. One on each side, they'll be the rubber pieces closest to the axle housing. Post #49 has one good picture and (kind of) one installed picture of the rear side. If they're cracked or frayed all around, dry-rotted, missing, etc., I'd be concerned enough to do something about it. You can remove the axle pivot slack bolt at the front of the forward pivot to give yourself some room (but only if you lift the front off the ground so the axle can move freely). If you don't move the locking nut touching the pivot bracket, you can put it back exactly how you found it.
 
/ Front Axle Pumpkin Vent #55  
Good grief, that's quite a project!

And another picture of the old girl ready for narrow row crop duty. I can't get over how silly she looks.

Reminds me of that TV deodorant commercial where the mountain biker has his front wheel come off, and he chases after it riding solely on the rear wheel. Or you could take it to the drag strip and do wheelie exhibitions.

There is no torque spec for the axle pivot bracket bolts. I should have searched better as there are 22 of these bolts installed on the frame. I'm sure the rest have torque specs. So I stupidly chose 215 ft-lbs based on the stronger bolts holding the spindle housing to the axle housing. Unrelated parts, unrelated bolts, unrelated problem created.

The first one torqued to 215 ft-lbs. The second one was taking an awful long time to get there. As I was thinking, "wow this is taking way too long," the bolt snapped in half.

I have one of these little torque charts that comes in handy for situations where the manufacturer didn't post a torque value in the shop manual.

McMaster-Carr

McMaster part number 90662A050
 
/ Front Axle Pumpkin Vent
  • Thread Starter
#56  
Good grief, that's quite a project!
The axle pivot grease fittings aren't all that much work. The rest would go faster if I didn't spend half the time opening beer.

Or you could take it to the drag strip and do wheelie exhibitions
I like it! Probably need to supercharge the engine first though.

I have one of these little torque charts that comes in handy for situations where the manufacturer didn't post a torque value in the shop manual.
Yeah, they even have one in the Deere tech manual and about ten other manuals I got in the garage. I thought about it but wound up over-thinking it.
 
/ Front Axle Pumpkin Vent #57  
Nice job Arrabil, thanks for the pics.
Rob
 
/ Front Axle Pumpkin Vent
  • Thread Starter
#59  
And the final installation pictures....
 

Attachments

  • axlepivotzerk4.jpg
    axlepivotzerk4.jpg
    232 KB · Views: 250
  • axlepivotzerk5.jpg
    axlepivotzerk5.jpg
    208.1 KB · Views: 235
  • vent5.jpg
    vent5.jpg
    104.1 KB · Views: 223
  • ventfilter1.jpg
    ventfilter1.jpg
    235.4 KB · Views: 221
/ Front Axle Pumpkin Vent #60  
And the final installation pictures....

Looks good!

I noticed a couple things in your last photo.

Is that an add-on device to hold the FEL hoses (A in the photo)? I have
not seen one on any 4300, and it would come in handy.

B in the photo looks like your fuel overflow drain tube. I hope it is not
getting pinched between the valve cover and the intake hose....that's
what destroyed my engine.
 

Attachments

  • 4200_axle_vent.jpg
    4200_axle_vent.jpg
    237.9 KB · Views: 238

Marketplace Items

42" X 30" FIRE PIT RING/DISC (A64281)
42" X 30" FIRE PIT...
40' Used Container, High Cube, Single End Doors (A62679)
40' Used...
Challenger 65-85C Tractor Service Manual (A63117)
Challenger 65-85C...
UNUSED ATSPOWER STAND-ON SKID STEER (A64280)
UNUSED ATSPOWER...
2022 TAKEUCHI TL10V2 SKID STEER (A64279)
2022 TAKEUCHI...
2021 UTILITY VS2DX 53X102 T/A DRY VAN TRAILER (A59912)
2021 UTILITY VS2DX...
 
Top