You are using an out of date browser. It may not display this or other websites correctly.
You should upgrade or use an alternative browser.
You should upgrade or use an alternative browser.
A timber frame cabin memoir
- Thread starter caver
- Start date
- Views: 42436
More options
Who Replied?
/ A timber frame cabin memoir
#41
OP
caver
Veteran Member
- Joined
- Dec 20, 2006
- Messages
- 2,046
- Location
- Southeast Missouri
- Tractor
- Fisher Price, toddlers first tractor.
I will start "bent" assembly pretty soon. Has anyone you know used Menard's I joists? Some people say Menards lumber is junky but I've not bought much lumber from them. I just got a quote from the local lumber yard that is double the price of Menards yet the same or very close grade. Similar experience when I called another area lumber yard a few months ago.
dstig1
Super Member
- Joined
- Apr 7, 2010
- Messages
- 5,728
- Location
- W Wisc
- Tractor
- Kubota L5240 HSTC, JD X738 Mower, (Kubota L3130 HST - sold)
There was a time their lumber was poor. Around the time Home Depot entered the market in this area (upper midwest), Menards seemed to take a deep look at their operation and made major investments and improvements in both their stores and their merchandise. I used plenty of lumber from Menards and also from the local professional lumberyard on my build, and I saw no difference in quality. In fact, I often got better stuff from menards as I was mostly hand picking what I needed for later work that was smaller quantity typically. Lumber in general has gotten worse over time but I think has reached some sort of steady state these days as they grow their own trees super fast and control the process. In other words, I don't think it can get much worse and still be called lumber.
I-joists in particular are going to be coming from TJI or one of the other big names, in all likelihood and will be the same no matter where you get them.
I-joists in particular are going to be coming from TJI or one of the other big names, in all likelihood and will be the same no matter where you get them.
OP
caver
Veteran Member
- Joined
- Dec 20, 2006
- Messages
- 2,046
- Location
- Southeast Missouri
- Tractor
- Fisher Price, toddlers first tractor.
Local place (and have been told he can be competitive on prices) wanted $136 grade 65. Menards has same size grade 65 for about $70. It's quite a difference. The Menards guys told me they come from a plant in Missouri and it takes about 2 weeks to get them. I would have to try and fit them 22' long on a 16' trailer. Not sure if the local guy would deliver as I forgot to ask. My place is only about 8 miles from local place.
OP
caver
Veteran Member
- Joined
- Dec 20, 2006
- Messages
- 2,046
- Location
- Southeast Missouri
- Tractor
- Fisher Price, toddlers first tractor.
Second bent of 4 being put on the stack and some of the joints/plates have been secured. I did most of the first bent myself and a buddy came over to help me finish A and start on B. This project sat too long and some of the joints are difficult to get the plates on from timber warp. The bents are assembled on the plant floor and then taken back aprt to be put into a bundle plus labeled. Progress has been slow as the summer heated up it became a little too much for me. I work in the morning, knock off then get back at it after 3:30

OP
caver
Veteran Member
- Joined
- Dec 20, 2006
- Messages
- 2,046
- Location
- Southeast Missouri
- Tractor
- Fisher Price, toddlers first tractor.
A and B bents are assembled on the ground. I spotted C bent posts in their position but needed taller cribbing so they don't interfere with a cross beam support bracket. That slowed me down. The tractor with my QA forks is a lifesaver. I have gotten in touch with a contractor who's interested in my project. He owns a crane and telehandler. We will meet next week to talk details. My main hurdle is to get the bents flown into place and braced. If they have time I may have them put all or some of the rough cut 4x6 roof purlins on. One big boo-boo the plant made was that they cut two bent posts too short. Initially it drops my roof down about 8" but I will likely add pressure treated blocks on the bottom of the posts so that gains me another 1.5 inches. It's something they recommend on slabs and included but not needed on a foundation. The reason I want to use them is my U-brackets on the sill plate have two anchor bolt heads sticking up. I would have to position the bent post to make an impression then lift back up and drill countersink holes. So my option is live with it and the first bent with shorter posts is now the zero cut line. Or they can send two replacement Douglas Fir posts to me but I would have to cut the angles and drill the splice plate holes. I might possibly do that but that bent will be the last to go up and is on the bottom of the constructed bent pile. I'll run it past this contractor if he comes on board for a few days or a week. He has other work but some jobs can be postponed. PS I checked today with my clinometer phone app and that is a 11* slope I'm building those on. Ugggg
![20230901_100351[1].jpg](https://tractorbynet.com/forums/attachments/20230901_100351-1-jpg.819043/ "20230901_100351[1].jpg")
JJT
Veteran Member
- Joined
- Oct 13, 2001
- Messages
- 2,142
- Location
- Upstate NY, USA
- Tractor
- Kubota L3710 HST and a Kubota ZD21 60Pro
If you were closer I'd jump at the chance to recut those posts for you. Don't settle for the short posts. USe the short posts as a template, it's not that big of a job.
I've built several timber frame structures, including a 3000 square foot house. Timber framing is a hobby. I've even cut a few posts for my Amish neighbors.
I've built several timber frame structures, including a 3000 square foot house. Timber framing is a hobby. I've even cut a few posts for my Amish neighbors.
OP
caver
Veteran Member
- Joined
- Dec 20, 2006
- Messages
- 2,046
- Location
- Southeast Missouri
- Tractor
- Fisher Price, toddlers first tractor.
The problem is you see in the photo the short posts are on the bottom of the built stack. But, If this contractor comes on board I may see what he thinks of flying A, B & C bents and then D bent is exposed. See how long it might take to swap those posts out on D bent. If he thinks that's easily doable then I will get the TF folks to send those new posts asap. If not (I didn't mention it) and I go the short version I would hit them up for some compensation for their mistake. My "project manager" happened to be in the office of another co-worker. We thought something was obviously wrong about 15 days ago when we started spotting posts for the B bent. A phone call made it seem like they just cut those posts way longer...but they didn't.If you were closer I'd jump at the chance to recut those posts for you. Don't settle for the short posts. USe the short posts as a template, it's not that big of a job.
I've built several timber frame structures, including a 3000 square foot house. Timber framing is a hobby. I've even cut a few posts for my Amish neighbors.
I got back to the project early this week and my buddy wasn't there as last time. I had a clear head and decided to take measurements again. It did not make sense looking at the print. So I called them back.
During the phone call 2-3 days ago I think the co-worker understood the problem and was looking at the picture showing a tape measurement and no where near saying what the prints say.
buckeyefarmer
Epic Contributor
I have not bought lumber from Menards, none near me. But I watch the RRconstruction youtube channel, and I noticed he used lumber from menards in one video.
JJT
Veteran Member
- Joined
- Oct 13, 2001
- Messages
- 2,142
- Location
- Upstate NY, USA
- Tractor
- Kubota L3710 HST and a Kubota ZD21 60Pro
Another thought, you could simply scarf/splice in an 8" stub, then trim out the bottom of every post with some nice hardwood for the bottom 12". I'd do that before I cut all the posts to match the shortest pair.
OP
caver
Veteran Member
- Joined
- Dec 20, 2006
- Messages
- 2,046
- Location
- Southeast Missouri
- Tractor
- Fisher Price, toddlers first tractor.
I thought about that to a little extent but all four corners get a 5/8 threaded rod epoxied 12" into the foundation and connected to the base via a Simpson HDU bracket. There are no mortise and tenon joints in this kit. Everything is plates and bolts and/or
#17 -8" screws. Some angle brackets get 3 or 4" large wood screws. The 8" stub would be hidden under the 14" I joists that go in after the bents have been flown.
#17 -8" screws. Some angle brackets get 3 or 4" large wood screws. The 8" stub would be hidden under the 14" I joists that go in after the bents have been flown.
OP
caver
Veteran Member
- Joined
- Dec 20, 2006
- Messages
- 2,046
- Location
- Southeast Missouri
- Tractor
- Fisher Price, toddlers first tractor.
A contractor came by today and we discussed the details. My main goal is get the bents up and on the foundation then if his schedule or my funds allow I may have them put the roof purlins on. He also said yeah replace those two posts so I don't regret it down the road. We can raise the top 3 and then swap them over on the last bent to go up. Plus, like he said these Douglas Firs will be fresh from the sawmill so no or little warpage. Also the shipping dept guy is going to send me 3-4 replacement 10" nail base panels that were buggered up during shipping.
OP
caver
Veteran Member
- Joined
- Dec 20, 2006
- Messages
- 2,046
- Location
- Southeast Missouri
- Tractor
- Fisher Price, toddlers first tractor.
Headway. Finally got 2 bents flown into place on Halloween and the other 2 the following day. We still have about 3 cross beams and two posts that go all the way to the basement to put in. I assisted as needed but let the boss man and his two helpers do their thing. This is the first timber frame he's dealt with. They also swapped out the two posts that were cut too short at the plant. Hopefully next week we rent a telehandler as his broke down and acts like it has an air in fuel problem. He plans to bring an Amish crew in to finish the aforementioned stuff and get the roof purlins on. Then it's 8" tongue & groove followed by 10" nail base panels. This project has had way too many delays and paying a crew to hustle along was the way to go for me.


thclimer
Veteran Member
Nice to see that you are making progress.
Hoping you can get it weather tight before winter is in full force.
Hoping you can get it weather tight before winter is in full force.
EddieWalker
Epic Contributor
Somehow I missed this thread and I just found it. Seems like all of my comments that I wanted to make have already been addressed, and you are moving along nicely. I'm looking forward to following along the rest of your build!!!!
OP
caver
Veteran Member
- Joined
- Dec 20, 2006
- Messages
- 2,046
- Location
- Southeast Missouri
- Tractor
- Fisher Price, toddlers first tractor.
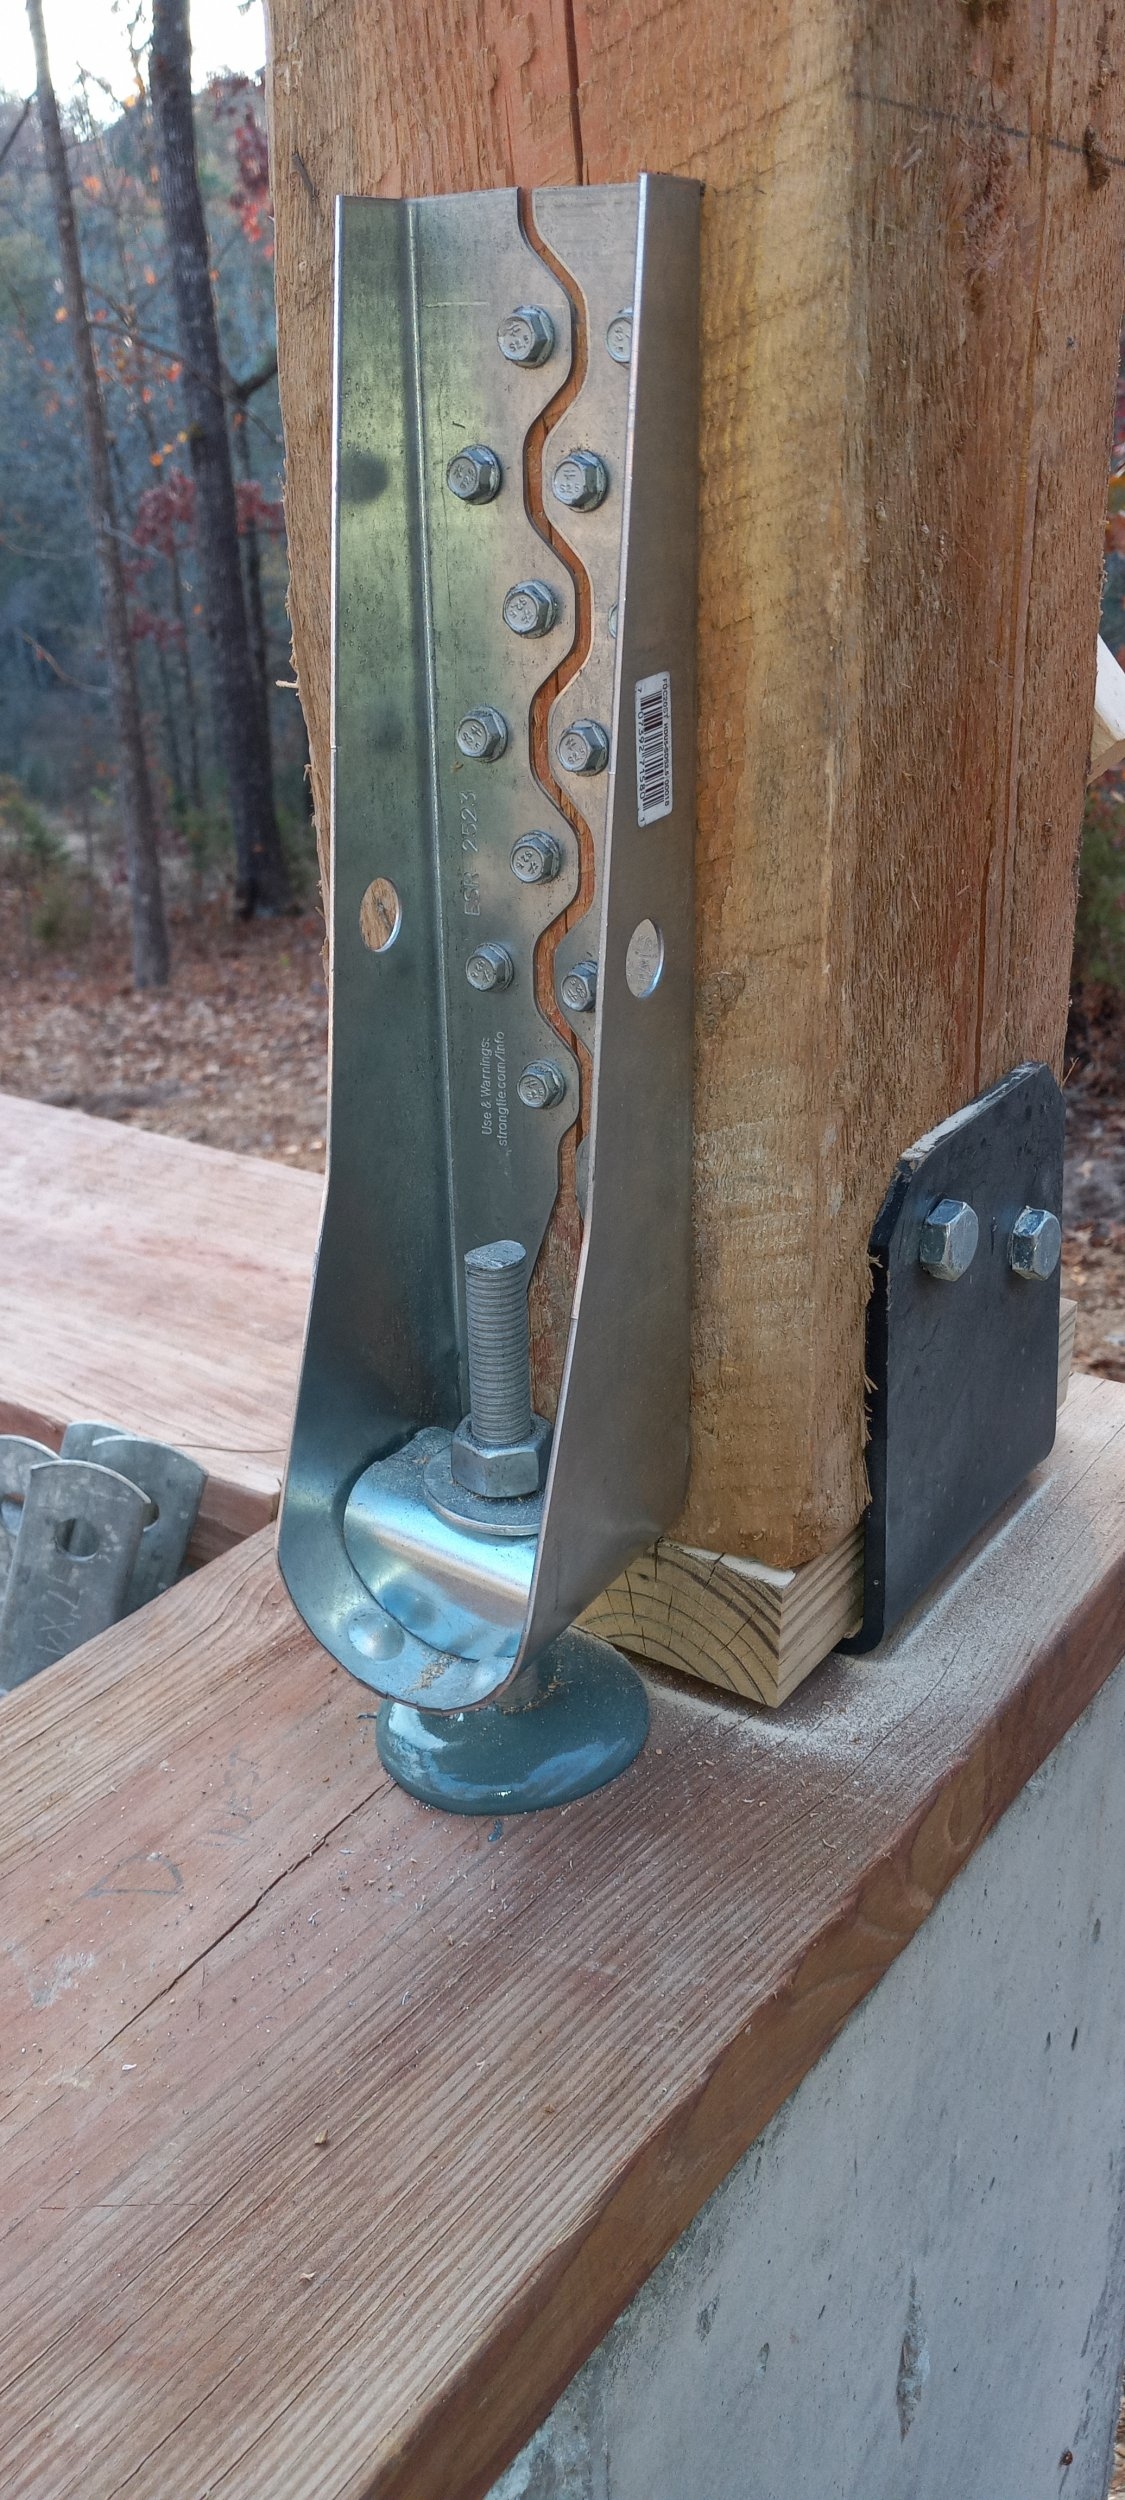
I'm back at the property today. I moved some stuff around then worked on installing the corner anchors. It's something Legacy Post and Beam do and I never did ask why. Maybe it's required in some areas of the US so they just make it part of the package. Only the four corners get one. Last Thursday before I left, I drilled 3/4" holes 12" deep into the foundation. Then I spent some time running a pipe cleaner type brush in and out followed by a compressed air lance. It's just a valve with a piece of stainless tubing about 10" I made up years ago. When I felt like they were fairly cleaned out I got my expensive tube of Set-XP epoxy made by Simpson and filled the holes up then inserting the threaded rod. It's a dual tube system that requires a dual tube heavy duty caulking style gun. I had to buy one just for it. The epoxy is mixed in the spiral dispensing tube. I will tighten the nut up after a few more days just to give that epoxy more time to cure. All the u-brackets that the post sit in are also anchored with two Simpson 6" Titen HD anchors. I was impressed by those anchors.
Attachments

thclimer
Veteran Member
That is an interesting designed anchor. The cup at the bottom and its length being split into two sections indicates to me it was designed for flexing side to side (left to right in your picture) but to limit uplift.
ponytug
Super Member
I suspect the anchor requirement is against tornados. The split anchor helps wood flex due to humidity.
Simpson makes some quite amazingly engineered products. I have used that anchor in concrete, and you really, really don't ever want to remove one. It is much easier to design a different anchoring system around another location. Those were used on our deck, and solid does not begin to describe them. (One hole was mis-located/drilled...)
We use the two part glue and glue gun/dispensers with some frequency now that we own the dispensers to do it. (Yes, we have more than one for different types/brands.) I personally prefer to use the ones that come as an inner/outer two part system in a standard caulking cartridge, as I can then use my air powered caulking gun, but the downside is that you need to use something close to an entire 14oz cartridge at a time (an hour or two). It beats trying to hand mix epoxy and filler, especially as you get to high solids mixes. BTDT...
All the best,
Peter
Last edited:
Here are some similar links:
- Replies
- 19
- Views
- 27K