A timber frame cabin memoir

   / A timber frame cabin memoir
  • Thread Starter
#51  
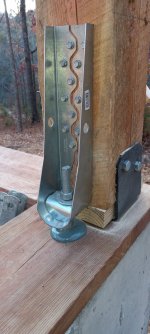
I thought about that to a little extent but all four corners get a 5/8 threaded rod epoxied 12" into the foundation and connected to the base via a Simpson HDU bracket. There are no mortise and tenon joints in this kit. Everything is plates and bolts and/or
#17 -8" screws. Some angle brackets get 3 or 4" large wood screws. The 8" stub would be hidden under the 14" I joists that go in after the bents have been flown.
 
   / A timber frame cabin memoir #52  
From what you say - they made the mistake. So make them fix it at their expense. Normal business...
 
   / A timber frame cabin memoir
  • Thread Starter
#53  
A contractor came by today and we discussed the details. My main goal is get the bents up and on the foundation then if his schedule or my funds allow I may have them put the roof purlins on. He also said yeah replace those two posts so I don't regret it down the road. We can raise the top 3 and then swap them over on the last bent to go up. Plus, like he said these Douglas Firs will be fresh from the sawmill so no or little warpage. Also the shipping dept guy is going to send me 3-4 replacement 10" nail base panels that were buggered up during shipping.
 
   / A timber frame cabin memoir
  • Thread Starter
#54  
Headway. Finally got 2 bents flown into place on Halloween and the other 2 the following day. We still have about 3 cross beams and two posts that go all the way to the basement to put in. I assisted as needed but let the boss man and his two helpers do their thing. This is the first timber frame he's dealt with. They also swapped out the two posts that were cut too short at the plant. Hopefully next week we rent a telehandler as his broke down and acts like it has an air in fuel problem. He plans to bring an Amish crew in to finish the aforementioned stuff and get the roof purlins on. Then it's 8" tongue & groove followed by 10" nail base panels. This project has had way too many delays and paying a crew to hustle along was the way to go for me.
20231031_104841.jpg
20231031_142146.jpg
20231031_142400.jpg
20231101_111249.jpg
20231101_130322.jpg
20231101_132618.jpg
 
   / A timber frame cabin memoir #55  
get Bent, eh? 😁
 
   / A timber frame cabin memoir #56  
Nice to see that you are making progress.

Hoping you can get it weather tight before winter is in full force.
 
   / A timber frame cabin memoir #57  
Somehow I missed this thread and I just found it. Seems like all of my comments that I wanted to make have already been addressed, and you are moving along nicely. I'm looking forward to following along the rest of your build!!!!
 
   / A timber frame cabin memoir
  • Thread Starter
#58  
I'm back at the property today. I moved some stuff around then worked on installing the corner anchors. It's something Legacy Post and Beam do and I never did ask why. Maybe it's required in some areas of the US so they just make it part of the package. Only the four corners get one. Last Thursday before I left, I drilled 3/4" holes 12" deep into the foundation. Then I spent some time running a pipe cleaner type brush in and out followed by a compressed air lance. It's just a valve with a piece of stainless tubing about 10" I made up years ago. When I felt like they were fairly cleaned out I got my expensive tube of Set-XP epoxy made by Simpson and filled the holes up then inserting the threaded rod. It's a dual tube system that requires a dual tube heavy duty caulking style gun. I had to buy one just for it. The epoxy is mixed in the spiral dispensing tube. I will tighten the nut up after a few more days just to give that epoxy more time to cure. All the u-brackets that the post sit in are also anchored with two Simpson 6" Titen HD anchors. I was impressed by those anchors.
20231105_161513-jpg.830590
 

Attachments

  • 20231105_161513.jpg
    20231105_161513.jpg
    1.4 MB · Views: 164
   / A timber frame cabin memoir #59  
That is an interesting designed anchor. The cup at the bottom and its length being split into two sections indicates to me it was designed for flexing side to side (left to right in your picture) but to limit uplift.
 
   / A timber frame cabin memoir #60  
I suspect the anchor requirement is against tornados. The split anchor helps wood flex due to humidity.

Simpson makes some quite amazingly engineered products. I have used that anchor in concrete, and you really, really don't ever want to remove one. It is much easier to design a different anchoring system around another location. Those were used on our deck, and solid does not begin to describe them. (One hole was mis-located/drilled...)

We use the two part glue and glue gun/dispensers with some frequency now that we own the dispensers to do it. (Yes, we have more than one for different types/brands.) I personally prefer to use the ones that come as an inner/outer two part system in a standard caulking cartridge, as I can then use my air powered caulking gun, but the downside is that you need to use something close to an entire 14oz cartridge at a time (an hour or two). It beats trying to hand mix epoxy and filler, especially as you get to high solids mixes. BTDT...

All the best,

Peter
 
Last edited:
 
Top