Let's see your welds...

/ Let's see your welds... #61  
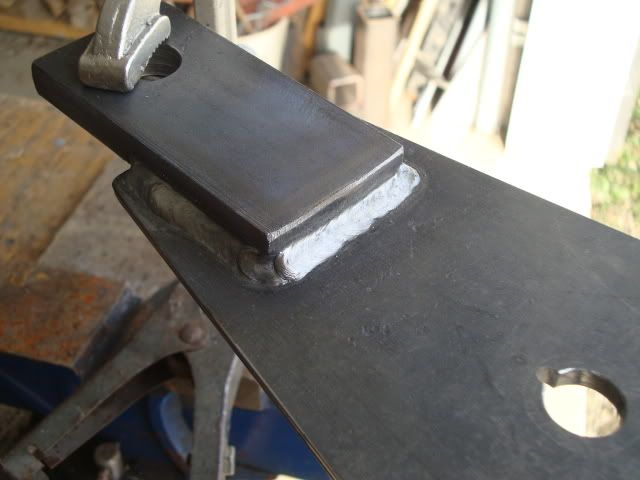
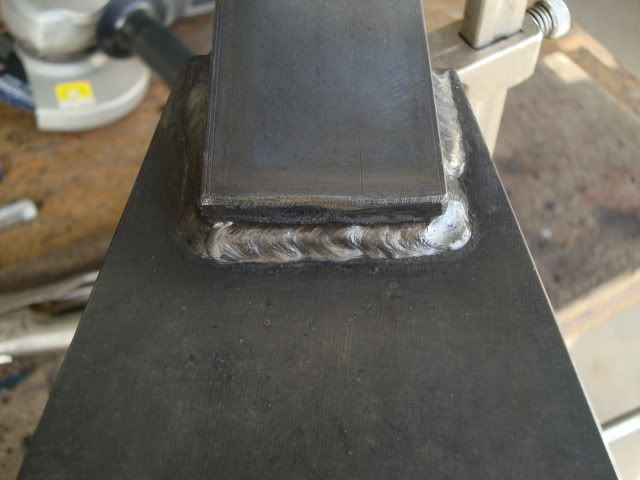
slow your wire speed down to the point it would be unorthodox to use, but yet steady. This is a very slow process of mig welding. Prob about 5in per minute, just as a referance

REALLY? What good is that? I thought the idea behind Mig was to be fast?:confused:
I'll try your way tomorrow morning. I was just setting here thinking, I should have tried it like 6010, with a whip back and forth motion.
 
/ Let's see your welds... #62  
I thought the same thing once I figured it out. Welds look cool, but like I said yesterday, there definateley is a time and place for that procedure very very slow. Would definateley help put a staple in big dollar, eye catcher jobs tho.
 
/ Let's see your welds... #63  
Being so slow is the key to the perfect uniformity, you have so much time to watch everything going on. Thats how its possible to pull off that robotic look. When I first caught wind of this (outcome) of mig welding I was scratching my head saying wtf, how is this possible with a mig welder, no one could be that fast and that accurate for that long, no way! Maybe on luck once in a while, with a scrap pile of steel behind you. But after a little trial and error and a little research, Bingo! Mega slow, then it made sense on how to pull it off for 2ft at a time, every time ;)
 
/ Let's see your welds... #64  
I guess I'll have to change the way I think.:laughing: When I set up a Mig welder to weld, I set it up to run as hot and as fast as I can handle it. I've taken hundreds of Mig tests, only failed one, and that was in the mid 1970s. I ran a 1-inch 3-G too cold, I swore it would never happen again, to date it hasn't!;)
 
/ Let's see your welds... #65  
That is very interesting! We use to have a saying, UT inspection is only as good as the man behind the scope. A good UT man is really helpful for repair work, but only if his trigonometry is up to snuff. That way we don't go digging around all over god's creation.

UT is very tedious. Even when you're set up correctly you most like will never see anything unless there's a problem. You can test for hours on end looking a a display showing nothing forcing you to return to your calibration block just so you can double check everything is working correctly, a sanity check. Of course I didn't use UT to do welds and I would guess that it would pick up on things like undercut.

PT is simple. With RT unless you really screw up on how hot your source is or developing time for the film you always shows something. MT is also pretty easy, especially if you are doing fluorescent.
 
/ Let's see your welds... #66  
crazyal said:
UT is very tedious. Even when you're set up correctly you most like will never see anything unless there's a problem. You can test for hours on end looking a a display showing nothing forcing you to return to your calibration block just so you can double check everything is working correctly, a sanity check. Of course I didn't use UT to do welds and I would guess that it would pick up on things like undercut.

PT is simple. With RT unless you really screw up on how hot your source is or developing time for the film you always shows something. MT is also pretty easy, especially if you are doing fluorescent.

You hit the nail in the head Al. I am a level 2 UT, my job sent me for a one week school a long time ago through a company called Lucious Pitkin, and I passed all my tests and got certified, but do you want to talk about mass confusion, I left there dumbfounded, like what the heck did I just learn. This instructor couldnt prove anything on either end of anything.
 
/ Let's see your welds... #67  
So, with the slow mig, you're setting the wire speed as slow as you can, and cranking the volts up?
 
/ Let's see your welds... #68  
Very good thread you got here and I am enjoying reading it. I'm probably one of those guys that just ran out and bought a welder so they can weld. Some of you guys are professionals so if you would put up with me as I learn, I'd appreciated it.

I do have some pictures I took of some stuff I welded last summer that I know was too thick and I didn't do adequate preparation with. I am not good at disciplining myself to go all the way to get an optimum weld which I should do.

It has been cold out there in the shop and I haven't done any welding for a long time. I should go out and make sure my wire isn't rusted and practice a bit.

Welder is a Lincoln 180C, 240V Mig welder with C02 Shielding gas and I think 0.035 wire. Don't remember what I had it turned up to but probably turned all the way up.
Single pass on about 1/4 inch channel.
IMG_0013.JPG

This is, if I remember right, three passes on 1/4 and 3/4 steel. I didn't bevel the 3/4 enough to get full penetration with multiple pass.
4.jpg
 
/ Let's see your welds... #69  
Getting closer! I started out at 16-volts, which gave a little more definition, but I thought it was way too cold. I ran these at 18-volts, 77-amps, wire speed was at 187-1/2 inches per minute, (measured). Even these seem cold to me! I checked Lincoln's site to see if this was anywhere close to factory recommendations. For .030 L-56 Lincoln has a minimum of 17-volts, and 35-amps! I was shocked at this!:shocked:

The travel speed on this is so slow, I fell asleep three times while making this 7-inch long weld! :laughing:
 

Attachments

  • 1A.JPG
    1A.JPG
    232.7 KB · Views: 244
  • 1B.JPG
    1B.JPG
    229.2 KB · Views: 230
  • 1C.JPG
    1C.JPG
    242.1 KB · Views: 257
  • 1D.JPG
    1D.JPG
    234.3 KB · Views: 228
/ Let's see your welds... #70  
I never had much trouble getting that " fishscale" look. It is all in the type of weave you use. The >>> look is probabally just from a typical u shaped or z-weave. You can run the amps hotter and still get the "tig" look if you do the lower case e pattern. The problem is doing it SOOO consistantly.

Here is a pics of some I just did. Miller 350P welder and .035 wire. Volts @ 15.8 and wire @ 160 FPM. This was 1/8" cold roll. And I too feel it isnt hot enough. I tried it colder and slower as per suggestions here. I normally would have welded this somewhere around 18.5V and 200-230 FPM.

The second pic is the same size metal, only set up to pulse. Wire speed @ 280. (there is no voltage/amperage adjustment on pulsed). This is about 2x's to 3x's faster travel speed than short curcuit welds.:thumbsup: And **** strong too.

The last two pics was a little TIG'ing on some stainless. Welding 1/4" bar to 14ga sheet for a guard.
 

Attachments

  • mig.jpeg
    mig.jpeg
    111.4 KB · Views: 265
  • pulse.jpeg
    pulse.jpeg
    605.7 KB · Views: 273
  • tig.jpeg
    tig.jpeg
    457.7 KB · Views: 309
  • tig2.jpeg
    tig2.jpeg
    400.5 KB · Views: 380
/ Let's see your welds... #71  
Here is the others I did. I didn't catch the amps on some of these, the Invertec only holds the amp reading for a few seconds and I always forget to look!
 

Attachments

  • A.JPG
    A.JPG
    220.3 KB · Views: 240
  • B.JPG
    B.JPG
    232.8 KB · Views: 208
  • C.JPG
    C.JPG
    238.1 KB · Views: 215
  • D.JPG
    D.JPG
    231.3 KB · Views: 202
/ Let's see your welds... #72  
Shield Arc said:
Here is the others I did. I didn't catch the amps on some of these, the Invertec only holds the amp reading for a few seconds and I always forget to look!http://imageshack.us/photo/my-images/35/mur.gif/

Pretty cool right bud. I like it when someone throws a stick in the spokes once in a while. Like I said bud, time and place for it, but I can use it.
 
/ Let's see your welds... #73  
You hit the nail in the head Al. I am a level 2 UT, my job sent me for a one week school a long time ago through a company called Lucious Pitkin, and I passed all my tests and got certified, but do you want to talk about mass confusion, I left there dumbfounded, like what the heck did I just learn. This instructor couldnt prove anything on either end of anything.

I got several of my level 2 certs in CT at a place called Hellier. The owner of the company I worked for came from the air force with decades of experience and is a level 3 so I was lucky and got plenty of hands on experience.

It's no different than the HAZWOPER training I got. Too much information crammed into a short period of time.
 
/ Let's see your welds... #74  
A few of the welds I did when building my snatch block for the logging winch.

1/8 7014 @ 115 amps DC

DSC01368.jpg


DSC01369.jpg


Sean
 
/ Let's see your welds... #75  
Here are a few of when I build a 3-point bale spear a year and a half ago. This was the first project I had welded, and the only welding I had done before was practicing on scraps a few times to get it figured out.
I'm pretty sure it was 1/8 inch 6011 rod, with a 220 volt Lincoln AC/DC set to 90amp AC. While a lot of welds didn't look that great, I felt they weren't too bad for my first time, and by the time I finished it I had a few that looked pretty good, to me anyway.;)

Ed
 

Attachments

  • 3-point bale spear part 4 035.JPG
    3-point bale spear part 4 035.JPG
    816.5 KB · Views: 249
  • 3-point bale spear part 5 006.JPG
    3-point bale spear part 5 006.JPG
    759.1 KB · Views: 267
  • 3-point bale spear part 4 017.JPG
    3-point bale spear part 4 017.JPG
    817.9 KB · Views: 270
  • 3-point bale spear part 4 005.JPG
    3-point bale spear part 4 005.JPG
    722.7 KB · Views: 249
/ Let's see your welds... #76  
Here are some from last June on the bucket project. The reinforcing piece I put in just under the latch holes of the SSQA plate I welded on my old bucket after I got it cleaned off. It was cut at about a 45 degree angle, and I made multiple passes. I just wanted some more strength near those holes as I backdrag to smooth out dirt and gravel a lot Notice the smooth MIG welds on the SSQA plate, I did not make them, they are factory. The close up of the long bead is the top reinforcing plate I welded onto the top of the bucket, and the third one of course is one of the hooks welded onto that plate. Pic 4 is the finished product. My rod was 7018 125 amps Welder Everlast PA160


James K0UA
 

Attachments

  • DSCF0450.JPG
    DSCF0450.JPG
    439.2 KB · Views: 262
  • DSCF0459.JPG
    DSCF0459.JPG
    438.5 KB · Views: 217
  • DSCF0463.JPG
    DSCF0463.JPG
    440.1 KB · Views: 224
  • DSCF0468.JPG
    DSCF0468.JPG
    440.5 KB · Views: 191
/ Let's see your welds...
  • Thread Starter
#77  
On these beautiful TIG welds, what type and power of welder are you using? Is it water cooled?
 
/ Let's see your welds... #78  
I never had much trouble getting that " fishscale" look. It is all in the type of weave you use. The >>> look is probabally just from a typical u shaped or z-weave. You can run the amps hotter and still get the "tig" look if you do the lower case e pattern. The problem is doing it SOOO consistantly.

Here is a pics of some I just did. Miller 350P welder and .035 wire. Volts @ 15.8 and wire @ 160 FPM. This was 1/8" cold roll. And I too feel it isnt hot enough. I tried it colder and slower as per suggestions here. I normally would have welded this somewhere around 18.5V and 200-230 FPM.

The second pic is the same size metal, only set up to pulse. Wire speed @ 280. (there is no voltage/amperage adjustment on pulsed). This is about 2x's to 3x's faster travel speed than short curcuit welds.:thumbsup: And **** strong too.

The last two pics was a little TIG'ing on some stainless. Welding 1/4" bar to 14ga sheet for a guard.
Sadly only the second photo appears to have good fusion to the base metals. Running too cold with MIG and trying to get that fish scale look may look cool, but you run a very high probability of getting cold lap between those scales and non fusion on the sides which the other 3 photos show distinctly on the top edge more prominently than anywhere else.
If you guys want good strong welds, try to make the ripples closer together and the weld as smooth as possible, keep the puddle molten as you weave back and forth, if it cools and you are adding molten metal to the cold puddle, you will have more issues with cold lap than if you keep it molten like the spray arc welding. This isnt always possible when in vertical and overhead, but run it as hot as you can without sags or undercut on the sides.

Welds in general and TIG welds especially should be rather slightly concave , to flat with sides tied in well to the base metal when joining plate rather than convex. The extra metal humped up in the middle contributes nothing to the strength of the weld and in actuality creates internal stresses in the weld that will contribute to cracking. Cap passes on pipe are generally limited to about 1/16" high max with additional 1/16 allow for really thick materials but regardless of thickness, never more than 1/8" above the base metal and they must be fused to the base metal completely.
 
/ Let's see your welds... #80  
Sadly only the second photo appears to have good fusion to the base metals. Running too cold with MIG and trying to get that fish scale look may look cool, but you run a very high probability of getting cold lap between those scales and non fusion on the sides which the other 3 photos show distinctly on the top edge more prominently than anywhere else.

I agree that the first pic doesnt have as good of fusion as the second. But that ISNT how I normally weld. For sake of trying....I was trying to get that "row of dimes" look that shieldarc was also trying to duplicate. The second pic is pulsed and everyone has their preference as to what the "like" as far as looks....And I personally like the look of a pulsed or spray weld:thumbsup:


Welds in general and TIG welds especially should be rather slightly concave , to flat with sides tied in well to the base metal when joining plate rather than convex.

If you look closely, the las two pics of the TIG welds they ARE concave slightly:thumbsup: Those welds arent going anywere. The base plate that the bar was welded to is only 14ga SS. I have played around with the TIG and done break tests on different joints enough to know that TIG welds are TOUGH to break. A butt weld on two 1/8" plates with a single pass on one side only, and bending in the weak direction (back overtop of the weld) and I can bend it into a tight U shape and then flatten it back out and no cracking at all.
:thumbsup:
 

Marketplace Items

CASE TV380 SKID STEER (A62129)
CASE TV380 SKID...
2015 GMC 3500 HD 4x4 Crew Cab Pickup Truck (A60352)
2015 GMC 3500 HD...
2013 MACK GU713 CAB AND CHASSIS (A60736)
2013 MACK GU713...
MORBARK WOOD HOG 6400 XT HORIZONTAL GRINDER (A60429)
MORBARK WOOD HOG...
2019 GALYEAN EQUIPMENT CO. 150BBL STEEL (A58214)
2019 GALYEAN...
2004 INTERNATIONAL 7400 20FT TANDEM AXLE FLAT BED (A59906)
2004 INTERNATIONAL...
 
Top