Repairing MF35 Utility Hydraulics

   / Repairing MF35 Utility Hydraulics
  • Thread Starter
#41  
1) Starting to fit the cylinders, you have to have the cam rotated JUST right in order to get it all in place, carefully pinching the piston rings to get them to fit into the cylinders. Stagger them so you can fit one full side at a time.
2)Doing the same to the other side
3) Had to flip it over, pic is blurry, sorry!
4) Both cylinders fitted. This is a bit of a fiddly job
5) same
6) put the front suction plate back on
 

Attachments

  • IMG_8503.JPG
    IMG_8503.JPG
    546.1 KB · Views: 319
  • IMG_8504.JPG
    IMG_8504.JPG
    412.6 KB · Views: 255
  • IMG_8505.JPG
    IMG_8505.JPG
    661.2 KB · Views: 270
  • IMG_8506.JPG
    IMG_8506.JPG
    701.1 KB · Views: 342
  • IMG_8507.JPG
    IMG_8507.JPG
    605.9 KB · Views: 278
  • IMG_8511.JPG
    IMG_8511.JPG
    602.8 KB · Views: 459
   / Repairing MF35 Utility Hydraulics
  • Thread Starter
#42  
I had to refit the control valve as mentioned earlier, here's the back side of it, the oscillator assembly. It has a large circular hole in one end that attaches to one of the cam blocks, and the other end attaches to the oscillator assembly, It's primary function, from what I understand, is to prevent the control valve from ever sticking by constantly rocking it back and forth as the cam rotates. The spring was blown out of mine, rusted in half, and the the circlip and end cap were gone. The end cap piece that helps hold the spring is NLA according to my dealer, so I used a washer that fit very snugly. On to the pics:

1) Where the control valve spring goes, in the oscillator assembly
2) The brand new control valve spring. It's a bit finicky to get it in place, but not terribly difficult. Having your hands covered in hydraulic oil certainly doesn't help!
3)All fitted. Behind the spring is a small rod that fits into the control valve, which is how the control valve gets it's spring tension
4) Here you can see the control valve rod pressing perfectly against it's roller. Success!
 

Attachments

  • IMG_8535.JPG
    IMG_8535.JPG
    420.2 KB · Views: 275
  • IMG_8533.JPG
    IMG_8533.JPG
    432.2 KB · Views: 272
  • IMG_8532.JPG
    IMG_8532.JPG
    597.3 KB · Views: 276
  • IMG_8530.JPG
    IMG_8530.JPG
    470.1 KB · Views: 427
   / Repairing MF35 Utility Hydraulics
  • Thread Starter
#43  
Now that the pump is done and ready to go back in, I turned my attention elsewhere. I had to replace the o-ring on the PTO housing and the PTO seal as well. Note: the 50yr old seal is MUCH better quality than the one I got from the dealer. It's got a metal housing, which makes it abundantly easier to press into place. I made the new one work, but it wasn't as easy as the old one probably was. I ended up using the original steel cased seal to help press the new one in place.

1) grab some large sockets and chuck it up in the vice. One to fit the diameter of the seal, one of the seal housing
2) turn carefully until it pops out until you have just the housing, now's a great time to clean out the threads! (no pto shaft in your way!)
3)old seal
4)same
5)cleaned out the threads of the PTO housing
6) old seal vs new
7) again
 

Attachments

  • IMG_8656.JPG
    IMG_8656.JPG
    673.3 KB · Views: 271
  • IMG_8655.JPG
    IMG_8655.JPG
    707.3 KB · Views: 264
  • IMG_8654.JPG
    IMG_8654.JPG
    703.6 KB · Views: 332
  • IMG_8653.JPG
    IMG_8653.JPG
    565.4 KB · Views: 443
  • IMG_8652.JPG
    IMG_8652.JPG
    580.5 KB · Views: 325
  • IMG_8651.JPG
    IMG_8651.JPG
    611 KB · Views: 252
  • IMG_8650.JPG
    IMG_8650.JPG
    562.5 KB · Views: 255
   / Repairing MF35 Utility Hydraulics
  • Thread Starter
#44  
Last update for the day as I don't have pics of the rest yet:

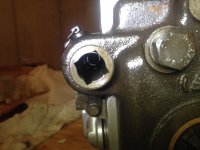
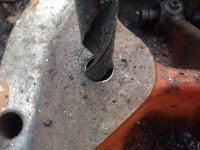
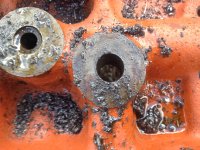
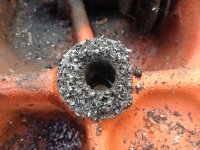
The original lift cylinder on my Massey 35 Utility was threaded for 1/2" studs. They're small, they broke, which is the whole reason I was able to get the tractor so cheap (no 3pt lift and it didn't run), looks to me like someone lifted something too heavy and bounced it on a bump. I can see on the axle housing where the 3pt lift arms contacted the axle. Big dent in the steel. So when I pulled it apart and the lift cylinder wasn't even attached to the top cover plate, I knew I needed to dig it all out and repair. The new lift cylinder I bought is drilled for 9/16" studs, much sturdier. They're only 1/16" of an inch larger, but they LOOK huge in comparison! I'll get a 1/2" vs 9/16" comparison shot next time I get to work on the machine. In any case, I had to drill out the top hydraulic cover plate on which the cylinder is mounted for the larger studs to fit. Pretty easy with a good drill bit, now I may need to just ream the holes a touch for an easier fit. Pics of that to follow:

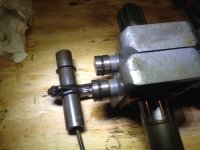
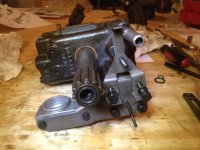
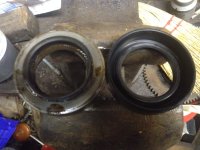
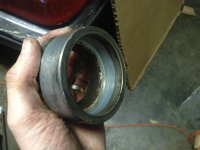
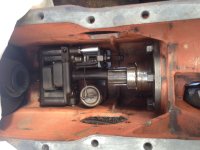
1) finished up the hydraulic pump and reinstalled, this pic before I put the drive shaft and sheer collar back in.
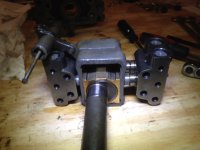
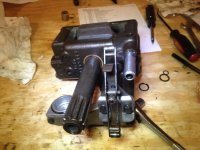
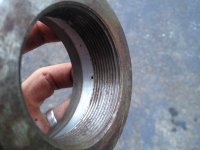
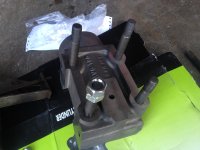
2) Drilling the cover plate
3) same
4) same
5) same
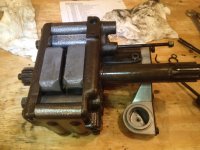
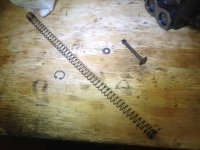
6) last but not least, new hydraulic lift cylinder, fitted with new 9/16" studs. I still have to install the piston/rings.

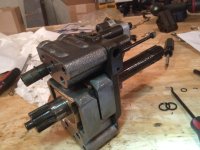
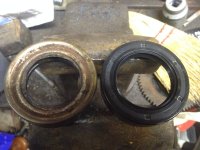
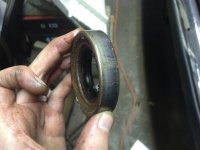
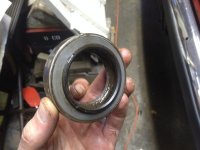
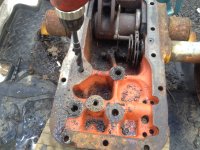
I also degreased the inside of the cover plate (pic1) and hosed it all out. Much cleaner now. I removed the control levers as well because they're pretty rusty and the levers don't slide on their slides smoothly, although everything inside is free. More updates to follow, but probably not for a week!

For those of you just tuning in, thanks for reading. If anyone's got any suggestions, feel free to let me know! Also, depending on how many posts per page you've got the forum set to, there are new pics on the last page as well! Enjoy!
 

Attachments

  • IMG_8669.JPG
    IMG_8669.JPG
    798.1 KB · Views: 283
  • IMG_8668.JPG
    IMG_8668.JPG
    878.5 KB · Views: 261
  • IMG_8667.JPG
    IMG_8667.JPG
    834 KB · Views: 752
  • IMG_8666.JPG
    IMG_8666.JPG
    725.1 KB · Views: 261
  • IMG_8665.JPG
    IMG_8665.JPG
    799.7 KB · Views: 793
  • IMG_8664.JPG
    IMG_8664.JPG
    622.6 KB · Views: 515
  • IMG_8670.jpg
    IMG_8670.jpg
    548.4 KB · Views: 334
   / Repairing MF35 Utility Hydraulics
  • Thread Starter
#45  
Alright, fellas. I've hit a bump in the road again. Need some help. I rebuilt the hydraulic pump, reinstalled, new o-rings and gaskets everywhere, filled with 5gal of hydraulic oil and fired up the tractor. (only five gallons so I can keep one of the side plates off to see inside) I've made all my adjustments to the hydraulic control levers (position and draft) as well as the final adjustment to the lock-nut on the control valve. When I fire up the tractor, I see fluid swirling around inside the case as if the pump is operating, but still no 3pt lift.

After all of this, I hate to admit it, but I'm frustrated. I was sure hoping that I'd fire it up and the three point hitch would magically work again. Tomorrow if it's not raining, I plan to pull the stand pipe to see if the pump is actually working. I wish I had someone in my area that knows more about these tractors than I do.

When I try to operate the control valve with a screwdriver, it feels very tight while the tractor is running. However, when I turn the machine off the valve moves a bit more freely. I'm fairly certain I did the adjustments correctly, as I followed the Vintage Tractor Engineer DVD.

So, any advice for me?
 
   / Repairing MF35 Utility Hydraulics #46  
G'day I would say the standpipe is not in correctly

Jon
 
   / Repairing MF35 Utility Hydraulics
  • Thread Starter
#47  
G'day I would say the standpipe is not in correctly

Jon

Hey Jon, I'll pull it back out once it stops raining here, been raining non stop since last night! Hopefully it's something simple like that! Thanks for the suggestion.

-Chris
 
   / Repairing MF35 Utility Hydraulics #48  
Hey Jon, I'll pull it back out once it stops raining here, been raining non stop since last night! Hopefully it's something simple like that! Thanks for the suggestion.

-Chris
Any luck on this?
 
   / Repairing MF35 Utility Hydraulics
  • Thread Starter
#49  
Not yet, I haven't had a chance to get back to the tractor, life keeps getting in the way! Hopefully I'll get to poke around on it a bit this weekend.
 
   / Repairing MF35 Utility Hydraulics #50  
Sorry ... wasn't following lately due to no email alerts until June 6th, which I finally saw today :ashamed:
First thing I thought of was the standpipe as well, but your comment that the control valve seems tighter when the engine is runnung (pump is driven) so one reasonably suspects there is restriction to the pump output. That said, I would certainly check it anyway before doing anything else.
I'm not much help beyond that - so long since I've worked on one! :confused:
Remember ... sometimes Google is your best friend!!! :laughing:
 

Tractor & Equipment Auctions

2012 VOLVO VNL TANDEM AXLE SLEEPER (A51222)
2012 VOLVO VNL...
2018 KUBOTA MS-091 TRACTOR (A51243)
2018 KUBOTA MS-091...
2000 Ford F-650 TMA Attenuator Truck (A50323)
2000 Ford F-650...
2016 FORD F-250 SUPER DUTY SERVICE TRUCK (A51243)
2016 FORD F-250...
(4) 24' Stand Alone Texas Panels (A50515)
(4) 24' Stand...
2019 Chevrolet Silverado 1500 4x4 Crew Cab Pickup Truck (A50323)
2019 Chevrolet...
 
Top