Repairing MF35 Utility Hydraulics

   / Repairing MF35 Utility Hydraulics
  • Thread Starter
#31  
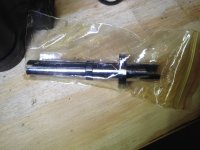
That's a great idea, however for my purposes I think that the factory cylinder will be more than adequate as long as the studs are strong enough to make it stay put. According to the part number in my manual- I cross-referenced it to what Yesterday's Tractor sells, the new cylinder that Massey Ferguson supplies is drilled for 9/16 studs.

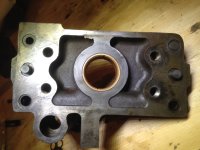
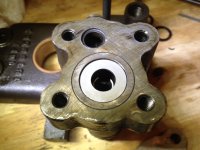
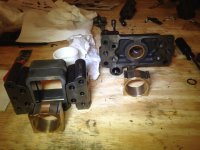
I placed an order for that cylinder along with new rings to fit to my current piston. I also got all they hydraulic fluid I need today so once I'm done reassembling the hyd. pump, and reinstalling it I should be about good to go.
 
   / Repairing MF35 Utility Hydraulics #32  
You are correct - why fiddle with it when it will work quite adequately once it's back in good condition? They were designed correctly in the beginning. Every 35 I've ever known hasn't been lacking in that are unless it just needed some repairs and rejuvenation.
 
   / Repairing MF35 Utility Hydraulics
  • Thread Starter
#33  
Right on, at this rate, basically every seal and o-ring in the rear end will be replaced, except for axle seals. A cool thing I noticed when I got my pump rebuild kit, it comes with seals and o-rings for EVERYWHERE in the rear hydraulic assembly. It even came with the o-rings for the lift arms, which I had ordered separately. Now I have spares, as it was all special order. Oh well!

Next up- PTO shaft seal and o-ring. Can't find them for sale online anywhere so I'll have to go through the dealer.

I got to thinking, I was 99% sure my parts manual says 9/16 studs for the lift cylinder, but now I've got to double check. If I can just order later studs for the 135 series that are already 9/16, it would save me the effort of finding an exact match of size and length at the local parts stores. I'll have to check when I get home...
 
   / Repairing MF35 Utility Hydraulics
  • Thread Starter
#34  
PTO seal and o-ring ordered, and I put in an order for the 135 studs, as they're 9/16" compared to my 1/2" factory (broken) studs. The new hydraulic lift cylinder is en route, pre-drilled for 9/16" studs too. Once the rest of the parts come in I'll be in good shape to start re-assembly.

I'll try to take some decent pictures of reassembling the hydraulic pump.

Lastly, in regards to my previous statement in the last post- I looked again, my parts manual does state 1/2" studs. Not sure why I thought they were listed as 9/16.

I also procured some old forklift forks to adapt to my bucket for moving firewood, I just have to fabricate the mounts for it and make sure to attach them in such a way that they won't bent the bucket.
 
   / Repairing MF35 Utility Hydraulics #35  
All sounds good to me. :thumbsup:

I'm waiting for a pair of forks too, from a friend of mine. He's keeping the mounting plate as well so their width will be adjustable.
I'm not sure yet how I will mount them either. The bucket has quite a strong floor, also, I have a 3PL frame I could weld to their mounting plate. With some lateral thinking I might be able to both fit them to the loader bucket and also use them on the 3PL of our 135. I will make that "Plan A" and see how things work out. Maybe a pair of strong brackets I can quickly bolt to the floor of the bucket, then two pins through them to the 3pl lower link holes. Add a piece of box-tube welded to the top of the bucket with another pin to the top link holes - might just work! :confused:
 
   / Repairing MF35 Utility Hydraulics
  • Thread Starter
#37  
Slowly, my parts came in from Yesterday's Tractors. However, their site says order (1) for a set of three rings for the hyd lift pump. I did just that and they sent me one ring. Waiting for them to open so I can call and straighten it out.

Hoping for more progress tonight!

Update: Just got off the phone with Yesterday's Tractors- fantastic customer service, missing parts on their way. :) (CJ in the parts department was VERY helpful!)
 
Last edited:
   / Repairing MF35 Utility Hydraulics #38  
Sounds like it cost you a day or two, but human error is a factor that's difficult to eradicate. They'll arrive shortly & you'll be back into it!
 
   / Repairing MF35 Utility Hydraulics
  • Thread Starter
#39  
I finally finished putting the hydraulic pump back together. I took some better pictures this time around, although it's not a complete walk-through because my hands were constantly covered in hydraulic oil. I'll post pics when time allows. Pump is ready to drop in as soon as I get the PTO o-ring and oil seal, then I'll reinstall the PTO shaft, main driveshaft and sheer collar, clean the hydraulic cover plate and drill for 9/16" studs, install the cylinder, replace some o-rings, make adjustments and fill with oil. Fingers crossed, the end is finally in sight!

I wish I had more time to work on it, but being that the machine is not at my house I have to take whatever sliver of time I can find on weekends.

PS- my grass is getting quite tall, I mowed the other day with a riding mower that I bought for $50 at a yard sale. It works, it's slow, and slips in anything past gear 3 in high range. Probably needs a new belt. I'll tell ya though, I was Jonesin' for my flail mower- 8ft John Deere 25A with finish knives. I'd have been done with the whole lot in no time!

After the tractor is back together, the next (and hopefully much faster!) project is to weld in a bit of steel plate to reinforce the 25A, replace the belt and any knives that have seen better days, change gear oil in the gearbox, and finally get to give it a go!
 
   / Repairing MF35 Utility Hydraulics
  • Thread Starter
#40  
Been awhile since my last update, life gets busy! Here we go:

I finally got the hydraulic pump put back together with new cylinders, pistons, o-rings, brand new control valve assembly, and lots of meticulous cleaning. Torqued the four main bolts down to 55ft. lbs as shown in the repair manual. I'm going to break this up into several posts because I have lots of pictures, as promised. This set shows the pump going back together after cleaning.

1) cleaned out end plate
2 and 3) new control valve
4) control valve fitted into it's orifice
5) pistons and cam blocks as they came out of the rebuild kit, had to take them apart anyway
6) blocks go onto the cam first
 

Attachments

  • IMG_8494.JPG
    IMG_8494.JPG
    576 KB · Views: 168
  • IMG_8497.JPG
    IMG_8497.JPG
    604.7 KB · Views: 191
  • IMG_8498.JPG
    IMG_8498.JPG
    522.9 KB · Views: 171
  • IMG_8499.JPG
    IMG_8499.JPG
    535.1 KB · Views: 178
  • IMG_8500.JPG
    IMG_8500.JPG
    548.6 KB · Views: 184
  • IMG_8501.JPG
    IMG_8501.JPG
    458.1 KB · Views: 190

Tractor & Equipment Auctions

2016 CATERPILLAR 259D SKID STEER (A51242)
2016 CATERPILLAR...
2016 CATERPILLAR TL642C TELESCOPIC FORKLIFT (A51242)
2016 CATERPILLAR...
2013 John Deere 824K (A52128)
2013 John Deere...
2018 PETERBILT 579 TANDEM AXLE SLEEPER (A51222)
2018 PETERBILT 579...
2006 Volvo VNL (A52128)
2006 Volvo VNL...
1240 (A50490)
1240 (A50490)
 
Top