Pole barn purlin help!

   / Pole barn purlin help! #1  

inane2

Silver Member
Joined
Feb 26, 2012
Messages
137
Location
Kentucky
Tractor
NH T4.75 Powerstar, Kubota KX161-3 & SVL75-2
Hey guys,

Running into a bit of a problem "remodeling" a pole barn on my property.

I'm working on a 96' x 60' pole barn built in 1997 (former horse riding arena). 6x6 posts 6' OC (sidewalls), 6x6 posts 12' OC (endwalls), 2x6x12 girts 30" OC, 2x4x14 purlins 24" OC and the walls are 14' tall. The roof currently has 2" vinyl reinforced insulation (6' rolls). I want to replace all the metal (color change), replace the insulation and try to eliminate the leaks. I'm replacing the old 24" fiberglass ridgecap skylight with a metal ridgecap which should help with most of the leaks. The roof is almost 32' long on each side. The roof currently has two 16' panels overlapped but I'm going back with a single sheet.

The barn has had water damage over the years due to bad trim work, too small gutters (3"), fiberglass skylights and nails working loose. All of the fasteners are nails with washers, not screws. Insulation is rotted and damaged in areas.

I have all of the metal, trim, fasteners, precut insulation and a wagon load of lumber ready to go. I'm very familiar with construction and with pole barns. There is a smaller 36' x 48' barn attached to this one that we've already completed. I simply don't have the time to effectively tackle the larger barn.

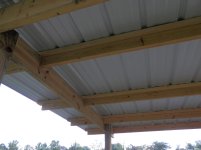
My problem is I can't find anyone really interested in doing the work for me. I'm in Kentucky and we are full of pole barns. Our big name pole barn companies aren't interested in sending a crew out because I didn't buy my materials from them. My supplier has provided me with names but there is one thing seems to make everyone lose interest: the roof purlins (2x4x14´) are mounted on edge. One purlin crosses three trusses and then overlaps the next purlin by 2'. Then, the next purlin is staggered above or below the previous one. The purlins are fastened with a single 6 60D pole barn nail at each truss. The purlins are fastened where they overlap with some 16D's I believe. Again, these are spanning 6' on a 3:12 pitch roof, 24" OC. No new construction methods or anything, just the purlins are on edge. I had my new insulation in 4' rolls to make it easier to see the purlins.

My thoughts: remove 5 panels at a time to open up 15'. This would allow you to replace any purlins that need it. Roll a 4' piece of insulation down, fasten it, lay a 3' panel of metal down and fasten it. Repeat. After the fourth panel is down, start all over and be ready to change lines with your fasteners as the purlins have shifted.

I'm getting some interested crews but the purlins seem to be a major concern. I realize you have 1.5" to hit with a screw. Everyone who has come out to the barn gets locked in on the purlins and wants to modify them in some way (doubling them up, laying them flat, adding plywood). This is a stout barn with a very good, solid core. I want to leave the purlins as they are, on edge. There is 256 purlins total and probably 50 or so need to be replaced because of rotted ends (mostly the ones on the ends of the barn).

The other problem is I'm getting references such as "Johnny" the guy down the road that can "do anything". For this project and the expense involved, I'd rather go with someone who is familiar with metal and pole barns.

1. Any thoughts, comments, suggestions?
2. Secondly, would you guys use closure strips on the ridge cap? This barn is not heated / cooled, has no exterior soffit and no gable vents / fans.

Thanks!
 
   / Pole barn purlin help! #2  
Simple to just leave the ones there and double up.. Why is this a concern for you? Weight? The gable end ends :))) could be cut back to the last truss so only one purlin end is over hanging.
 
   / Pole barn purlin help!
  • Thread Starter
#3  
Thanks midniteoyl.

I'm good with doubling them up. That provides 3" of material to hit (as long as you don't hit the crack between the two). They'll be using 1.5" screws.

I'm good with this if it will add confidence to the crew. It will be extra material cost and time, but I'm fine with this opposed to laying them all flat. Believe me, this is the most reasonable request I've gotten as how to deal with it.

I guess I'm just shocked at how the purlins being on edge is such an outstanding issue. I've been there, done it. Seems it just makes you pay more attention to what you're doing.
 
   / Pole barn purlin help! #4  
Ya.. I like them on edge personally, but it seem most crews want them flat. I dont see it myself other than allowing more area to miss with the nails. You should see the amount of holes in my roof...
 
   / Pole barn purlin help! #5  
go find some amish
 
   / Pole barn purlin help!
  • Thread Starter
#6  
The Amish is a very good suggestion. There are some that advertise on CL but they are a piece away from me.
 
Last edited:
   / Pole barn purlin help!
  • Thread Starter
#7  
image-679565276.jpg

Barn in question ....
 
   / Pole barn purlin help! #8  
This is just my round bale feeder but I put a 2x4 on edge between the "trusses" and one flat across the top to make a T.
 

Attachments

  • P7160729.jpg
    P7160729.jpg
    449.4 KB · Views: 4,776
  • P7160730.jpg
    P7160730.jpg
    633.3 KB · Views: 1,132
   / Pole barn purlin help! #9  
Until I went to work delivering barn materials for a builder that had 10-14 crews on, I had not seen 2x4'x on edge for purlins but that is all that that company did and they did alot of buildings. Been to long to remember how they laid them out and fastened them. I would maybe consider some sort of Simpson Strong Tie clips where to purlins fasten to the endwalls to resist uplift from high winds. Maybe replace every other rotted end with a 2x long enough to overlap at the first truss but go longer to catch a couple of trusses in between.

I thought most insulation was laid horizontal with a couple of inches of overlap so any moisture would follow to the eave. I don't know if going in line with the roof tin would be an issue or not? I have seen builders roll out enough insulation horizontally to secure a few panels but not all the way so that the wind would pick it up. They would have several rolls stepped out across the roof wtih the required overlap. I don't remember if they had to secure the rolls or not as they worked across the roof to keep them from taking off.

I like a vented peak but would always use some coated chicken wire under the to limit bird nesting. With no insulation, you would have moisture but minimally.

Be vary wary of do anything Johnny. I have had "Johnny" highly recommended by his buddy. "Johnny meant well but did not know pole barn methods from his backside. That is not to say that your "Johnny" is that way just be careful.
 
   / Pole barn purlin help! #10  
I re-tinned a pole building that was built in the mid 70's. From the ground, before we started to tear off the old tin, the purlins (on edge btw) looked aweful. The original tin was nailed on and leaked in around 3500 places (every frackin' nail basically). we figured that the leaking over the years had ruined all the purlins and they did look bad. However, once we got the old tin off and got up there, none of them were bad. We walked on the roof as we tinned it, and none of the purlins had any issue. I was amazed. Now, the wall girts were a different story. They were damaged from machinery running into them and breaking them, and since we were now constructin wainscott on this building, the girts were essentially all in the wrong places, and half of them broken anyway. so all of those were removed and replaced with new. Cheap to do really, on this 32 x 50 building, and made interior much cleaner looking too. Later I reused every single removed 2x4 for another building re-roof.
My re-tinned building did not ever have insulation, so maybe that is why the purlins survived al the years of leaking nails, because they were allowed to dry out between rains. the insulation maybe held the water close to your 2x4s and ruined them. Anyway, in case you havent actually touched them yet, they may look bad from the ground due to water staining, but still be serviceable.
We have been putting a layer of Tyvek housewrap on top of the purlins, under the tin screwed on. It gives us a second barrier in case any leaks develop. If there was a leak, the water would run down to the vented soffit instead of dripping inside the building. This includes condensation, if any ever ocurrs.

Have you put an ad in the papers for help? Maybe if you did you could kind of interview the reponders and choose one to work with/for you.
 
   / Pole barn purlin help! #11  
I re-tinned a pole building that was built in the mid 70's. From the ground, before we started to tear off the old tin, the purlins (on edge btw) looked aweful. The original tin was nailed on and leaked in around 3500 places (every frackin' nail basically). we figured that the leaking over the years had ruined all the purlins and they did look bad. However, once we got the old tin off and got up there, none of them were bad. We walked on the roof as we tinned it, and none of the purlins had any issue. I was amazed. Now, the wall girts were a different story. They were damaged from machinery running into them and breaking them, and since we were now constructin wainscott on this building, the girts were essentially all in the wrong places, and half of them broken anyway. so all of those were removed and replaced with new. Cheap to do really, on this 32 x 50 building, and made interior much cleaner looking too. Later I reused every single removed 2x4 for another building re-roof.
My re-tinned building did not ever have insulation, so maybe that is why the purlins survived al the years of leaking nails, because they were allowed to dry out between rains. the insulation maybe held the water close to your 2x4s and ruined them. Anyway, in case you havent actually touched them yet, they may look bad from the ground due to water staining, but still be serviceable.
We have been putting a layer of Tyvek housewrap on top of the purlins, under the tin screwed on. It gives us a second barrier in case any leaks develop. If there was a leak, the water would run down to the vented soffit instead of dripping inside the building. This includes condensation, if any ever ocurrs.

Have you put an ad in the papers for help? Maybe if you did you could kind of interview the reponders and choose one to work with/for you.
I like bubble wrap with foil on both sides under the roof tin. Cuts the rain noise alot as well as the condensation. Relatively inexpensive and available in six foot widths.
 
   / Pole barn purlin help! #12  
I don't have a lot of experience with this, but have done a few. Unless the trusses are 4 feet apart, you have to have the roof purlins on edge to have any long lasting strength. With a 6ft spacing, you are fine with 2x4 on edge, which is normal and proper. Putting them flat will cause them to sag over time and anybody who suggests that you do so just so it's easier for them to attach the roof is an amateur and incompetent.

Installing the metal screws is very easy when you put the metal up and you can line up the purlins. It's only 3ft, so it's pretty easy to hit the edge of a 2x every time. Even with rolls of bubble insulation up, you can see the purlins through the insulation easily.

Your plan of removing sections of the metal roof and replacing it as you go creates a lot more work and takes more time. The best way to to remove all of it, or at least one half of it, and then addressing the rotten wood and putting on the new metal.

You absolutely HAVE to have good air flow from the eves to the peak on a metal roof to keep the wood dry. Metal roofs create condensation more then any other type of roof. Air movement across the bottom of the metal will dry out the condensation and stop the moisture from rotting the wood. Give yourself some overhang at the eaves and leave the ends open. The shape of an R Panel is perfect for allowing air to flow in, and then install a ridge vent to allow air to exit.

Have you tried Angies List to find somebody to do the work? This is where I go to find somebody when I don't have a good recommendation or already know somebody. I also like to use Facebook when looking for somebody to do something. For me, it's all about getting a list of names, and then seeing if they are who I want to hire. Facebook is good because it allows me to ask a question to a lot of people, just like here. Then I look up that person on FB and see if they have pics of their work. Funny thing is some guys will post pics of what they do, and it's terrible, or not what I'm wanting out of who I plan to hire.

Lastly, trust your inner voice. If you have doubts about the guy you are talking to, don't hire him. In every case where I've been hired to finish off a job, or totally redo what was just done, the clients tell me how they knew he wasn't the right person, but hoped it would get better, or they where wanting it done right away and hoped for the best when hiring him.

Good luck,
Eddie
 
   / Pole barn purlin help! #13  
I'm surprised no one caught onto the 1 part roofing. The issue is with the LONG sections of roofing is they are very flimsy and will fold up AND bend/kink like crazy. Even 14' are difficult to move about and place without bending them. I also agree with the above post about removing 1/2 of roof or building and then continuing on. The 2x4 on edge is not all that common but does add some additional structural to the roof. I would still keep them closer span, I think they are on 4' is ok, but 6' is a bit far for metal as most of the metal is pretty thin stuff.

Mark
 
   / Pole barn purlin help! #14  
P4110837.jpgIMAG1009.jpgIMAG1011.jpgP7280035.JPG
I'm surprised no one caught onto the 1 part roofing. The issue is with the LONG sections of roofing is they are very flimsy and will fold up AND bend/kink like crazy. Even 14' are difficult to move about and place without bending them. I also agree with the above post about removing 1/2 of roof or building and then continuing on. The 2x4 on edge is not all that common but does add some additional structural to the roof. I would still keep them closer span, I think they are on 4' is ok, but 6' is a bit far for metal as most of the metal is pretty thin stuff.

Mark
I re-read the original post, and I think you mis-understood the specs. The roof purlins are on edge and on 24 inch centers, not 4 or 6 feet.
As to long sheets: I have worked with sheets as long as 41 feet. It is tough to get them delivered and unloaded without damaging the edges, but if you can get the tin supplier to use a couple cover sheets it helps, and get the driver to use more than two straps when unloading it too, it helps. After that it comes down to having enough hands to lift them without kinking. On the 41 footers we had 4 guys. 32footers will need three guys. Another good trick is to build a ramp of sorts, at the point where the roof is closest to the ground, so you can slide the sheets up. Think of it this way: A sawhorse that is about 5 feet tall, then five feet closer to the building a sawhorse that is 8 feet tall, then five feet closer a sawhorse that is 11 feet tall, OK, you get the point. They dont have to be actual sawhorses of course, but now you have the concept. Cover them with carpet if you are really ****. Or you can use some automation. Let me see,,, Yup, here are some pics of a deal I built to handle long steel sheets...
 
   / Pole barn purlin help! #15  
I have a 22' boom for my loader. I reach over 4-5 sheets lengthwise & place a couple of slings under the sheets to lift them. I use short cam action straps between the slings & the boom which makes it easy to lower the sheets to the roof. I have another strap with a hook which is placed over the ends of the sheet closest to the tractor to prevent them from sliding out of the slings. The slings bow the sheets side to side & keep them from kinking. This setup works for side walls up to 12' no problems. If it is higher, it will still lift the sheets over the roof part way & allow you to slide them up the rest of the way lice the ramp mentioned earlier. (Note - On some loaders where the lift arm cylinders are pinned to the lift arms there may be several holes. If so, if you use the set of holes closest to the driver, it will allow you the highest reach. If you use the furthest set of holes, you lose reach but gain digging depth.)

The boom has sure made life easier for many things.:thumbsup:

John
 
   / Pole barn purlin help! #16  
   / Pole barn purlin help! #17  
Does using a sheet 40ft long create any problems with expansion? Is there any advantage to using two 20ft sheets instead? I don't mean handling, or installing, just the expansion issue.

Bill
 
   / Pole barn purlin help! #18  
I don't know what the practical limit on length is, from the perspecive of expansion and contraction due to temperature change. In my case, the 41 footers were a ceiling. The pics I posted showing roofing were 25 footers. I don't know how much the Original Poster's desired 32 footers used as roofing, would expand and contract. From the handling standpoint, I would want to use a single pc for the 32 foot span. It would avoid the overlap, where 4 corners all stack up and it never looks right. My opinion anyway.
 
   / Pole barn purlin help! #19  
I don't know what the practical limit on length is, from the perspecive of expansion and contraction due to temperature change. In my case, the 41 footers were a ceiling. The pics I posted showing roofing were 25 footers. I don't know how much the Original Poster's desired 32 footers used as roofing, would expand and contract. From the handling standpoint, I would want to use a single pc for the 32 foot span. It would avoid the overlap, where 4 corners all stack up and it never looks right. My opinion anyway.

I agree with everything and will add that whatever the expansion of the metal is, it's so minimal as to not be a concern as long as quality screws are used.

Eddie
 

Tractor & Equipment Auctions

2006 Freightliner Auger Truck (A56438)
2006 Freightliner...
2016 Ford F-550 Venturo HT40KXX 3 Ton Crane Mechanics Truck (A59230)
2016 Ford F-550...
2016 CATERPILLAR 259D SKID STEER (A60429)
2016 CATERPILLAR...
2020 Peterbilt 367 Weldco Hydra-Lift WHL45TC100 45 Ton Tri Axle Telescopic Crane Truck (A55973)
2020 Peterbilt 367...
Yamaha Golf Cart (A57149)
Yamaha Golf Cart...
2018 Chevy Traverse 3rd Row Seating (A56438)
2018 Chevy...
 
Top