OP
Jmlcolorado
Bronze Member
- Joined
- Apr 4, 2020
- Messages
- 69
- Tractor
- Yanmar ym240
You two have been locked up in quarantine too long ��
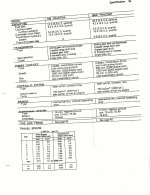
I think we all agree the shift pattern casting and decal are weird.
I suppose if we really want to finalize this debate, we can dig up all the gear ratios of each gear including high and low. Then we can tell for sure what each gear really is.
Then again, we can just appreciate the odd engineering done back in the 70’s and enjoy the machines.
What do ya say?
��
Can we all be friends again? ��


")
