New To Using MIG

/ New To Using MIG #1  

bindian

Super Member
Joined
Feb 10, 2007
Messages
8,429
Location
Willis, Texas
Tractor
Mahindra 6520 4WD
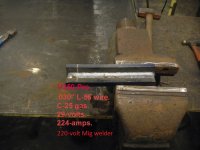
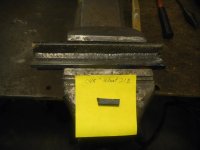
I finally got all my welding ducks in a row and welded my first job today with my brand new Hobart 210 MVP. I have only arc welded in the past, and mostly in high school ag class. So that is ancient history. Anyway, I had scraps cut and was gonna practice and play around, but I broke the tack welds on the hinge off my CAT's battery door (don't ask how) and welded that first. Anyway, I had fun playing with the speeds, while increasing voltage to get penetration. It ain't pretty, but the door and existing welds were kinda messed up anyway. I can't wait to start my first "real" project...........4 water gates for my island pond.
hugs, Brandi
 
/ New To Using MIG #2  
With Mig welding you want to run as hot as you can handle it. Also, if you are right handed. Hold the Mig gun in your right hand. Start on the right side, and travel to your left. That is called pushing.
 

Attachments

  • 220 Mig 1.jpg
    220 Mig 1.jpg
    227.8 KB · Views: 392
  • 220 Mig 2.jpg
    220 Mig 2.jpg
    203.4 KB · Views: 395
/ New To Using MIG #3  
Thanks Shield Arc for the tip :thumbsup:
 
/ New To Using MIG
  • Thread Starter
#4  
With Mig welding you want to run as hot as you can handle it. Also, if you are right handed. Hold the Mig gun in your right hand. Start on the right side, and travel to your left. That is called pushing.
Carl,
I am using shielded wire. Don't you drag the puddle with shielded wire?
hugs, Brandi
 
/ New To Using MIG #5  
By shielded wire, do you mean self shielded flux core? If yes, you do drag it. If you are right handed. Hold the Mig gun in your right hand, start on your left side, and weld towards your right. Drag it.
This is Lincoln's NR-212 self shielded flux core wire. I'm right handed.
 

Attachments

  • Best NR 212.jpg
    Best NR 212.jpg
    286.8 KB · Views: 359
/ New To Using MIG #6  
Check out Welding Tips and Tricks - TIG, MIG, Stick and a pantload of other info. Lots of great videos showing what a good weld looks and sounds like when it's being made. And what to do with wire feed speed, travel speed, and voltage to correct problems.

On my Lincoln, the parameters under the wire feeder door are pretty good starting points.

But in general, if the wire is balling up before it drops into the puddle, the wire feed speed is too low. WFS also controls depth of penetration, as the machine will try to pump out more current to burn off higher wire feed speeds. If you feel the wire bottoming out in the pool, it needs more voltage. Too much voltage, though, and you're back to the balling up problem. Watch the videos, then go out and run beads on scrap plates and play with the settings to see what they do. Compare how your weld puddle looks and sounds to the videos, and keep twisting the knobs until they match. But only adjust one knob at a time to observe the cause and effect...
 
/ New To Using MIG #7  
Brandi, just in case you haven't already found this, make sure you have your POLARITY set right for the flux core wire - DCEN for most cored wire, DCEP for solid - if it's set wrong, changing it will make you think you got 'WAY BETTER real fast :D

Dunno about Hobart, but since BOTH my Miller mig's came from the factory set for solid wire yours might be that way also.

If you have the PDF version of your manual, a quick search for "polarity" will get you to the info fast... Steve
 
/ New To Using MIG
  • Thread Starter
#8  
Brandi, just in case you haven't already found this, make sure you have your POLARITY set right for the flux core wire - DCEN for most cored wire, DCEP for solid - if it's set wrong, changing it will make you think you got 'WAY BETTER real fast :D

Dunno about Hobart, but since BOTH my Miller mig's came from the factory set for solid wire yours might be that way also.

If you have the PDF version of your manual, a quick search for "polarity" will get you to the info fast... Steve

Thanks. I checked polarity on installation. All is good. I have a hard copy of the manual. I figured the polarity was right as the machine included a spool of self shielded flux core.
hugs, Brandi
 
/ New To Using MIG #9  
Brandi, you're welcome - I had to chuckle a bit at this -

"I figured the polarity was right as the machine included a spool of self shielded flux core."

To which MY response (and likely yours too, maybe even more so since YOUR instrumentation stuff hasta FLY, whereas my 35 yrs in instrumentation only "flew" when it was put in place by a 100' crane :=) would have been, "Trust, but VERIFY" :D

Have fun with your new "resource" - I know I've made so many useful attachments, etc, that these days I can't even IMAGINE having tractors around and NOT having a welder (or several)...Steve
 
/ New To Using MIG
  • Thread Starter
#10  
Brandi, you're welcome - I had to chuckle a bit at this -

"I figured the polarity was right as the machine included a spool of self shielded flux core."
Then I opened the side and verified it was correct.
hugs, Brandi
 
/ New To Using MIG
  • Thread Starter
#11  
Yesterday I couldn't spell welder. Today I are one. Yesterday, I played around with beads and different setting and bead techniques. Last night I was watching training videos from the link posted above. Today I welded my first project. 1-29-17 Water Gate Frame Welded.jpg An inlet watergate for my pond. I tried the video guys "church steeple" technique and the weave. I do better with the weave. My first decent weld on the 2 inch tubing happened on the inside corner weld. 1-29-17 First Decent Looking MIG Weld.jpg Go figure. Also, I seem to weld better dragging the puddle away from me, then to the left or to the right. I did better on my first vertical welds then the flat position welds. Go figure again.

It will have 1/4" plate U bolted to the pipe hinges. The two inch gap at the bottom will be for normal water flow. 1-29-17 Water Gate Gap Welded In Place.jpg I gave it a two inch gap to keep out larger logger head snappin' turtles. Logger heads are open season in my ponds. Red Ear Sliders are no shooting for all. The frame will be bolted 3 places per side with all 1/2 bolts or all thread. The cedar posts will be cemented in 24 inch long x 12 inch wide trenches with rebar in the concrete and through the post. We will see next flood how it does.

2 inch pipe hinge on 1.5 inch pipe.1-29-17 Water Gate Pipe Hinge.jpg

hugs, Brandi
 
/ New To Using MIG #12  
With Mig welding you want to run as hot as you can handle it. Also, if you are right handed. Hold the Mig gun in your right hand. Start on the right side, and travel to your left. That is called pushing.

With welds looking like that you've earned bragging rights, I'm still trying to master Mig.
 
/ New To Using MIG
  • Thread Starter
#14  
Thanks! It is black pipe. I did have the fan going blowing the smell and grinding dust out the door. I don't weld galvanized. That stuff is bad, even grinding.
hugs, Brandi
 
/ New To Using MIG
  • Thread Starter
#15  
I usually wipe my metal with acetone, then spray on two or three coats of spray bomb rustoleum.
What do Y'all use.
 
/ New To Using MIG #16  
For personal use when I paint something like a truck or tractor thats going to be exposed to the elements I sand blast to white metal the use Endura polyurethane primer and top coats. These are a two part paint and have a limited pot life.

Endura from the same can maybe used for Marine and Aviation.

It's wicked paint breathing gear is required to apply.

Endura Paint - Industrial Coatings
 
/ New To Using MIG
  • Thread Starter
#17  
For personal use when I paint something like a truck or tractor thats going to be exposed to the elements I sand blast to white metal the use Endura polyurethane primer and top coats. These are a two part paint and have a limited pot life.

Endura from the same can maybe used for Marine and Aviation.

It's wicked paint breathing gear is required to apply.

Endura Paint - Industrial Coatings
Understand. At work, we have to be respirator fitted each and every year................even if we don't use one.
hugs, Brandi
 
/ New To Using MIG #19  
Once you get the hang of it, you'll be reaching for the MIG gun allot more than the stick weldor. Keep looking over the videos and the rest really is staying behind the shield! The more practice, the better you get once you have the basics.....I have a Miller 250 and run a gas mix instead of fluxcore. I seem to get less splatter that way, but really don't have much shield time with fluxcore.
Sometimes you can grab a night course through your local tech school that can help. Two other things that have helped me is make sure you buy good wire (the price difference IS worth it!) and save your pennies for a good helmet. I have two guns; One set up for .030 wire and one for .023 for the light stuff, and found a nice used Speedglas helmet on e-bay for $250 that I love. Just like anything you get what you pay for!

WELD ON!!
LOOSENUTS
 
/ New To Using MIG #20  
A big part of welding well is being able to see what you're doing through the lens, and the new electronic ones can be turned up or down depending on how much current you're using. It also helps to have strong light where you're welding as that will also help you see. I'm also a big fan of gas shielding 75% argon/25% CO2 for steel, straight argon for stainless steel and aluminum, which I do very little of. Much easier to see what you're doin' without all that flux in the way...
 

Marketplace Items

1999 John Deere 7810 (A60462)
1999 John Deere...
2013 GREAT DANE  TANDEM AXLE 48FT DRY VAN TRAILER W/CRANE (A59906)
2013 GREAT DANE...
CFG Industrial 680 QA Hydraulic Hummer (A60463)
CFG Industrial 680...
2021 Ford F-150 XL (A53317)
2021 Ford F-150 XL...
JOHN DEERE 310K (A58214)
JOHN DEERE 310K...
CFG QK16R (A60463)
CFG QK16R (A60463)
 
Top