Modifications to Yanmar 2010D

   / Modifications to Yanmar 2010D
  • Thread Starter
#21  
Well,
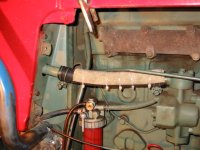
After a bit of a break I started to work on the loader mounts today. I finished the rerouting of the hydraulic lines, drilling of the rear loader brackets and welding and test fitting of all of the rear mounts.
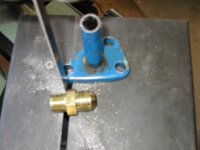
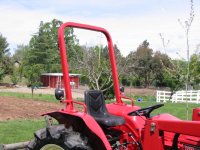
Here is a photo of the rear mounts that I fabricated. In all, the rear brackets weigh 214 pounds, use 32 hardened bolts and are mounted in 20 threaded locations in the frame, engine, clutch housing and transmission. I was quite a challenge to get them all lined up.
Cameron
 

Attachments

  • 49-169325-IMG_0295.JPG
    49-169325-IMG_0295.JPG
    130.8 KB · Views: 170
   / Modifications to Yanmar 2010D
  • Thread Starter
#22  
One of the challenges that seemed to take a lot of head scratching was how to reroute the hydraulic lines. Here is my solution for the return line. I cut a hole in the firewall and routed a combination of flexible line and salvaged hydraulic tubing. I covered all of the lines where there was a possibility of abrasion with old fire hose and secured it with zip ties.
 

Attachments

  • 49-169329-IMG_0296.JPG
    49-169329-IMG_0296.JPG
    111.2 KB · Views: 163
   / Modifications to Yanmar 2010D
  • Thread Starter
#23  
Here is a shot from a low angle looking at the bottom of the transmission housing. I mounted a 1" X 3-1/2" X 14" bracket to the transmission between the side brackets. Here all of the pieces have been temporally test fitted and spot welded together. I will use 8 of the 12 bolts to mount the supports to the rear axle
 

Attachments

  • 49-169339-IMG_0298.JPG
    49-169339-IMG_0298.JPG
    82.1 KB · Views: 185
   / Modifications to Yanmar 2010D
  • Thread Starter
#24  
Tomorrow's job will be finishing the front bracket. The Yanmar is a bit wider than the ford which required trimming and refitting of mounting brackets. Here I fitted the bracket with new mounting plates and will attach it to the frame shims below. This will require a bit of drilling and tapping first thing in the morning. When it is all done the frame shims will sit in the "C" channel of the frame and the mounting brackets will bolt through them and to the tractors frame.
After that Is done, I may weld a few additional supports to make the new mounting plates a bit sturdier.
 

Attachments

  • 49-169343-jpegfrontbracket.JPG
    49-169343-jpegfrontbracket.JPG
    83.6 KB · Views: 163
   / Modifications to Yanmar 2010D #25  
Cameron, I'd be curious to hear what type of welding and general tooling setups that you have. Do you have any special background fabricating these sorts of things?
 
   / Modifications to Yanmar 2010D
  • Thread Starter
#26  
Roger,
I have no real fabrication experience. I am a Fireman by trade. I enjoy construction of all types including metal work. I have been able to perform all of the work with a band saw, drill press, cutoff saw, and wire feed welder. For heavy pieces I tack them with my wire feed, clean them up and take them to a friends shop for real welding with a big MIG welder.
This tractor board has been very helpful to me in getting ideas and bouncing ideas off others with tractor fabrication experience.
Thanks,
Cameron
 
   / Modifications to Yanmar 2010D
  • Thread Starter
#27  
I finally got back to work on the loader project.
The front brackets have been attached to the tractor and the loader frame is fitted to the brackets.
At this point all of the difficult fabrication is complete. Now I just need to clean it all up a little with a fresh red paint job and finalize the hydraulic connections. However, I am going to build a new bucket for it. My narrow gates and rows of fruit trees won't accommodate the 5' wide bucket that came with the Ford, so I will make a 4' bucket this weekend.
 
   / Modifications to Yanmar 2010D
  • Thread Starter
#28  
Here is the photo
 

Attachments

  • 49-173657-Newloaderbrackets.jpg0330.JPG
    49-173657-Newloaderbrackets.jpg0330.JPG
    89.9 KB · Views: 217
   / Modifications to Yanmar 2010D
  • Thread Starter
#29  
Here is another angle. I will post some more this weekend.
 

Attachments

  • 49-173658-Newloaderbrackets.jpg0328.JPG
    49-173658-Newloaderbrackets.jpg0328.JPG
    88.6 KB · Views: 169
   / Modifications to Yanmar 2010D
  • Thread Starter
#30  
I was able to get a the loader shell together and ready for mounting on the loader arms. I followed the plans for the Cad Plans 1007 loader bucket for dimensions. It is made out of 1/4" plate and has a 1-1/2" tube on the top edge for added strength. I still need to add some chain hooks and reinforcement to the bottom surface.
This smaller bucket will allow me to fit through my gates and rows of fruit trees and around obsticles.
 

Attachments

  • 49-176344-IMG_0342.JPG
    49-176344-IMG_0342.JPG
    95.7 KB · Views: 179
   / Modifications to Yanmar 2010D
  • Thread Starter
#31  
The last three hydraulic connection will adapt the 12 mm Yanmar tubing to the Ford's 15 mm tubing via flexible hoses. I did this by using short hoses with 12 mm hydraulic compression fittings on one end and standard 3/8" fitting on the other. However, This required cutting one end off of a 3/8" fitting, drilling it out to near 15 mm and brazing the fords tubing to the 3/8" fitting. The following photos I hope will illustrate it.
 

Attachments

  • 49-176350-IMG_0345.JPG
    49-176350-IMG_0345.JPG
    74.6 KB · Views: 186
   / Modifications to Yanmar 2010D
  • Thread Starter
#32  
I got in a hurry and did not photograph all of the steps of brazing the fittings together. In summary, I cut off part of the 3/8" fitting, drilled out the hole to match the size of the 15mm tubing and brazed it all together.
All of my adapted fittings brezed together well with no leaks however one of the Fords connections needs a new O ring.
This photo shows all of the hydraulics completed and needing just a good cleaning and Yanmar Red paint.
I am now ready to hook-up the loader arms and attach all of the quick-disconnect fittings. However, I think that I will save it for the weekend.
 

Attachments

  • 49-176446-IMG_0346.JPG
    49-176446-IMG_0346.JPG
    121.2 KB · Views: 179
   / Modifications to Yanmar 2010D
  • Thread Starter
#33  
Hello all,
I thought I would offer another installment on my Yanmar 2010D. After building a horse arena for my wife and daughter, I found a little time to finish some of the projects on my tractor.
During a rainy spell yesterday I decided it was time to install the roll bar from the Ford 1320 on my Yanmar 2010D. The most difficult thing again was figuring out how to make everything fit. Surprisingly, it was pretty easy.
Cameron
 

Attachments

  • 255199-IMG_0672.JPG
    255199-IMG_0672.JPG
    84.8 KB · Views: 270
   / Modifications to Yanmar 2010D
  • Thread Starter
#34  
A little closer shot
 

Attachments

  • 255200-IMG_0673.JPG
    255200-IMG_0673.JPG
    74 KB · Views: 244
   / Modifications to Yanmar 2010D
  • Thread Starter
#35  
From the rear of the tractor
 

Attachments

  • 255202-IMG_0674.JPG
    255202-IMG_0674.JPG
    87.6 KB · Views: 235
   / Modifications to Yanmar 2010D
  • Thread Starter
#36  
The original Ford support bracket was designed to fit inside the fender. The Yanmar fender was about the same size so the support fit nicely. The support starts at the bottom of the photo near the large bolt and extends upward to the bottom side of the top of the fender.
The large bolt used to be the only thing that held the support to the axle bracket. I welded both pieces securely together with several heavy steel plates which cannot be seen in the photo.
 

Attachments

  • 255204-IMG_0668.JPG
    255204-IMG_0668.JPG
    42.9 KB · Views: 215
   / Modifications to Yanmar 2010D
  • Thread Starter
#37  
Looking from the rear at the axle bracket
 

Attachments

  • 255205-IMG_0669.JPG
    255205-IMG_0669.JPG
    44.1 KB · Views: 196
   / Modifications to Yanmar 2010D
  • Thread Starter
#38  
The roll bar is attached to the supports with four 1/2" grade 8 bolts on each side with the fender sandwiched between.
 

Attachments

  • 255208-IMG_0671.JPG
    255208-IMG_0671.JPG
    35.4 KB · Views: 202
   / Modifications to Yanmar 2010D #39  
Nice job on the Rops. Looks almost stock. Nice looking lawn too. How long did it take you to install it? (The rops not the lawn.) /forums/images/graemlins/smirk.gif
 
   / Modifications to Yanmar 2010D
  • Thread Starter
#40  
Thanks for the compliment on the lawn, taking care of it is one of the tasks that I enjoy the most.

So far the ROPS took about four hours. I am considering extending the front loader mounts to the rear axle for a sub-frame and incorporating additional bracing for the supports inside the fenders to the sub-frame. It is very secure now, but I have a tendency to over build a bit. I suppose that will take an hour or two, plus I need to find a seat belt and install it as well.

Cameron
 

Tractor & Equipment Auctions

401 (A52706)
401 (A52706)
Big Tex T/A Flatbed Trailer (A56857)
Big Tex T/A...
12' CONTAINER (A52706)
2005 JOHN DEERE 160C LC EXCAVATOR (A52709)
2005 JOHN DEERE...
2018 JOHN DEERE 844K-III AG HANDLER WHEEL LOADER (A60429)
2018 JOHN DEERE...
2012 CATERPILLAR 308D CR EXCAVATOR (A59823)
2012 CATERPILLAR...
 
Top