Engine Overhaul Kama 554

/ Engine Overhaul Kama 554 #21  
Hi Rob,

Whilst i don't have the experise of some of these other members, I would like to add a couple of tings.
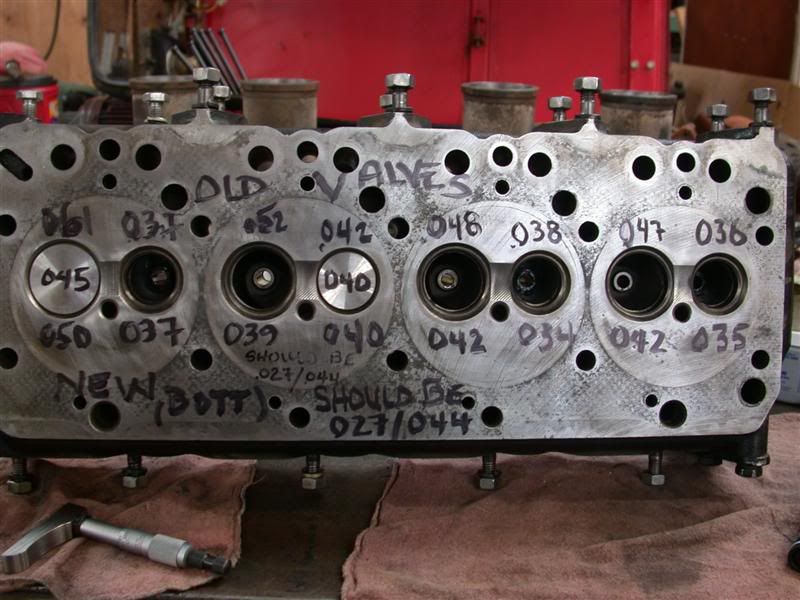
I doubt that you would lose 0.020 unless you actually ground the valve prior to lapping the valve to the seat in the head.
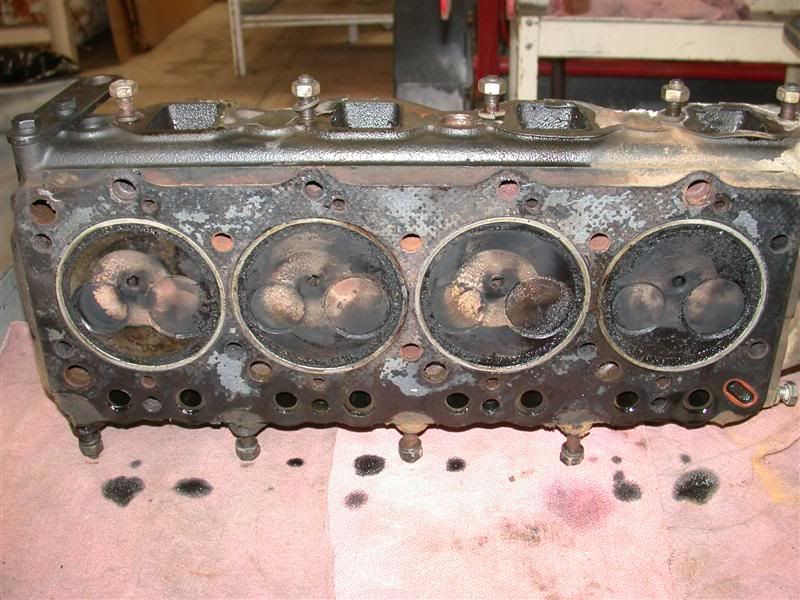
As Bob Rookes has said, use a very light application of engineers blue on the valve and then slowly put the valve back into the head - taking care not to rotate it. This will give you the contact area of the seat itself and should be an unbroken ring. Any areas without blue indicate a low spot on the valve seat or maybe valve slightly bent on the stem. All simple checks but needed.

You are doing well and getting lots of advice from thems that know.

Look forward to seeing it finished and running.

Cheers

Jim
 
/ Engine Overhaul Kama 554 #22  
Hey Rob, another great thread. I am no engine expert ( the term flunky comes to mind) but when the time has arisen in the past, I am like you and always preferred to do as much as possible myself. I am certain any shop that's been in business for any time can do a decent job on the head. The local parts guys can probably steer you in the right direction if you need to go that route. I have always ground valves seats using the same method as you i.e. suction cup/ grinding compound. I have found that using a cordless drill on the end of the handle and alternating directions every 5-10 seconds or so is much faster than spinning by hand and does a good job. I know the mechanics in site will probably cringe...but this has yet to fail me, to check the seat I will darken the room and put a strong light above and under the valve and look it to see if any light is visible from the other side, while turning the valve 360*. When all light has disappeared I will grind just a little more then recheck. I never heard of the "kerosene test" but sounds like it would be a good "poor mans" indicator. As IH mentioned, you need to also check the valve guides for excessive wear.

I have always ground my own valve stems, just as IH 3444 described. Instead of determining how much grinding the valve stem needs by using the difference in valve depth, you need to check the valve lash. This is the slight amount of free play between the rocker and the valve stem. A small amount of lash assures that the valve will close completely but not so much "slop" that the rocker "hammers" the valve stem ( we've all probably heard "valve chatter" sound in older engines). Whether you do this job your self or use a shop, you need to talk to Chip or one of the other guys if you don't have a manual that tells you what the correct valve lash is, for both intake and exhaust valves ( they will most likely be different). Also need to know if the engine needs to be warm or cold when setting them. You may be able to get the correct lash with simple rocker adjustment ( no grinding). I am sure there's lots of online info that explain all this better than me. Also would appreciate anyone chiming in if they disagree with any info I've given ( remember the "flunky" thing!)

Good luck and keep us up to speed.
 
/ Engine Overhaul Kama 554 #23  
Me thinks Rob that 0.020" would be easily taken up in the rocker arm geomerty. It's ever so slight. If you do decide to grind the valve stem ends, then it should be perfect.

Thank Gawd you stopped when you heard the dull thunking, and drove the machine into the garage.

The stories I heard over the years such as "I heard a very loud bang, then the engine began to lose power, and the car was slowing down, so I mashed the gas pedal to the floor to try and make it to the next exit, all the while down shifting to keep the engine running"

I've seen people's engine blocks almost sawed in half from a broken rod that acted like a whirling chopper through it's revolutions while swinging around the crankshaft. While the other 3, 5, or 7 cylinders were still powering it along.

I'm chuckling now thinking about some of them...."there was smoke pouring out behind the car, and I couldn't see the traffic in my rear view mirror"

"It sounded like large hammers were under my hood banging away"

"there was a loud pop, and the car wouldn't go anymore"
 
Last edited:
/ Engine Overhaul Kama 554 #24  
3RRL:

The valve stem top side under the rockers can be checked with the machinist die as well, but grease works too. what you should check after you got the valves lapped and installed install the rockers and gap them on the engine with push rods and all. to make sure that the rockers are contacting the center of the valve stem. if they are contacting the Front or Back (closer to the rocker or farther away) this will put undue wear on the valve stem & valve guide. There was a HORSEPOWER TV (I'll look for a show on-line that demonstrates this it was just a few weeks back) and edit in a link if I can find it. (note not the best search there here is main site.)
HorsePower - Episodes | PowerblockTV


Like others said just because the valve is setting low in cylinder/combustion chamber does not mean you need to take that much off the top. You can use a mill to turn down this excess or a valve stem cutter, grinding by hand may leave a un-level surface (needs to be perpendicular with the valve stem.) so that the valve can rotate in the guide/springs to keep a good sealing surface without burning through.

the rocker should show a rub/wear that is pretty much centered on the valve. you will need to rotate the engine to have the valves move through the arc that rubs on the valve stem center. I think you can probably do this on the bench as well by simply holding the rocker in the position and using it to press the valve down the same amount as the push rod would force it through...

Hate to go through all the motions of assembling the head onto the block and find you have to turn down a valve or two but I had to do this and ended up needing different push rods on one engine, but was luckily enough on several others... Note this was car engines running at higher RPM built for 100K+ miles. Tractor engines should last 3000+ hrs but often as you found out things happen.
Mark
 
/ Engine Overhaul Kama 554 #25  
The stories I heard over the years such as "I heard a very loud bang, then the engine began to lose power, and the car was slowing down, so I mashed the gas pedal to the floor to try and make it to the next exit, all the while down shifting to keep the engine running"

I've seen people's engine blocks almost sawed in half from a broken rod that acted like a whirling chopper through it's revolutions while swinging around the crankshaft. While the other 3, 5, or 7 cylinders were still powering it along.

I'm chuckling now thinking about some of them...."there was smoke pouring out behind the car, and I couldn't see the traffic in my rear view mirrow"

"It sounded like large hammers were under my hood banging away"

"there was a loud pop, and the car wouldn't go anymore"

Who told you about my 1989 S-10 Blazer with the 4.3L V6. :D 16,000 miles and when she started knocking I was so mad I just hammered the gas pedal down. Blew up so bad it took off the TBI injector unit, put a hole in the block, and pushed the rods out. It also put a hole in the hood which was also replaced under warranty.:eek:

Chris
 
/ Engine Overhaul Kama 554 #26  
"Who told you about my 1989 S-10 Blazer with the 4.3L V6. 16,000 miles and when she started knocking I was so mad I just hammered the gas pedal down. Blew up so bad it took off the TBI injector unit, put a hole in the block, and pushed the rods out. It also put a hole in the hood which was also replaced under warranty."

Chris

Ohhhhhhhh....yea. That one blowed up real good!:D

My engine machinist friend and I tell these stories to each other....I'm sorry we laugh so much about them. Had a gal friend drive for 5 hours to see me once. I asked her if she had checked her oil lately. She said " O, it's OK". I poped her hood, pulled the dipstick, and there was no oil on it. 3 quarts poured in later...it was on the tippy bottom of the stick. How she made it to my place I'll never know. It was a 4 cylinder engine, and only held a bitover 4 quarts.

"my car not running well, and something is stuck out the side down there"
 
Last edited:
/ Engine Overhaul Kama 554 #27  
Rob good thread as usual

If you come out of "retirement" you could write technical manuals.

tom
 
/ Engine Overhaul Kama 554 #28  
Hi Greg,
Yes you are correct about a crummy valve cover gasket, but that is also where the breather is on my engine. And I had re-routed (re-made) that breather so it would go directly into my air intake tube. There was a lot of leaking oil in that area. In that other thread there are photos of what I'd done, but here is one of it.


I'm not going to bore you with every little detail since most of you Chinese tractor owners are probably used to working on your machine and have seen all this before. But I did want to share a few more photos of what I saw.
After removing the rocker arm and decompression assembly, I removed the fuel injectors. They had crud built up on them. I saw oil inside the intake manifold where it had been sucking the excessive blow by and the exhaust manifold had a lot of carbon build up in it. Shees, what a moron I am, looks like I won't be re-routing that breather tube anymore!


After removing the head, I saw carbon build up there and also on the top of the pistons.
You can see the head gasket is still on the head in the second photo below. I had no head gasket leaks of any kind. Once the bores were exposed, I saw a pretty good indentation where the rings had worn into the liners. Of course I will be cleaning everything before I re-assemble.


Rob: Interesting project. Looking at these photos, I'm reminded of what my 1951 Minneapolis Moline BF engine (a Hercules 4-cyl gas flathead, 27 hp or so) looked like when I pulled the head a few months ago

DSCF0041 (Small).JPG

DSCF0024 (Small).JPG

DSCF0025 (Small).JPG

DSCF0026 (Small).JPG

No compression on 3 of the cylinders, 30 psi on the 4th. So I hauled the engine to the machine shop for a complete overhaul (cyl sleeves bored 020, new exhaust valves, new valve seats for unleaded fuel, crankshaft ground 010 under, head milled flat, flywheel milled flat, new exhaust valves/guides, new bearings all around).

Looks like you're a real engine overhaul DIY guy.
 
/ Engine Overhaul Kama 554 #30  
The last thing I had to do before ordering new parts from Chip was to remove the (wet sleeve) liners.
They came out pretty easy by tapping them out from the bottom with a copper bar.

You are so fortunate there. The last time I removed those kind of wet
liners, I had to hold the block in my press, and it sounded like a shotgun
blast when they broke free.

That looks like a direct-injection engine (no pre-combustion chambers)...is
that correct?
 
/ Engine Overhaul Kama 554 #31  
I have found that using a cordless drill on the end of the handle and alternating directions every 5-10 seconds or so is much faster than spinning by hand and does a good job.

That's almost how I do it, too. I thought, "there has to be a better way", once when I did my first 32-valve engine. First coarse compound, then
fine.

You can barely see my drill in this photo. I chuck it up around the valve
stem, instead of using the wooden rod with suction cup.
 

Attachments

  • valve_lap1.JPG
    valve_lap1.JPG
    60.2 KB · Views: 264
/ Engine Overhaul Kama 554
  • Thread Starter
#32  
Hi guys,
Got back yesterday from my 2 day a week job down South.
I wanted to start checking the everything that was mentioned above but Loretta had me put in a gate to her garden. At least I got some seat time on her Jinma and the post hole digger.:)

Chip is sending me the new sleeve liners and they should be here late today.
I will check the valves to see how good the guides are. As I recall, when the valve is almost closed there seems to be very little or no play, but I will check it again. I'll also blue-off the valves into the seats before lapping any more of them. After checking the blue off I figured on using a drill motor like you guys do to finish seating them. I have plasti-gage and several different kinds of impression blue in my tool boxes. I use that stuff all the time to check shut-offs on the plastic injection molds I build. I remember when I was an apprentice back in the sixties, I was working for an old journeyman top moldmaker. He used to light cigarette paper under the mold inserts and use the soot as impression blue off (black) ... pretty cool.

I've also decided to grind the valves to length to obtain the proper rocker arm geometry.
I have a set up in my surface grinder to do that. I can also grind a radius on top of the valve stems so that the rocker arm only hits closer to the center point of the stem. It won't be a full radius, I was going to leave about a .050"/.100" flat on the center of the stem. Right now the valve stems are just squared off. My plan is to measure the new valves with gage blocks and indicators. I have to determine an average over-all length. I presume since they are stock, I could use that length as a standard? Then, depending on how much deeper the valve sits in the head (than spec) I will kiss grind that amount off the valve stem. Looks like from what you guys have said, that should make the rocker arm geometry real good again (closer to spec).

Is that piston cracked?
You know I haven't check it close enough.
Good eye! But that is also the piston with the that broken ring and the first ring groove has doubled in width. So I ordered a new one and it will be replaced anyway. I'll take some photos of the new components later today and any progress I make.

BTW Dave, yes that is a direct injection engine.
I too was paranoid at removing those sleeves, but like I said they came out nicely.
IH3444, Indeed I was lucky to only be a short distance from the barn. I was already cringing at the thought of even driving it that short distance to the barn, but I had to.
Mark, Jim, kernopelli, Chris, Tom (and anybody else I missed) thanks for all the technical input and support. With all your help, this DIY project should come out real good in the end.
I should have more stuff to share later in the week.
 
/ Engine Overhaul Kama 554 #33  
Hi guys,

I've also decided to grind the valves to length to obtain the proper rocker arm geometry.
I have a set up in my surface grinder to do that. I can also grind a radius on top of the valve stems so that the rocker arm only hits closer to the center point of the stem. It won't be a full radius, I was going to leave about a .050"/.100" flat on the center of the stem. Right now the valve stems are just squared off. .

3RRL:

Not sure on the valve to rocker geometry on this engine, the radius probably is not needed as it will take away form the contact area of the rocker to valve stem and may cause some additional wear on the rocker or the stems. adding a very small chamfer to the very outside edge is OK to prevent any sharp edges but not .100 worth of flat left. You can break the edge with a stone is all it should need to remove any sharp edge that was left after grinding. Also note you may not need to take much off as noted prior by several people there is more than likely enough adjustment on the rocker stud mount to compensate unless you have really hogged down the valve seat...

Mark
 
/ Engine Overhaul Kama 554
  • Thread Starter
#34  
Thanks Mark,
I'll just grind a tiny radius on the stems then.
In fact I have done 2 valve adjustments so far, and each time there was very little adjustment to do. My thought on grinding the valve stem was because those valves in the head already sat low from when I bought the tractor new. So I was thinking maybe I should grind the length to compensate? But if I don't need to, time saved and a little less work to do.

What I'll do is check the length of the old valves vs the new set.
Maybe they have already been adjusted (ground before)? When I check the length I'll know better which way to go. I don't mind having to grind them, and if indeed they are all the same length, then I probably will. If the old set is shorter than the new, then I won't.

I really meant to get more done on the rebuild today, but Loretta and I got caught up in putting up more fence posts for her garden. We had to drive down to Visalia again to pick up more stuff which took up the rest of the day.
 
/ Engine Overhaul Kama 554 #35  
Hi Rob,

Seems like you are getting just as good service from Chip, for your Chinese tractor as some people get for home produced machines.

When I rebuilt the engine on my JD450, I was held up for over a month waiting on engine parts and they had to be ordered three times before they got it right. I even had to point out to the John Deere parts people what they were doing wrong and I am sure I had to pay a restocking fee for their faux pas. A long story but finally got 'er together and tried it out and it fired and ran the first time I tried it. Sure was good to see it running clear with no exhaust smoke or blowby from the head valve cover vent pipe. Oh, and the old sleeves on my engine pretty much fell out - the O-rings were shot and two of the four liners had impingement erosion (pinholes in walls) from previous owners running without the inhibitors in the coolant (like final charge etc.).

I think you will be very impressed with the way that engine runs when you are through with it. Gives ya a good feeling knowing it is all done properly - in your case, the whole bloody tractor now :D:D:D

Cheers

Jim
 
/ Engine Overhaul Kama 554
  • Thread Starter
#36  
Thanks for the vote of confidence Jim,
Chip at Artrac has given excellent service. And more importantly, because most of us do it ourselves on these Chinese tractors, he gives clear and accurate advice how to do it. But this is not the first time. Even though I did not buy my tractor from Chip, I've been buying parts (and getting advice) from him going on 5 years now.
Very admirable indeed.

BTW, along with Chip, there are Tommy and Ronald who have also given the same service and technical advice over the years. I feel the Chinese tractors are very well represented and supported by these dealers in particular.
The myth about not being able to get parts or service is something I have yet to experience.
 
/ Engine Overhaul Kama 554 #37  
The myth about not being able to get parts or service is something I have yet to experience.

I am interested in what you have to give for things like new pistons, liners,
etc. I am sure the prices will look stunning next to what I have paid for
many many factory Kubota and JD parts.

It is great that you have been able to get all those parts. What about
service? You do all your own service, as far as I know. What if you had
to get service for your machine?
 
/ Engine Overhaul Kama 554
  • Thread Starter
#38  
I am interested in what you have to give for things like new pistons, liners,
etc. I am sure the prices will look stunning next to what I have paid for
many many factory Kubota and JD parts.

It is great that you have been able to get all those parts. What about
service? You do all your own service, as far as I know. What if you had
to get service for your machine?
Hi Dave,
Yes, I do all my own service.
I planned on it when I decided on the Kama. If you're lucky enough to live near a dealer, then you could bring it in. I bought mine cross country and at the time, there were no dealers here in CA.
Example of cost:
New piston: $60
New liner: $65
 
/ Engine Overhaul Kama 554
  • Thread Starter
#40  
I measured all the valves ... old and new.
Turns out that the old valves are the same length as the new. In fact, the old valves measured within .002" and the new valves, one was about .009" shorter than the rest. After depth mic'ing the all the valves, I found that only the very first one was sitting deeper in the head than the others. That was the one I based my judgment about having to grind the ends of the valve stems. Turns out all the other intake valves were only slightly deeper than spec, from .003" to .008" deeper. And all the exhaust valves are within spec (.027/.044 deep).


With that in mind, I decided not to grind any of them. Instead, I replaced that first intake valve with a new one which sits closer to what the other intake valves were. I also tested each valve when it was almost all the way in for play or slop. All of them except one exhaust valve had almost zero movement. So the valve guides were all good. I tried a new exhaust valve and it seemed to fit tight in the guide, so I decided to put a new one in that 2nd cylinder.
That means I only replaced 2 valves ... intake on cyl #1 and exhaust on cyl #2.
 

Marketplace Items

2004 VE ENTERPRISES 500BBL FRAC TANK (A58214)
2004 VE...
Kubota U55-4 (A57148)
yellow ball Trailer (A56859)
yellow ball...
2017 Freightliner M2 106 AWD Terex Hi-Ranger 5TC-55 55ft Insulated Material Handling Bucket Truck (A60460)
2017 Freightliner...
SDLD25 MINI DUMPER (A58214)
SDLD25 MINI DUMPER...
2012 INTERNATIONAL PROSTAR+ (A58214)
2012 INTERNATIONAL...
 
Top