YAPB (yet another pole barn)

   / YAPB (yet another pole barn) #1  

skid mark

Silver Member
Joined
Apr 29, 2002
Messages
242
Had another question. Since I'm sure that there will be many more to follow, I thought I'd go ahead and post a thread that is topic-neutral that I can update now and then.

As with several others, I'm starting down the path towards putting up a pole barn. Have asked several questions already and found this site to be a wealth of info.

FYI, I've built a couple smaller barns in the past.

Unlike the last two, the one I'm putting up now will be built largely of wood instead of steel. The reason for this is that I want to fully insulate this barn, put in a small living quarters with heat, AC, plumbing, etc and wood offers better insulation properties than steel.

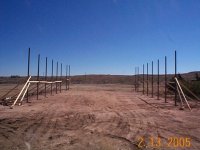
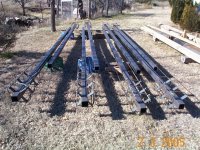
The barn I've recently started on will be 42x63. One difference in my barn from most is that I'm using 3.5 x 3.5 x 3/16" A500 tubing for the load bearing posts instead of wood. I like the idea of burying the poles to offer additional bracing to the building but was a little nervous about putting wood poles in the ground. That, plus the fact that the relatively slim 3.5" poles can be hidden in a wall that is framed with 2x4's will make the living area look a little more finished.

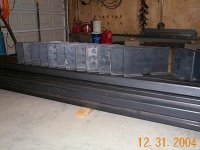
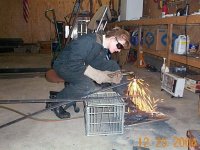
Here's a picture of some of the poles before they went into the ground. You can see that I built a cage at the base out of 2" x 1/4" flat and some weldable rebar. The rebar will eventually be tied into the slab. Hopefully that is only a few weeks off!
 

Attachments

  • 589512-poles3.jpg
    589512-poles3.jpg
    82 KB · Views: 1,482
Last edited:
   / YAPB (yet another pole barn)
  • Thread Starter
#2  
Here's a picture of one of the poles getting ready to go in the ground. I built a 19' gin pole for the front of the tractor for this very job (and eventually to use to lift the roof rafters in place).

The gin pole is lifted in place with the 9000lb winch on top of the tractor, secured with chains and then the winch cable is freed up to use to lift the poles.
 

Attachments

  • 589514-poles6.jpg
    589514-poles6.jpg
    42.2 KB · Views: 1,360
   / YAPB (yet another pole barn)
  • Thread Starter
#3  
I put some "steps" on the gin pole to allow it to double as a ladder. Here my wife is removing the cable from the poles after they've been put in place and braced up. Cable attaches to a little hole at the top of the pole that I punched with a torch when I cut the pole to length (chopped down to about 18.5').
 

Attachments

  • 589515-poles8.jpg
    589515-poles8.jpg
    42.3 KB · Views: 1,036
   / YAPB (yet another pole barn)
  • Thread Starter
#4  
This pretty much brings you up to speed on where I am now. This last picture shows all 16 of the poles in the ground.

The front and back (gable) walls will be framed up using traditional stick built framing techniques. Which brings us to my next question:

When we pour the concrete, I need to set all of the J anchors to anchor the bottom sill plate to the slab. I've read that these anchors should be spaced about every 5 feet.

I'm planning to prefab the walls on the ground (slab) maybe ten feet at a time and then tilt them into place, brace them up, etc.

My question is, do I need to make sure and have an anchor near the end of every section of sill plate? In other words, if I put up 10 foot sections of wall, should every section have an anchor at each end, plus one in the middle? I'm thinking that a 10 ft section would have an anchor at 1, 5 and 9 feet, smack in the middle of the 24" gaps between the studs. This is what I'm guessing would be best versus having the ends of some of the sections not tied to the slab. Of course the unsecured section of the wall would be secured to it neighboring section which *would* be secured, so maybe it really doesn't matter.

What is the norm when placing anchors for stick built walls?

Thanks for the pointers. I'm really out of my league in putting together a finished building versus the rather sloppy, dirt floored storage barns I've built in the past...

Mark
 

Attachments

  • 589520-site5.jpg
    589520-site5.jpg
    42 KB · Views: 1,026
   / YAPB (yet another pole barn)
  • Thread Starter
#5  
Second question -

For non-load bearing walls on the interior of a building, is it common to place anchor bolts in the slab, or just hammer drill some holes after the fact and then place expanding anchors in place, or maybe even just pound in some concrete nails to hold the sill in place?

Mark
 
   / YAPB (yet another pole barn) #6  
Mark,

Once again I have to say how nice the "poles" look. I am partial to tube steel and wish I had the talent & experience to work with steel.

To answer your first question, I would place the anchor bolts as you stated, at 1, 5, and 9 feet on each panel. Some codes only require an 8 foot spacing on the anchor bolt while other state 4 feet which I use. The three bolts per panel will also help in areas where you stop for the day or weekend. Also, attach the panels together to give the wall sections more rigidity. When you set the J bolts make sure you have at least 12” embedded in the concrete with at least 3” of concrete below the bottom of the bolts and on each side. I would also suspect that you will be attaching the wall panels to the side of your posts.

The norm for stick built walls is another thing. It is what that builder typically does. I have seen them spaced at 4 to 10 feet, sometimes placed with no thought and other times planed as you speak of. Ultimately, it is best to plan the locations. Based on what I saw on your web page I am guessing you will layout the bolts or you would not ask. If you do not just be sure to have at least 2 bolts per panel and not located at studs (obvious but does happen).

The second question, for interior partition walls go back and drill and screw with TapCon concrete screws or Powder actuated fasteners. Embedment of screws should be at least 1 ¼” and powder actuated fasteners ¾” minimum but check with mfg. recommendations.

…Derek
 
   / YAPB (yet another pole barn)
  • Thread Starter
#7  
Thanks a lot for the info Derek!

Thanks to the generous help of folks such as you, this web site has really provided me with a tremendous amount of help!

It is much appreciated.

Mark
 
   / YAPB (yet another pole barn) #8  
Those are great looking poles, and they have really peaked my curiosity. I'm planning a pole barn 74'x40'. I know NOTHING about building engineering, so excuse my ignorance in asking this question, but how does the strength of a metal pole like that compare to a 6x6 PT post set in the ground?
I have basic welding skills and equipment, and I'm wondering what the cost per pole is if you go that route? Is there any way you could provide a more detailed picture or description on how you built the cages at the bottom? Looks like with that setup, you could nearly just put the pole in the ground and pour the concrete around it, setting it plumb. With my planned barn, the poles only need to be 10' above grade, but there is an entire second floor so I have to have floor joists along the entire length of the barn. My barn will house horses, so I will have central posts in the ground to attach stall walls, stall doors, etc. and I've laid these out so that the floor joists can be nailed to these posts. If I were to use metal poles like this, is there a good way to attach the wall girts, etc. so that they just basically replace my plan for pressure treated poles? Also, did you paint or protect the portion of the post that's going into the concrete?
Thanks for showing us!
Todd Kirby
 
   / YAPB (yet another pole barn)
  • Thread Starter
#9  
Hi Todd-

I've posted the only pictures of the poles that I have but can offer a few more details for you. The cage at the bottom is built out of 2" x 1/4" flat steel, cut into 4" lengths. Could adjust length to fit larger or smaller holes. With the 4" length, the cage is maybe 14" across which still allows some wiggle room in the 24" dia holes when getting everything squared up.

The steel tabs mentioned above are welded to the corners of the tubing at (approx 45 degree angle) the lowest set of tabs is about 4" from the bottom of the pole; the next two rows of tabs are set with 9" between them and the one below. So the top set of tabs is about 28" from the bottom of the hole. Once the tabs were welded to the tubing, I then welded five foot pieces of 3/8" weldable rebar to the ends of the tabs, running parallel to the tubing. These four pieces of rebar will be bent over and tied into the rebar in the slab when it is poured. Finally, three pieces of 3/8" rebar were tied into place around the circumference of the cage.

The 16 pieces of tubing (20' long) ran about $1800, so they weren't cheap. Add in a few bucks per pole for the tabs and rebar and I'm probably at $115.00 per finished pole.

The two factors that convinced me to buy steel instead of wood were:

1) I got kindof paranoid after reading all of the stories about wood poles and concrete not playing well together. Ideally I wanted to tie the piers and slab together and didn't think that that would be good with wood. I guessed that steel would do better being planted in concrete. I did clean up the poles and slapped a coat of Rustoleum on them for good luck.

2) One thing I like about steel is that if you buy a straight steel post, bring it home and let it sit for a while, when you go back out later, it is still straight! I find it very aggravating to buy straight lumber, stack it nice and neat in the garage/barn and come out a week later and it is curled, warped, twisted, etc!

You asked about strength comparing wood poles to steel. In this great book I found a table that lists the maximum safe loads for (unbraced) wood members in compression.

For 12' 4x6's, the max load is 3,900lbs
For 12' 6x6's, the max load is 17,400lbs

I ran the numbers to calculate similar max loads for steel tubing and came up with the following:

For 12' 3 x 3 x 3/16, the max load is 18,700lbs
for 12' 3.5 x 3.5 x 3/16, the max load is 29,000lbs

So 3x3 tubing would have done the job of a 6x6. I went with the 3.5" because it would work well to build it into a wall framed from 2x4s. For what it's worth, at 8' pole spacing and 42' building width, and 40lbs/ft^2 (live and dead load), I figure that each pole will only be subject to a max of a little over 6,000lbs. So any of the above is overkill. Especially so since the numbers above are for unbraced members, and all of the poles will end up with quite a lot of bracing.

To answer your last question, securing the wood girts, etc to the steel will be a little more difficult than with wooden posts.

To connect the load bearing eave girt (the 2x12 double header that will support the roof rafters), I recently made some steel plates out of 10" x 3/8" steel plate that will support the 2x12s. These plates also have a 3" wide piece of 3/8" plate welded to the bottom to provide a bearing area for the 2x12 to sit on. So from the side, these plates look kindof like a tall, thin, upside down capital 'T'. The plates also have 1/2" holes punched in them so the 2x12's can be bolted in place also. The two 2x12's will sandwich the steel plate.

Here's a picture of the steel plates. You can see that the bottom piece of 3" steel is "notched" to allow the 10" plate to sit flush on the post and welded in place. I made the steel plates 18" long to allow for a large bearing area for the 2x12s and this also allowed the holes through the 2x12s to be moved a ways from the end as suggested in some texts I read.

For the rest of the girts, I'm going to run 2x4's horizontally along the length of the building. I will attach those to the poles with some "clips" that I made out of 2x3x3/16" angle iron, cut to 6" in length, with three holes punched to allow the 2x4's to be attached with deck screws.

It is certainly the case that the steel posts have required that I invest more time and $$$ in the building, but the $$$ wasn't too much in the big picture and the time didn't amount to much since I did all of that prefab during the dead of winter when it was too cold to be getting much done outside.

I'm looking forward to getting the plumbing rough in and concrete done so things can get moving again!

Mark

ps: The picture shows the steel plates described above. The longer ones are for "middle" poles which will have 2x12 headers on each side. The shorter ones are for the end poles which will have headers only on one side of the pole.
 

Attachments

  • 590389-poles2.jpg
    590389-poles2.jpg
    46 KB · Views: 774
   / YAPB (yet another pole barn) #10  
This looks like a great alternative to wood posts in the ground, for sure. I had no idea steel had gone up that much (last time I bought steel was about a year ago). For those header plates, do you think it'd be a good idea to put a piece of your 3" at the top to catch the top of the pole?

I understand perfectly the plates for the header, but I'm still fuzzy on your angle iron clips for the 2x4 girts. I assume the load for the siding is all on the welds between the clips and the poles (which is fine), but I'm unclear on how you're fastening the girts to the clips? I'm going with a post and beam type of construction and will be attaching vertical 1"x12" hemlock siding (board and batten). How would I best attach the horizontal girts for fastening the siding? I don't think the clips would need to be all that beefy for attaching the siding.
Looks like you do nice work! I'd have to have a shop fab up the metal for my brackets since I don't have a way of cutting the 3/8" plate or drilling that many holes (no drill press), but I could weld them up in the evenings. I'd also go ahead and attach all the plates and clips to the poles before setting them in the ground?

By the way, I checked pricing for 3.5"x3.5"x3/16" A500 tubing and was quoted $7.85 per foot. That's higher than wood of course, but if you compare the cost to using something like permacolumns it comes out close! And it sounds like it is WAYYYYY stronger.
 
   / YAPB (yet another pole barn)
  • Thread Starter
#11  
Howdy Todd-

RE your question about welding another piece of steel to the 3/8" plates that could then catch the top of the pole. That would certainly work! You could even cap the pole with that to keep the rain from sneaking down the inside of the pole to the bottom of the hole. But I don't think that it is necessary. In the end, the plate will be supported by a weld - either to the "cap" you mentioned, or to the pole itself. That great structures book I mentioned above says that a 3/16" weld will support 2,400lbs per inch of weld. So if you run a three inch weld at the top of the plate (to the pole) and a three inch weld at the bottom of the plate, that's six inches of weld == 14,400 lbs of allowable load which is plenty for our needs. One advantage of using a separate piece of steel as you mentioned is that you could weld it while you are on the ground and could turn the pieces this way and that to make the weld nice and easy to lay down versus having to lay the weld while the plate is clamped to a pole 13 feet in the air.

RE the 2x3 clips: It would definitely be possible to just bolt the 2x4 girts directly to the poles. But I want to orient the poles horizontally (1.5" high and 3.5" wide). In other words, the 2x4 should be perpendiular to the pole along both its length and its "height". That'd make bolting them to the pole more difficult. The clips fix that by providing something to secure the 2x4 to that is perpendicular to the pole. I stole that idea from Miracle Truss. Check out the picture at the top of this web page. If you click the higher of the red dots that are inside the garage door, or the one that is a roof purlin, you'll see that by orienting the 2x4's that way and spacing the girts/purlins 24" OC, you can use regular old (inexpensive!) insulation, running horizontally around your building. That's what I want to do.

I bet that Miracle Truss just takes a piece of 3" plate and welds it at a 90° angle to the truss. I had some extra 2x3 angle so I'm going to use that. Since it is bent 90° already, it'll be easy to clamp it in place (2" side to pole, 3" side to support 2x4), weld it and then set the 2x4 on top of it and run a couple deck screws up through the clip, into the 2x4.

RE making the plates. I cut the plates and the little support plates that are welded to the bottom of those with an oxy/ace cutting torch. Ditto all of the clips and their holes. I did get lazy and took the plates to a machine shop to have the 1/2" holes punched with an Iron Worker machine. IMO, a cutting torch is SUPER for cutting 1/8 - 1/2" plate, but punching holes is a bit of a pain as the plate gets to 3/8" or more (especially for my Sam's Special torch which isn't very big). The machine shop charged me $0.50 per hole, or about $60 for the whole lot of 'em. Compared to the day or so it would have taken me to do it, I was happy to hire it out. But, FWIW, if you don't have one, a oxy/ace cutting torch does very well for most cutting needs and is pretty easy to learn. Speaking of that, check out the attached picture. This is my wife helping me cut the 2" x 1/4" tabs that are used to make the cage at the bottom of the poles. I needed something like 192 of the small steel plates cut so she helped me out by cutting about a third of them! Wow, looking at that picture reminds me that that was on Christmas day! What a gal. FWIW, she'd never used a torch before. I showed her how, and she knocked out about 70 of those small plates in an hour or so! (I guess I better hang onto her!)

Lastly. Avoid the temptation to attach plates and clips to the poles ahead of time. If you do that, you will have to make sure and set all of the poles in the ground at the exact same elevation! If the hole for one pole is lower than the one next door and you don't somehow fix that, the clips and plates will be out of level. It's hard enough to get the poles in the ground oriented plumb and square. You don't want to also have to figure out how to shim them all up to the exact same height.

So wait to weld anything (above ground level) to the poles until after they are all in. Then you can use a laser level or transit to establish a level on all of the poles, then measure up/down from that mark to establish where to put all of the clips and the plates up top. Put the poles in the ground a little long so you'll have some room for error and plan to cut them all off a little to the level you have established.

Mark

ps: I'm still waiting for concrete. Darned wet/cold weather has my concrete crew backed up...

added in edit: I checked my receipt and I paid $5.30/ft for my 3.5 x 3.5 x 3/16" in December. The price of building materials continues to climb! /forums/images/graemlins/frown.gif
 

Attachments

  • 591093-samTorch.jpg
    591093-samTorch.jpg
    59 KB · Views: 471
   / YAPB (yet another pole barn) #12  
Great info!
I have an oxy/acetylene rig, but I'd probably just use a chop saw for those. Thanks for setting me straight on the clips, and I now like this idea even more since you pointed out the cheap insulation.
On the issue of welding the clips on before installation, remember that I only need 10' above ground so they won't be THAT heavy to move around and shim here and there (at least no worse than a 160# concrete permacolumn). I was thinking of actually setting a corner, then installing the bottom girt and keeping it level as I work my way, post to post around the barn (again I don't have much construction experience other than some run-in sheds, so this idea may be moronic). Couldn't I just run a level across the bottom girts and adjust each pole height as I go? If I had a way of anchoring each pole until I finished, I was thinking I could concrete all the poles in at once. With the strength of this setup, I could probably put all the hay I wanted in my loft with no worries.
For me, moneywise, this is actually looking like a competitive solution versus the permacolumns. It allows me to use more of my existing equipment and skills. If I go with the permacolumns, I have to rent a skid loader just to unload the pallets, which adds even more to the cost (haven't priced a rental fee for the skid loader yet). I've all but ruled out the post protectors since $40 seems like a lot just for a plastic sleeve for a post (still have the cost of the pressure treated posts).
Thanks again for all the ideas!
Todd K.
 
   / YAPB (yet another pole barn)
  • Thread Starter
#13  
Hey Todd-

What you are proposing could very well work. One thing that I've read from several sources is that one of the nice things about pole barn type construction is that it lends itself to one or two people working a little at a time. You put in a pole here and there as time allows and build up from there.

With that in mind, it certainly wouldn't hurt to weld the plates and clips on a couple poles and put them in as you suggest. If you find that it works great, then great! If not, you can go ahead and mix up some concrete to set those couple of poles and then try something else.

I definitely appreciate your idea of wanting to set all of the poles and then have all of the concrete poured at once - preferably out of the back of a big truck! My concern was that it would take a weekend or two to set the poles in the ground and brace them up. If they had _no_ concrete in the ground to help anchor them, I worried that they'd move around before the concrete was poured. Especially if any hired labor was involved in that effort and they bumped a brace, etc. I pictured myself running from pole to pole in a panic with my magnetic levels as the concrete was being poured! /forums/images/graemlins/laugh.gif

So I decided to mix enough concrete to help set the poles in place, leave the braces there to also help out until the slab was poured. So each of my holes has maybe 16" of concrete. In a 24" dia hole, that's a fair amount of concrete (4 80lb bags per hole), but with the poles being 18.5 feet tall, I wanted to leave the braces there.

One thing I noticed. As we leveled up the poles and poured the concrete, we had everything 100% spot on. But when I checked some of the poles a few days later, a few of them are off by a hair (maybe 1/4 to 1/2" at the top). I think that that is due to the 2x4 braces contracting as they get wet, dry out, etc. For some of the poles, simply loosening the clamp that holds the brace to the pole and then retightening would allow the pole to snap back to where it wanted to go (reinforcing my theory that the darned braces were changing lengths on me!).

FWIW, the paperwork I have from the company I bought the steel from, the 3.5" posts weigh a 8.1 lbs per foot. So with a few feet in the ground, your poles will weigh around a hundred pounds.

One last suggestion that I used. I set up batter boards and string lines to establish the perimeter of the building. Then I used those lines to place the four corner poles first, making last minute adjustments by double checking the distance between the poles along the edges and diagonal of the building.

Once the corner poles were in, I then ran a string line between the corner poles instead of the batter boards. By taping a 1x2 stake to the outside of the corner posts and stretching the string tight, I then made sure that each of the middle poles was a 1x2 thickness away from the pole.

Lastly, if you have the time and desire to do so, I can't recommend highly enough using some CAD software to design/layout your building. As you put components in place on the drawing, you can then go back and find out "what is the inside measurement between these two corner poles across the diagonal of the building" and not have to do a bunch of trigonometry to get very accurate answers! It allows you to think ahead and every item that pops into your head, you place on the drawing so that it'll be there later to remind you. I spent many hours this past winter doing just that with this building and am better prepared now that things are starting to go together.

The last storage building I built I used this free CAD program. I've since switched to Autocad 2004. I heard that there is an "Autocad Lite" that is free? If so, that might be the way to go.

Keep us posted on your building as it goes up!

Mark

ps: I Google'd "Autocad Lite" and "Autocad Light" and finally found "Autocad LT" which must be what I heard of. Not free, but did see it for $150.00 for a student version. ..
 
   / YAPB (yet another pole barn) #14  
I totally agree with the CAD thing. I used Visio to lay out my building and it's been great! That is, until now. Your idea on using the metal poles means that I have to go in and change all the 6x6's to 3.5x3.5's /forums/images/graemlins/wink.gif
I think it's wise to concrete the poles as you go (after setting the corners) like you suggested. I have access to a large, industrial type gas powered mixer that I could move from hole to hole...that would probably be perfect.
Regarding welding the plates, etc. on beforehand, my rationale for that was it'd be easier to line them up and level them near the ground (using the bottom girt) rather than at the top. It would be tough to cut the top off of one of those poles once it's set in the ground, right?
The more I think about this metal pole option, the more I lean toward it. For instance, I really like the idea of welding all my stall door hinges onto metal poles, and also welding channel on the poles inside for boards to slot into for stall fronts. Some hunter green paint on the metal and polyurethaned hemlock and suddenly I have a NICE barn...makes for a much better investment. Plus, the metal edges are not as enticing for the horses to chew on...they LOVE the T-111 siding I put on their run-in sheds!
I'll keep working on my plans. Thanks again for ALL your help and ideas. What a great resource!
Todd K.
 
   / YAPB (yet another pole barn)
  • Thread Starter
#15  
Hi Todd-

RE cutting the poles off when they are in the ground: My torch, bottles, etc are in a rack that I can put on a two wheeler to make it mobile. I'll wheel that out and cut off all of the poles using the torch. I already cut all of the poles down a little with the torch and it goes through that 3/16" steel quick and easy. The reason I cut them down some was thinking ahead to cutting them off to their final height. With a 20' pole in the ground, I might have to cut off about three feet from the top of the pole. At almost 30 pounds, it'd be scary to be on a ladder trying to hold the just-cut-off piece of pole in one hand and having a torch running in the other hand. As it is now, I will only need to cut off a foot or so which will be a little easier to handle.

I guess that making the decision on whether to weld the plates and clips on ahead of time or after the poles are in the ground depends on one question:

What is a bigger pain in the neck:

1) Having to cut the top of the poles off and weld all of the clips and plate on the pole with the pole in place.

2) Not having to do any of the above, but having to do more bracing, etc to hold the poles in position before pouring concrete.

To me, the issues in 1) are pretty minor. I've not tried 2), so maybe it's not as tough as I picture it.

I'm sure that either way, you'll get them in place and it will turn out great. To me, all of the planning, etc is all part of the fun! It sounds like your plans are percolating along just fine! /forums/images/graemlins/cool.gif

Mark
 
   / YAPB (yet another pole barn) #16  
Todd & Mark,

Here's an interesting argument for welding the plates & clips on before putting the poles in the ground.

With the plates & clips in place, it would be possible to run lengths of 1-1/2" angle between the poles (clamped to the clips) to help in aligning everything. Picture LOTS of C-clamps!

What I'm thinking is to prop the poles in the holes, clamp on the angle, then add your bracing. You can hang your magnetic level off a length of angle to determine if the poles are at the right heights, then jack the lower pole up and brace it.

Yes, this means buying a load of angle. So what, it's got to be about the most useful steel to have in stock. I use vast amounts of 1-1/2" angle for projects all the time. (Yup...bed rails are my friend...)
 
   / YAPB (yet another pole barn) #17  
Interesting...sort of along the lines of what I had in mind. My thinking was that I could set a corner pole, then lay the adjacent pole in the ground and use a laser level (as opposed to angle iron) to align the lower clip on the free pole so that it's level with the clip on the pole that is set. Then brace the pole and continue on the way around.
I also would like to use a precast concrete "pill" that I could drop into the holes (for the poles to rest on) rather than pouring the bottom of each hole. Does anyone know where to find those, and what sizes are available?
I'm so glad I found this forum! I've been looking around the site over the past several days and it's chocked full of good information. What a find!
Todd K.
 
   / YAPB (yet another pole barn)
  • Thread Starter
#18  
Sound like good ideas!

I'll second the "lots of clamps" comment! I have 40 clamps holding all of my braces in place!
 
   / YAPB (yet another pole barn)
  • Thread Starter
#19  
My question for the day: PEX versus copper?

A buddy of mine that is going to help me with the plumbing rough in has suggested that we use PEX. Whenever I think plumbing, I think copper.

Anybody have any experience with PEX?

One concern I have is that PEX can be destroyed by mice chewing it up. Since it will be a long time (maybe never!) before this building is completely mouse proof, I'm a little nervous about PEX.

While I have the ear of any plumbing experts, here's another question - is it necessary to shield copper tubing where it penetrates the slab? If so, with what? I'm guessing that it'd be a good idea even if it's not required...

TIA for any help.

Mark
 
   / YAPB (yet another pole barn) #20  
Mark,

I just used PEX for the first time. I chose it because the location of the previous copper line was over a covered porch and had frozen twice in one week. I could not use heat tape due to the enclosed area and providing heat was not reasonable. Had another pipe break that week and did not want a repeat. Apparently it will expand when the water freezes and not rupture.

If this is your primary concern it may be the way to go. You may be able to shield it with PVC or something else. Don't know if mice will go after it or leave it alone.

I hired a plumber to do the PEX install since the fitting to the copper was in the ceiling over our dining room. He normally used shrink fittings but had difficulty since he was working outside in the porch ceiling space and the temp was about 40 deg. F. He had to use crimp on fittings. This may be a consideration.

...Derek
 

Marketplace Items

Towable Chemical Applicator Sprayer (A59228)
Towable Chemical...
2001 PETERBILT 379 (A58214)
2001 PETERBILT 379...
2021 SANY SY265C LC LONG REACH EXCAVATOR (A59823)
2021 SANY SY265C...
2025 CFG Industrial MX12RX Mini Excavator (A59228)
2025 CFG...
2005 PETERBILT 379 TRI AXLE  DUMP TRUCK (A59575)
2005 PETERBILT 379...
2021 XCMG CV123PDU ROLLER (A60429)
2021 XCMG CV123PDU...
 
Top