work on my allis g

   / work on my allis g #1  

Soundguy

Old Timer
Joined
Mar 11, 2002
Messages
52,424
Location
Central florida
Tractor
RK 55HC,ym1700, NH7610S, Ford 8N, 2N, NAA, 660, 850 x2, 541, 950, 941D, 951, 2000, 3000, 4000, 4600, 5000, 740, IH 'C' 'H', CUB, John Deere 'B', allis 'G', case VAC
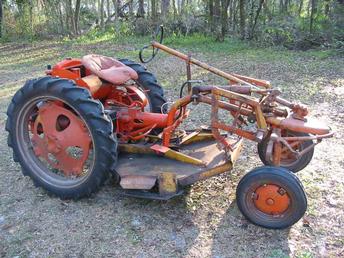
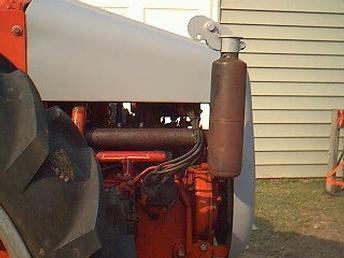
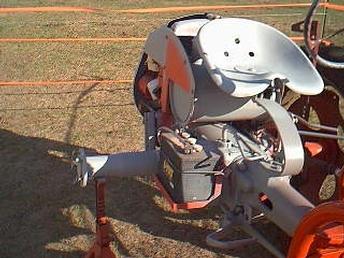
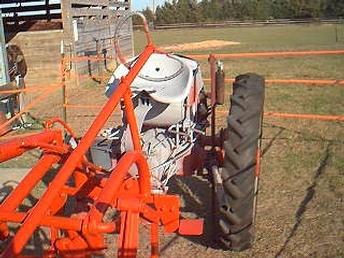
Well, I got off work a bit early today and decided to spend some time with my Allis G.
I degreased it.. boy what a task...

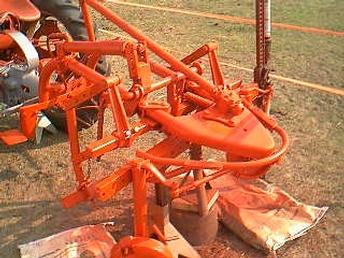
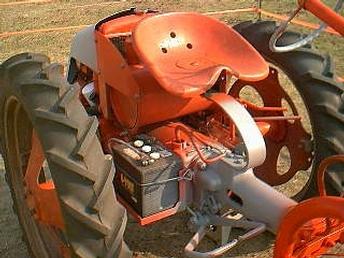
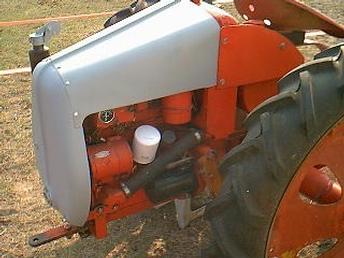
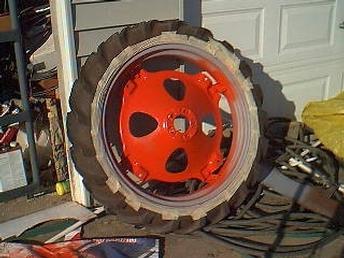
I've got the front up on jackstands and buffed as much paint as I can off. I primed everything forward of the steering wheel on saturday and sunday. Today, i shot a couple coats of persian orange on it. Gosh.. it looks great. I cad painted the front rims.

When i get more time off ( wednesday? afternoon ) I'll reinstall the front rubber and jack up the rear and prime it. Then disassemble the rims and centers and get them ready for paint. Hood and cowling were already primed. I need to do some body work ont he fenders, as well as alotta buffing and perhaps some brazing or welding on the battery box. At a minimum.. it needs help with corosion on the box floor.

It's looking more like a tractor now than a dune buggy now that it has some sheet metal!

Soundguy
 
   / work on my allis g #2  
Yeah, a dune buggy.
That was what I first thought when I saw it.
That thing would make a great dune buggy.

I used to have a dune buggy.
It was the first car I ever owned.
I sold it a couple of years ago.
I miss my dune buggy.

Pooh Bear
 
   / work on my allis g #3  
What, no photos? I looked back through your othe Allis-G posts and haven't seen any.

By degrease what exactly do you mean? Pressure wash? Rubbing it down with Simple green?

Also what does cad painting mean?

Sure would like to see before and after.

Cliff
 
   / work on my allis g
  • Thread Starter
#4  
I posted some pics before on other messages.. Not sure where they went.. Let me see what I can scrounge up.

Many of these oldies came with parts that were cadmium plated.. like gas tanks.. and rims mainly.. to give corosion resistance. That usually wears off or gets buffed off over the years.. or the repros come out virgin metal.. etc. There is a silver cad paint out and or you can use aluminum paint.. or silver paint... all 3 paint types look virtually the same, and look very close to the original cad plating.. though you can tell them apart.

I didn't pressure wash.. but did do some scraping brushing, and wiping with gojo citrus cutter/cleaner spray in a hand pump bottle. I was gonna buy an empty hand pump bottle at TSC and just use some of my simple green in my bulk jug at the barn.. but I notice dthe empty jugs cost a whopping 22 cents less than the prefilled bottles of go jo degreaser.. I decided for the 22 cents more.. I'd get the degreaser.. and when it was empty.. I'd use it for simple green anyway...

Soundguy
 
   / work on my allis g
  • Thread Starter
#5  
a25908.jpg


Ok, here is 'as purchased'.

It has a well used/rusty but functional woods mower deck under it. It has the factor optional belt pulley and hydraulic pump, as well as the factor hydraulic lift kit for the mid mount tool carrier. One front tire is an original 4x12 3 rib, and the other is a 4.8x12 trailer tire... both have now been replaced by a more readilly available 5.0x12 3 rib. Rears are 95% new. It has no fenders, hood, or rear hood cowling ( rear hood support ). It's had a weld repair or two on the front nose stabilizer bar.. nothing I'm going to mess with. The weld looks a tad crude.. but it also has had 4 coats of paint sinc ethe weld.. so my guess it is one of those ugly but tough 'good' welds. If I was ****.. I could grind on it for a few hours.. .. but I think I'll just leave it be. I don't want to chance cutting out so much weld that I have to take it down to original diameters and start over... My welding skills are still in the beginner stage.. not to mention I'd have to haul it to work to use the mig welder to get any kind of a good look.

I've found an original battery box, box lid, and rear cowling. A reproduction hood, and a reproduction cast crank hole... that gets installed into the rear cowling as a support for a hand crank. I also found a set of fender that were custom shortened ( with a torch? ). I'll have to grind on them to clean up the edges.. but they actually look ok. I liek the shorter looking ones anyway, as I'll have 2 hyd controlls on the left side and the shorter fender will help me get to them.

The tranny shifter had a small toilet plunger end on it instead of a rubber boot. I've located a suitable replacement boot. I've alsop purchased a 6v lamp for it, as well as a replacement manifold and muffler.. though I'll hold onto those as spare parts. it currently has a home-made muffler and manifold on it. Previous owner was good with a welder.. the homemade manifold looks great.. mad of pipe and flat stock. The muffler is a neat looking upright mini stack. I like it.. though the oem pancake muffler is nice as well. If I ever need to swap them.. I have the gaskets and parts available.

I had to customize the lower mounting bolts for the rear cowling to make about a half inch more clearance for the new muffler. that was easy by welding a nut onto a very short piece of allthread the same size as the mounting stud.. then screwing that onto the stud.. thus making an offset.. and then the cowling attatches to that offset stud.

I dropped the mower from the tractor as it needs serious maintenance.. lots of welding to do on it.. though all the bearings and spindles are good and tight...

It all comes down to how much shop time I get to spend on it. It is slow going being able to work on it only an hour hear and there. Most of my time is used up in buffing decades of old paint off of it with an agressive 3-m stripper disc and a hand drill.

While working on it this weekend, I noticed the fan belt was hanging on by a thread and a prayer. When I removed it I found that it was an old studebaker belt...talk about old!

Heres a rear shot:

a26184.jpg


Soundguy
 
   / work on my allis g #6  
Thanks for the photos and the run down. Sure is a wacky looking tractor, but I've always liked them for some reason I don't understand. Seems to me that if the MMM wasn't installed, it would be pretty easy to pop a wheelie.

Nice work, I look forward to the rest of the story.

Cliff
 
   / work on my allis g #7  
That's what the trailer hitch is for, A wheelie bar. /forums/images/graemlins/grin.gif
 
   / work on my allis g
  • Thread Starter
#8  
Yep.. letting the clutch out too fast with any throttle above idle will make the front come off the ground a couple inches.. Don't ask me how I know that. ( On my test drive in the owners yard.. I popped a 2" wheelie, and left a spinnout mark in his st augustine lawn.. I figure the tractor price covered the damaged sod /forums/images/graemlins/blush.gif )

Ok.. I took some pics today.. and here are 4 of them that fairly accurately capture the amount of work i've done so far.

Front frame.. I buffed/primed/shot it. I'll probably run one more coat on it..??

a26199.jpg


Operator platform. i still need to do reconstructive surgery on the battery box, and the fenders.. then when It is all reassembled.. I'll doctor the wireing.


a26202.jpg


Right rear.. shot of the new hood and used cowling. Also shows the engine, and simple control panel... lamp switch/resistor for generator, ignition switch, and ammeter.

a26200.jpg


Here the left rear.. shows the previous owners home made manifold ( great job ) and stack style muffler. The oem one would have had a pancake muffler mounted to the middle of the manifold. With this setup I had to lengthen the cowlng mounts by about an inch.. The fender mounts and hood area gave me just enough play for this.. that way the hood didn't set right ont he manifold and bur the paint.. and kept me from cutting the cowling down.. those cowlings are not reproduced anywhere and are pricey.. very pricey.


a26203.jpg


Soundguy
 
   / work on my allis g #9  
Looking good. It's amazing how many arms and joints and bars and couplings there are on the front end. Got to love the color.

Cliff
 
   / work on my allis g #10  
Looking good Chris. I've seen a number of those at various fairs/shows. Always catch my eye as they are so unique. Do you show any of your vintage iron? Thanks for the pics and keep 'em coming /forums/images/graemlins/smile.gif
 
   / work on my allis g
  • Thread Starter
#11  
Yes. I just started showing them last year. So far I've taken my 1946 ford 2n, and my 1952 ford 8n to shows.

If I get this sucker done by mid march.. It's going to the starke/fl show I go to twice a year..

Soundguy
 
   / work on my allis g #12  
Chris

With a front end like that I bet your gettin' good at standing on your head with a paint gun in your hand tryin' to get it all covered with paint.

Whiskey
 
   / work on my allis g
  • Thread Starter
#13  
That's one reason why i went with a bottom tank gun.. With the cup at least half full.. I can paint with the gun horizontal.

It does make it a tad tough.. even with the front end jacked up.

Soundguy
 
   / work on my allis g
  • Thread Starter
#14  
More updates!

I got a few hours work in on it, some before, and some after working with the animals today.

I got the front rims cad painted, and shot the front half of the tractor with another coat of paint. I pulled one rear rim and center.. buffed and primed both, and got the center painted orange.. but ran out of time to do the rim cad paint. I did some priming on the rear axle and tranny.. and am trying to touch up a repair the prev owver did on the seam in the gas tank. It doesn't leak.. but he sure used alot of sealer. I'll sand it down smooth and primer it before it gets the orange. I primed the seat.. after some buffing.. but may end up sanding on it again this weekend due to some piting. Primes cheap.. at least it will keep the metal from rusting.

I'm still waiting on one more box of parts from the big brown truck, and also have some extensive restoration to do tot he fenders and battery box.. I forsee some welding or brazing.. and lots of wire wheel and grinding.

I bought a 'test' rod to make the choke and starter pull rods. 3/16 looks great.. I;ll pick up another tomorrow. I'll heat and bend them around a 1" round stock with a little heat from the gas axe and they should look almost OEM.

Oh well, all for now.. gotta hit the shower.

Later guys!
 
   / work on my allis g #15  
Chris:

Man your blowin' me away.......I haven't shot any primer yet and this weekend is not looking like good weather for paint or primer. I did get the hood back from a friend who did a little body work for me and have the fenders in the back of the car to drop off to him after wook and see if he can do a little repair on them and I should be on my way to painting.

The feller next door is commin' over with the backhoe on Saturday to help me clean out a drainage ditch in the back of the property, so maybe on Sunday I'll get some time to start cleaning up the tractor and preping for paint.

Whiskey
 
   / work on my allis g
  • Thread Starter
#16  
I've been lucky on weather. Even in florida, mid february is generally a tad colder.. and I don't like to / can't paint or prime in under 70' weather.. just doesn't stick good.

I've also taken an hour off work early twice this week, so I could get home and shoot some paint before dark ( SHHHH don't tell my wife! )

I actually like the body work.. the metal repair that is. The buffing and paint removal is a bit tedious though...

Soundguy
 
   / work on my allis g
  • Thread Starter
#17  
Here's a few more pics as of the 11th.

Shot of rim is after prime and center paint.. but before I broke it down to cad paint the rim which i did tonight. Tomorrow I'll reinstall it.

Soundguy

v2272.jpg


a26252.jpg


a26253.jpg
 
   / work on my allis g
  • Thread Starter
#18  
I actually had a full day to work on the G this weekend.

I finishe dup the buld of the painting, including repainting the rear cowl on the tractor. I bufffed, primed and shot the fenders, battery box, and lid, and also finished the rear rim and center. Just need to bolt those items on.. and look for areas to touch up paint.

I painted the steering wheel flat black, and went with hi-temp black on the muffler.

Looks like it will be ready for decals by next weekend hopefully.

Soundguy
 
   / work on my allis g #19  
You sure work fast. I gather the mechanicals are all in operating order already.

Were you also going to redo the belly mower? I'll be interested to see that process.

I have an old small wagon that's rusty, but is made of sound thick metal. You've got me interested in in the process, maybe I'll start with that. Thanks for the motivational thread.

Cliff
 
   / work on my allis g
  • Thread Starter
#20  
The mechanicals are all functioning. It had been rebuilt by the prev. owner in 1992.. so that's almost a fresh engin ein antique tractor terms. No smoke, and just the lightest puff of blowby out the breather tube.. no oil inthe water/water inthe oil.. starts easy. I did attentd to a few minor mechanical and wireing issues.. but mostly maintenance items.. Funniest part was changing the fan belt.. it was ratty-tatty, and had a studebaker part number on it!

It also needed front tires.. etc.

Yes.. the mower is 100% operational, but looks like a pile of rubbish. All the spindle bearings are good as well as the mainpulley and blade carrier and ORC. The bulk of the metal is sound, and all the 'load bearing' supports are sound. There's some rust thru on the deck in a few spots I can cut and stitch, and I need to address a few splits inthe side where 'runner' rails were attatched, and the bolts loosened up and wallowed out the holes in the side of the mower.. etc. That will be my leisurely project... no rush... I've got 3 other cutters for tractors, plus a riding mower and a push mower.. so I am on 'no' timetable for the mower rebuild. However.. I have had a inkling of turning the mower into a belly mower for my 8n... it is a 60" woods mower.. I know the 8n would pull a 72".. but this would make it more agile. frame and bracketry would be easy.. I'd just need to come up with a pulley... shouldn't be too hard? /forums/images/graemlins/blush.gif I hope.

Thanks for the kind words. Something just got into me about this little tractor.. and i wanted to finish it to make at least one of the shows i attend this year.

I got about 3 hours on the G today, and got the fenders installed, removed the cobbled up battery tray the previous owner made.. cleaned up the battery and terminals, and installed the new box, and lid. My welded up new floor for the battery box fit perfectly and hold the battery good.

I opted to go with 1/8 metal dowel rods to re-create the choke pull rod and the starter pull rod that go thru the fenders. The both work great. I used a large 1.25" piece of round stock as my bending template for the finger loops. I got them as close to 'matched' as possible. if you look them over close you will see minor differences.. but what the heck.. I couldn't find originals anywhere. I had previously primed and painted the rods, so all I had to do was touch up the paint were the bend was. I installed a 6v headlamp on a cir-clamp bracket where the upright steering column support meets the steering tube. Wired it up to the OEM headlamp switch and it worked great! I thought about adding a tail lamp.. but with a quick check of the ammeter, the ignition and 30w 6v lamp draws 8.5 to 9 amps. My service manual says that genny is capable of 9.5a max.. so I'm at the limit with the single headlamp. I see pics of a small bullet style lamp inthe rear as well as a headlamp.. so my gues sis the oem headlamps must have been like 20 - 25 w instead of 3.. and the rear lamp must have been just a 5-10w red bulb.. cause the genny wouldn't do any more than that.

I mounted the last rear rim and center that I painted this weekend, and pulled the jackstands out, so she's standing on all her own rubber now.

At this point all she lacks is some touch up paint ont he lugnuts, and fender bolts, some on the headlamp bracket nut, and then decals, and then the padded orange seatcushion. Perhaps wednesday will be the 'finish' day?

In any case, I'll get some pics then, finished or not.

Soundguy
 

Tractor & Equipment Auctions

2017 ISUZU NPRHD 16' BOX TRUCK (A60430)
2017 ISUZU NPRHD...
2012 Ford E-250 Cargo Van (A59230)
2012 Ford E-250...
2025 32in Bucket Mini Skid Steer Attachment (A59228)
2025 32in Bucket...
2021 HYUNDAI HX220L EXCAVATOR (A60429)
2021 HYUNDAI...
KBH Tender (A61307)
KBH Tender (A61307)
2020 INTERNATIONAL LT625 TANDEM AXLE SLEEPER (A59904)
2020 INTERNATIONAL...
 
Top