quicksandfarmer
Elite Member
After getting the floor beam shored up I could work on supporting the hay loft on that side. Originally there had been eight posts between the floor beam and the beam that supports the hay loft. They held up that beam, and also served as dividers between the nine dairy stalls in that end of the barn. Those posts had been gone for decades when I came on the scene. They had been replaced by a motley collection of uprights that were landscape timbers from a big box store, not even proper posts. When I hoisted the loft at the beginning of the project they fell away with disturbing ease.
The beams had matching mortises to show where the tenoned posts had been. I was able to buy rough-sawn timbers from a local sawmill. (On the southeast corner of my property is an old family cemetery with a handful of graves, they have the same family name as the mill that I bought the wood from). I cut new posts and cut tenons into both ends. At the bottom I cut the tenons as deep as the mortise, but at the top I only cut them about 3/8" deep. At each post I put the new post in at the bottom, then used a post jack to spread the beams enough to slip the top in. At times hammering and cursing ensued. Where I had replaced a section of the bottom beam I didn't cut new mortises, I just toe-nailed the beam. For those posts I could put a deeper tenon in the top and then swing the bottom into place.
While the mortise and tenon joints aren't visible once the post is in place I believe it makes the beam stronger to have the mortises filled.
Here's a picture of the completed posts, which I learned were called "stanchions."
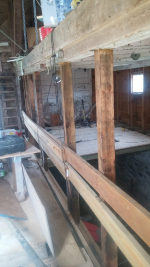
The center stanchion is missing. At some point a notch was cut into the beam there, I don't know why. I'm still trying to decide whether and how to deal with that.
Once the posts were in place I relaxed the chains a little, letting the weight of the loft settle onto the floor beam. When I had first repaired the beam it seemed almost a little flimsy, shaking under my feet. With some weight on it feels very, very solid.
The beams had matching mortises to show where the tenoned posts had been. I was able to buy rough-sawn timbers from a local sawmill. (On the southeast corner of my property is an old family cemetery with a handful of graves, they have the same family name as the mill that I bought the wood from). I cut new posts and cut tenons into both ends. At the bottom I cut the tenons as deep as the mortise, but at the top I only cut them about 3/8" deep. At each post I put the new post in at the bottom, then used a post jack to spread the beams enough to slip the top in. At times hammering and cursing ensued. Where I had replaced a section of the bottom beam I didn't cut new mortises, I just toe-nailed the beam. For those posts I could put a deeper tenon in the top and then swing the bottom into place.
While the mortise and tenon joints aren't visible once the post is in place I believe it makes the beam stronger to have the mortises filled.
Here's a picture of the completed posts, which I learned were called "stanchions."

The center stanchion is missing. At some point a notch was cut into the beam there, I don't know why. I'm still trying to decide whether and how to deal with that.
Once the posts were in place I relaxed the chains a little, letting the weight of the loft settle onto the floor beam. When I had first repaired the beam it seemed almost a little flimsy, shaking under my feet. With some weight on it feels very, very solid.
