OK, I'm getting almost caught up now.
Once I got the beams all squared away, the next step was to work on the east bay of the barn. This was the milking parlor. The flooring was completely rotted from decades of manure, and the joists underneath were gone as well, I couldn't save a single one of them. So the next step was to put replacement joists in.
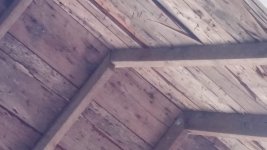
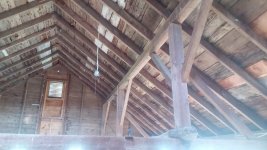
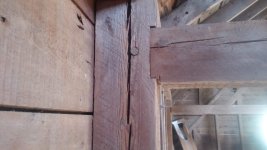
Here are two pictures you've already seen and one new one:

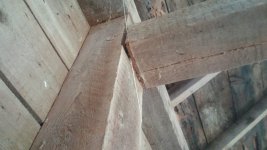
The original joists were 3x7's on about 22" centers (it varies somewhat). They run from the east floor beam to the east sill. The sill is mortised to receive them and the ends of the joists are tenoned, the joists sit with their tops flush with the top of the sill.In the background of the middle picture you can see the sill and the mortises in it. The floor beam sits about 4 1/2" below the level of the sills and the joists are notched at that end. Along the top of the beam there was a piece of wood that functioned like a rim joist, holding the ends of the joists. I don't know what it's properly called but I'm going to call it a rim joist. It had to be replaced so the first step was to replace it.
When I went to measure the rim joist thing I found it was 4 1/2" inches at one end and 5 1/2" at the other, due to settling. That got me thinking I wouldn't be able just to rip a piece. The joists in the middle bay of the barn run perpendicular to the bay that I'm working on, or parallel to this rim joist, and I realized that there would be a jump in the floor if it wasn't at least close to the height of the first joist in that bay. So I cut two pieces of 2x6 to length, and tacked them to the stanchions. Then I did my best to scribe them to the first joist of the middle section. The floor is still on the middle section, so I had to go down to the basement and stand on a step-ladder. I made a little jig from pieces of 2x4 that allowed me to hold one end against the existing joist with a short level, and then scribe the other end against the jig. I marked at every stanchion, then used a straight edge to connect the marks. I took up the pieces and cut them with a circular saw, then put them back and nailed them to the stanchions.
Then it was time to work on the joists. The originals were 3x7, so I used doubled 2x8's. At the sill end they fit into a mortise, and at the beam end they rest on the beam and sit flush to the rim joist. First step was to measure the length from the bottom of the mortise to the rim joist, and cut them to length. The sill is 7" high and sits on the foundation, which is about 24" thick and made of fieldstone. The replacement joists are nominally 7 1/4" so they needed to be trimmed to clear the foundation, I took about 3/8" off of the last 24" to be sure. Then I measured the depth and width of the mortise and cut a tenon on the end of the replacement joist.
Fitting the tenons ended up being quite time-consuming. I'd measure and get close, and then try to fit them and adjust. Depending on how close the fit was I'd use smaller and smaller saws, and then a palm sander, to make incremental adjustments. A complication was that the top of foundation wasn't smooth, in parts there were stones sticking up. The original joists had been scribed around the stones and I did the same thing. Once I got one piece of the joist to fit in the mortise I would set it down on the beam at the other end and measure how much it stuck up above the rim joist and how far it sat on the beam. These were different for every joist. I'd cut a notch so that the top sat flush with the top of the rim joist. I would usually have to make a few adjustments to get it to sit flush and tight.
Once one piece of the pair of joists was cut I used it as a template to cut the other piece. Then there would be more fitting as I had to get the width of the tenon so it fit in the mortise. Once everything fit I nailed through the rim joist into the ends of the new joist pieces, and nailed the two pieces to each other. This process was pretty time-consuming, I figure I averaged about two hours per joist piece, or four hours per pair. The first one was the toughest as I had no place to sit, I had to do all of the fitting from a stepladder from below. Once the first one was in I put a piece of plywood on it, and as I've worked I've moved more sheets of plywood out to make a pretty good platform. But it's still hard. The joist pieces are heavy, and the 22" spacing means I have to reach pretty far from where I'm sitting and it's awkward. During the fitting process I have to lift the new joist pieces into place repeatedly, and my arms take a beating. One thing that I've found helps is to put a c-clamp on the middle of the piece so I have something to grab onto.
So far I have done seven of the fourteen joists. I figure I have about 28 hours left to go, so three and a half days, or more likely, about ten evenings.