The Log house Project begins........

/ The Log house Project begins........
  • Thread Starter
#1,461  
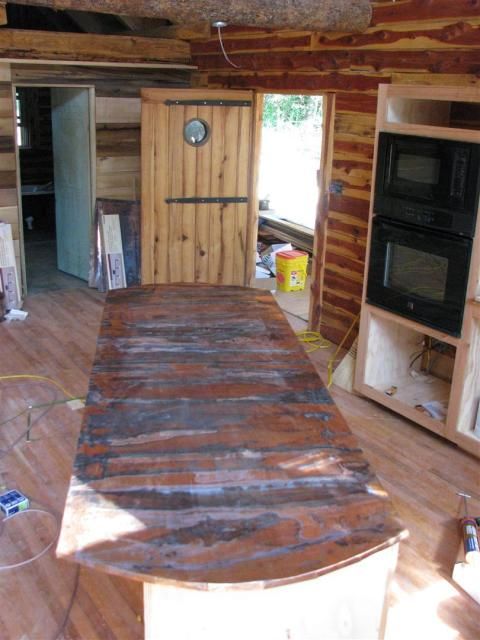
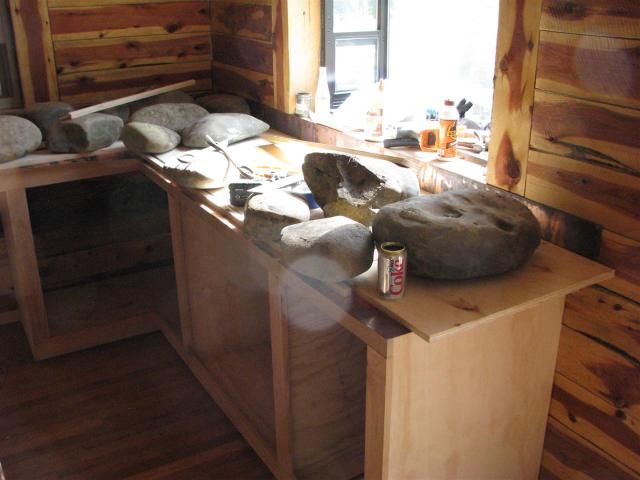
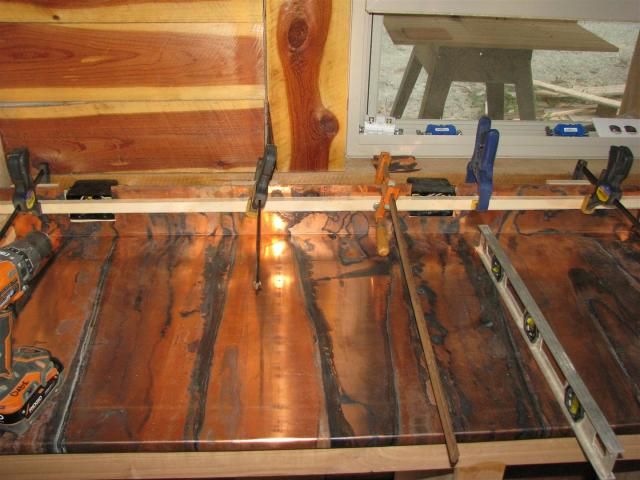
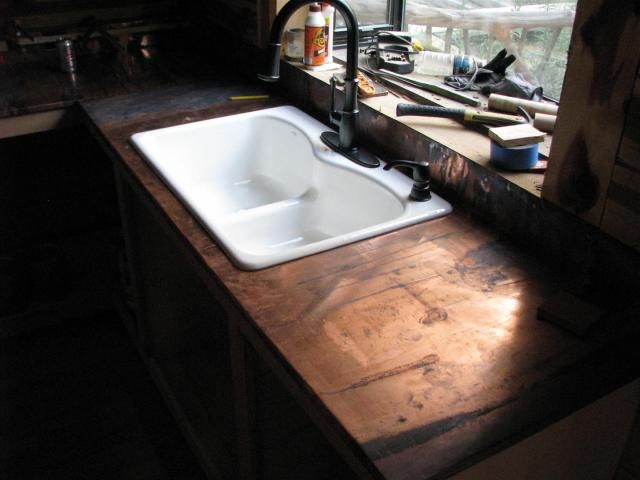
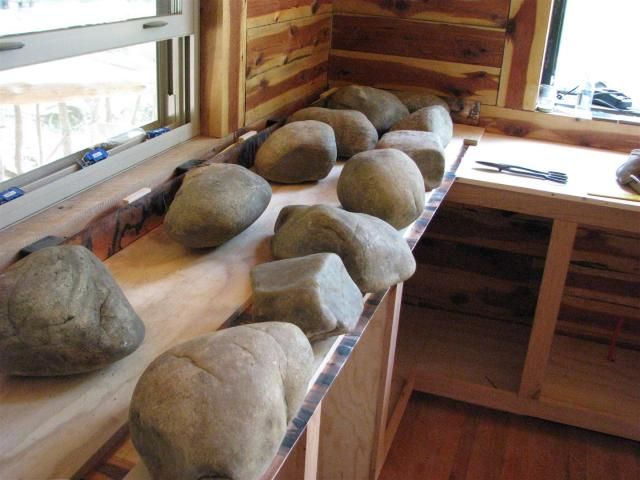
I glued down the countertops using Liquid Nails in the gallon buckets and a 1/16th notched trowel. Then the weigh-ting began:
Coppercountertops003.jpg


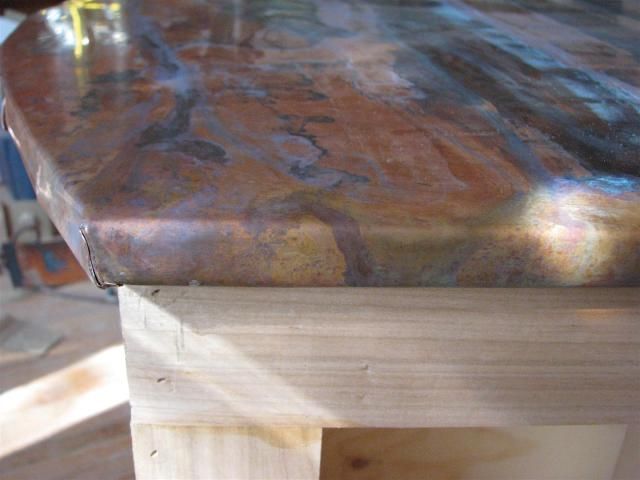
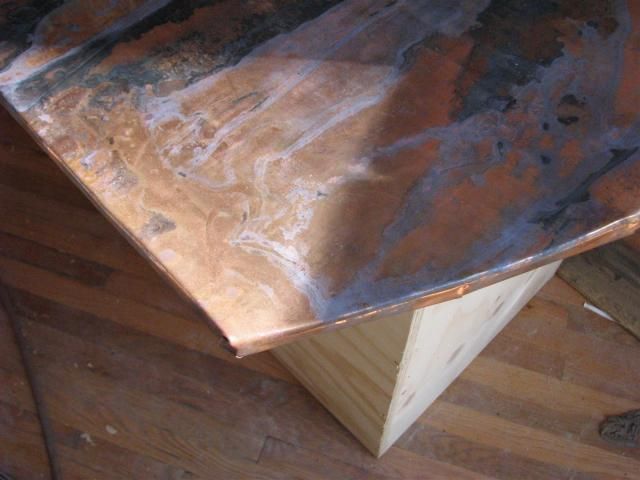
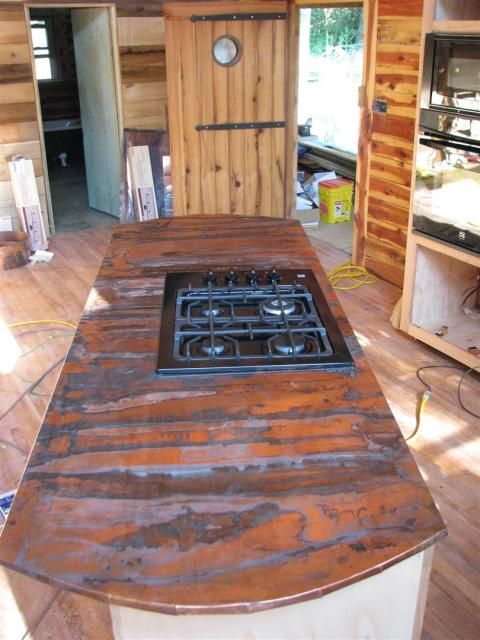
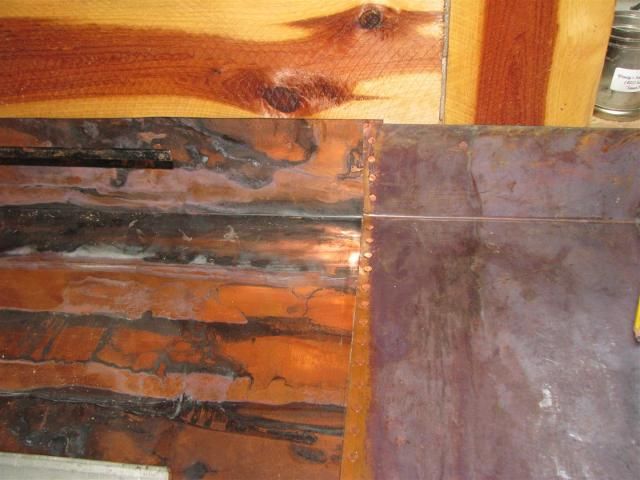
I did the island first and the curved to 90 degree corners were...interesting:
Coppercountertops005.jpg


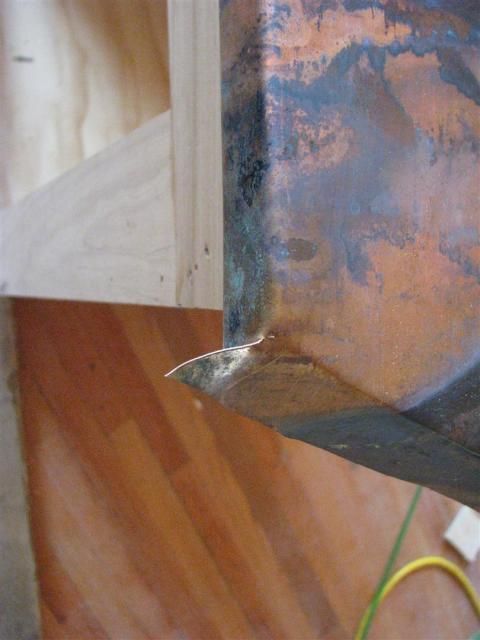
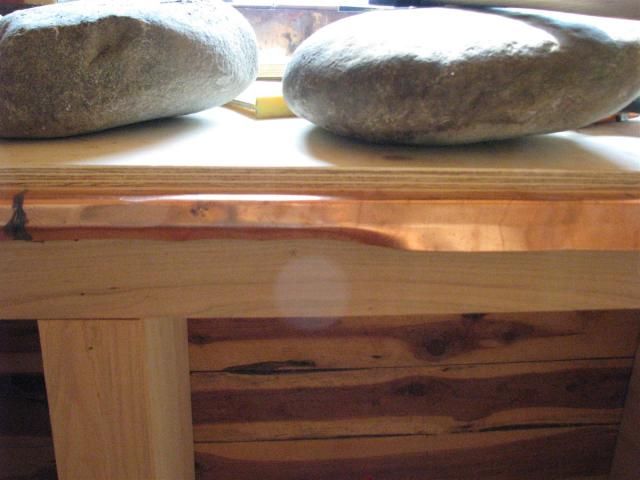
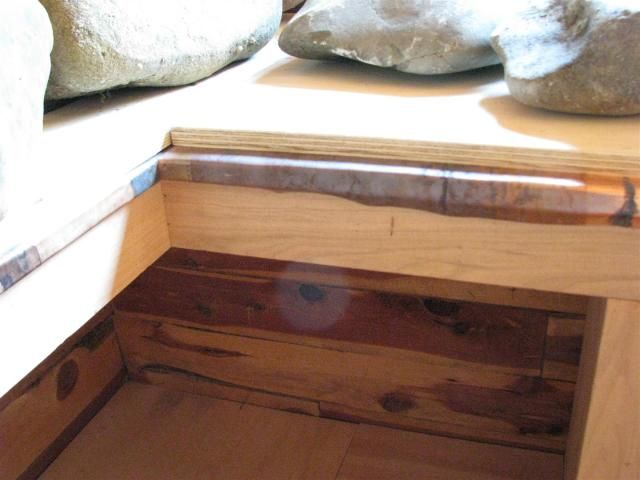
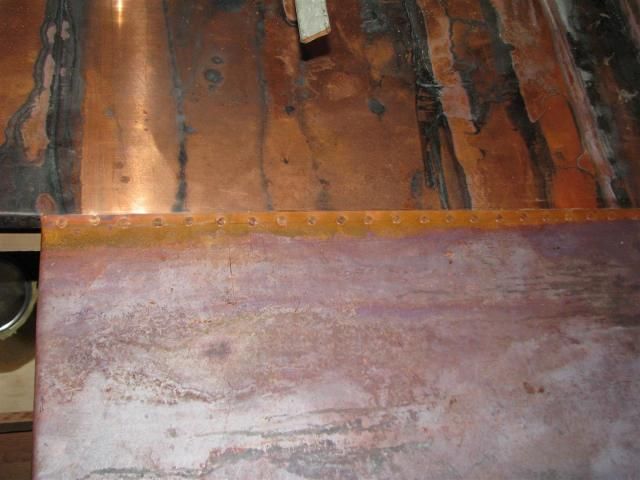
I found that I like working the copper. It has to be done in stages, strike the top edge all the way down it's length, come back and strike the face, then again with a glancing blow to start the turn underneath. I used the hard rubber hammer that came with the HF nail gun. The back side is square steel and perfect for tucking the lip all the way under:
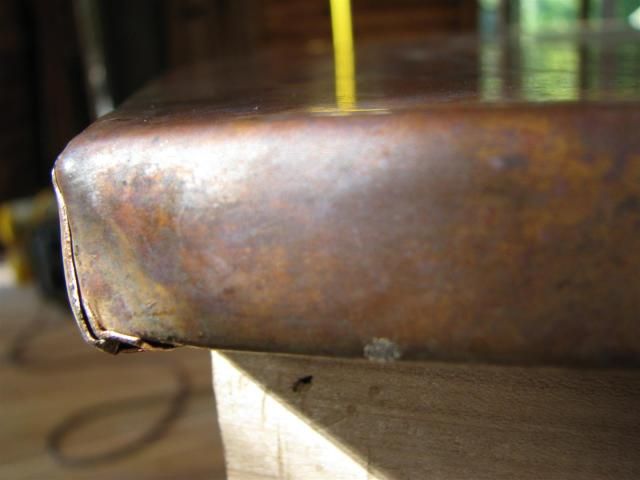
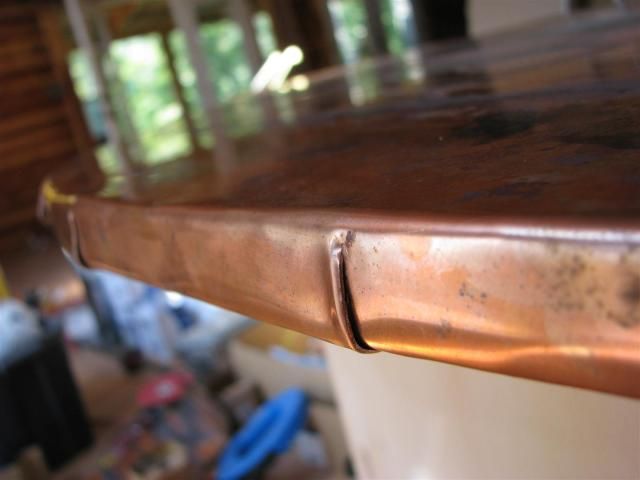
Coppercountertops009.jpg
 
/ The Log house Project begins........
  • Thread Starter
#1,462  
Coppercountertops008.jpg


I had to make relief cuts every 6 inches or so on the curved edge or it would bunch up:
Coppercountertops010.jpg


Coppercountertops012.jpg
 
/ The Log house Project begins........
  • Thread Starter
#1,463  
All done with the edges:
Coppercountertops015.jpg


Then I went ahead and started on the "L" tops while the glue was setting:
Coppercountertops013.jpg


Coppercountertops018.jpg
 
/ The Log house Project begins........
  • Thread Starter
#1,464  
A little more:
Coppercountertops016.jpg


Then I cut out the section for the gas stove top:
Coppercountertops020.jpg


and......I stuck the wall oven/micro in it's nest:
Coppercountertops002.jpg
 
/ The Log house Project begins........ #1,465  
MotorSeven,
I've been following your thread for a while now, but have not posted anything yet. After looking at the copper work you did.....WOW! Amazing work and design! Everything you have done along the way has been top-notch. You are building a true castle and I hope you enjoy your finished home soon!
I love reading everyone's comments and suggestions too, I have learned a lot just by reading this thread. Thanks to everyone!
Otto
 
/ The Log house Project begins........ #1,466  
That copper sure fits in with the rest of your craftsmanship, how are you going to finish relief cuts and corners, solder? Cant wait to see your sink!

Dave
 
/ The Log house Project begins........
  • Thread Starter
#1,467  
Thanks Otto, I can't wait to get the green patina on it to give it some color.

Dave, I was thinking the same thing, solder those folds once I have them where I want them, then there won't be any sharp edges. The question is, will a regular solder gun work, or will I need to use a micro torch? I would have to be real careful with a torch not to burn the wood and/or change the color too much so I think I will try my solder gun first.
 
/ The Log house Project begins........ #1,468  
Instead of solder (you would probably have to use at least a b tank) what about a decorative nail head. I would think that something that doesn not stick out (rounded) but more flat would work.
 
/ The Log house Project begins........ #1,470  
The B tank he is referring to is the small size acetylene tank used by plumbers and a/c contractors,

A soldering gun is not going to do it. Not nearly enough heat. You are going to have to clean it to bright to get solder to stick.

I would try a low temperature silver solder (has to be fluxed) and a mapp torch. The melting point of the low temp stuff is in the 400 degree range and is very strong.

Lots of progress. The Mrs. is surely pleased.
 
/ The Log house Project begins........ #1,471  
So I was playing around with the saws & router.......raised panel doors....nahhh...too common. I have an idea though for something a little different.............

Rick,
Okay, I'll bite. What are you planning?
hugs, Brandi
 
/ The Log house Project begins........
  • Thread Starter
#1,473  
Rick,
Okay, I'll bite. What are you planning?
hugs, Brandi

I knew I'd get a nibble.....nope, I'm holding out until the doors are done:talktothehand::laughing:


Thanks Mike & FB for the info...yes I am hesitant to heat it up. The copper nails arrived today & I used them on the seam & backsplash. But, I don't think I want to try them on the corners or folds, I think they will split the plywood.

Here is the long side of the L with the outlets cut out, and the backsplash glued and clamped:
Coppercountertops001-1.jpg


The nailed seam:
Coppercountertops008-1.jpg


Coppercountertops009-1.jpg
 
/ The Log house Project begins........
  • Thread Starter
#1,474  
Dr Dave...this one's for you:
Coppercountertops005-1.jpg


Coppercountertops003-1.jpg


It's a cast Iron/porcelain Kohler.

And this is a scrap section I am experimenting with on the green patina:
Coppercountertops007-1.jpg


......interesting...eh?
 
/ The Log house Project begins........ #1,475  
I knew I'd get a nibble.....nope, I'm holding out until the doors are done:talktothehand::laughing:


Thanks Mike & FB for the info...yes I am hesitant to heat it up. The copper nails arrived today & I used them on the seam & backsplash. But, I don't think I want to try them on the corners or folds, I think they will split the plywood.

Rick,
Ahhh, come on. Quit teasing us. For nails in edges of plywood not splitting..........drill a pilot hole for the screw and the plywood won't split.
hugs, Brandi
 
/ The Log house Project begins........ #1,476  
I knew I'd get a nibble.....nope, I'm holding out until the doors are done:talktothehand::laughing:


Thanks Mike & FB for the info...yes I am hesitant to heat it up. The copper nails arrived today & I used them on the seam & backsplash. But, I don't think I want to try them on the corners or folds, I think they will split the plywood.

Rick,
Ahhh, come on. Quit teasing us. For nails in edges of plywood not splitting..........drill a pilot hole for the screw and the plywood won't split.
hugs, Brandi
 
/ The Log house Project begins........ #1,477  
Looks good, thats the style faucet, my wife wants. Copper interts in the doors?

Dave
 
/ The Log house Project begins........ #1,478  
I like the way you have the grain of the patina in the copper running. The green will really pop with all the reddish tones in there. Looks great.
 
/ The Log house Project begins........
  • Thread Starter
#1,479  
The bottled patina is called Tiffany Green. I was surprised at how fast it works and that was less than an hour. They also make a Brown & a Blue and claim it works on metals other than copper. There is even a base metallic spray paint that can be sprayed on anything(cardboard, glass, wood etc), then these patinas can be applied. I'm going to try this on some switch plate covers...the dang things are expensive. So instead of a 10 dollar metal outlet cover(there's 19 on the main floor), I can make a 35 cent one look like metal for just a little work.

So for the cabinet doors they are going to be old barn tin with patina applied. A simple frame with a kerf cut all the way around the inside edge will allow the tin to be captured when it all gets glued up. It's simple, quick and different:thumbsup: Also, later on if we choose, I can punch a design on the tin.

Here is the link to the bottled patina: Bottled Patinas


I studied those corners again, and I think I want to try my micro torch, flux and solder first. The nails are just going to look odd and might even stick out further. Also, once I punch a hole in that edge there is no turning back. If I can't get the solder to take, or if it changes the color too much, I think I'll just use a small punch to make sure all the sharp edges are turned in, then just leave them alone.
 
/ The Log house Project begins........ #1,480  
Rick - Have you looked at liquid tubes like liquid solder or flex steel that hardens and is grey colored? You might also find something else before trying to solder all the corners.

PAGUY
 

Marketplace Items

2023 KRT ST900HD STAND-ON SKID STEER (A60429)
2023 KRT ST900HD...
UNUSED FUTURE EQUIPMENT SEAT (A60432)
UNUSED FUTURE...
PONDEROSA PINE TONGUE & GROOVE (A60432)
PONDEROSA PINE...
2016 CATERPILLAR 311FLRR EXCAVATOR (A60429)
2016 CATERPILLAR...
2020 CATERPILLAR D6 LGP CRAWLER DOZER (A60429)
2020 CATERPILLAR...
TANK MANIFOLD (A55745)
 
Top