You are using an out of date browser. It may not display this or other websites correctly.
You should upgrade or use an alternative browser.
You should upgrade or use an alternative browser.
Show What Tool You Made*
- Thread starter graydog111
- Start date
- Views: 457623
More options
Who Replied?
/ Show What Tool You Made*
#521
ETpilot
Gold Member
Here is a good example of needing a special tool. I had to change the oil pressure sensor on my Dodge Diesel Ram. So I purchased the dedicated socket. The problem I had was I had an interference fit. The socket would not go straight on the socket. Forcing it on I broke the old sensor. Time for Plan B for the install. All I had was a HF open end wrench. Cut down I had enough room for the install. As pointed out here HF tools are good for making special tools. I usually go to a pawn shop and buy assorted tools to keep on hand.
Attachments

TXHF
Silver Member
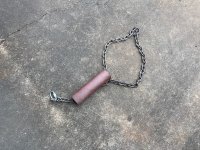
Finally done. Hooks in place, toothbar complete and two holes in the bucket for my modified tee post driver.

ETpilot
Gold Member
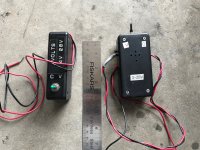
Oh electrical trouble shooting. I could not live without this tester. Both do the same thing. The left one is in my portable tool box and the right I keep at the airport. It helped me to troubleshoot a nose landing gear problem on a retractable geared airplane. I had a stuck on starter on my tractor I had to disconnect the battery to stop the starter. Using this tool I traced it to worn insulation on a wire in the stater circuit. Easy fix and in both cases I worked solo. Neat tool.
Attachments

ETpilot
Gold Member
Ok last one. Water hose reels. What a pain, they always leak on me. I bought 2 hand cart types. It didn't take too long for the leaks. Changing O'rings did not help. The metal used just wore out. So I set to make my own. This is the prototype. I used the reel from the store bought model and made the feeder tube and swivel out of PVC. Any leaks I fix with some O'rings. So far no leaks. I just used it yesterday while burning my burn pile. Not pretty but it works.
I've been determined to make a better swiveling model for behind the shop. Just don't have the time. Some day.
I've been determined to make a better swiveling model for behind the shop. Just don't have the time. Some day.
Attachments

aczlan
Good Morning
- Joined
- Mar 7, 2008
- Messages
- 17,540
- Tractor
- Kubota L3830GST, B7500HST, BX2660. Formerly: Case 480F LL, David Brown 880UE
I'm curious what you used to make the swivel. I need to make one of those at some point.
Aaron Z
Aaron Z
Luke'sScreenName
Elite Member
- Joined
- Mar 1, 2015
- Messages
- 3,710
- Location
- Lakes Region, NH
- Tractor
- Kubota MX4800 with BH-90X hoe; Hustler FastTrack 48; B3300SU (sold); 1969 Case 680B CK (sold)
Ok last one. Water hose reels. What a pain, they always leak on me. I bought 2 hand cart types. It didn't take too long for the leaks. Changing O'rings did not help. The metal used just wore out. So I set to make my own. This is the prototype. I used the reel from the store bought model and made the feeder tube and swivel out of PVC. Any leaks I fix with some O'rings. So far no leaks. I just used it yesterday while burning my burn pile. Not pretty but it works.
I've been determined to make a better swiveling model for behind the shop. Just don't have the time. Some day.
If you decide to buy these aren't cheap but you actually get what you pay for (and then some... Also all USA) :
Garden Hose Reels, Garden Hoses & Watering Tools – Eley Hose Reels
Luke'sScreenName
Elite Member
- Joined
- Mar 1, 2015
- Messages
- 3,710
- Location
- Lakes Region, NH
- Tractor
- Kubota MX4800 with BH-90X hoe; Hustler FastTrack 48; B3300SU (sold); 1969 Case 680B CK (sold)
Ok last one. Water hose reels. What a pain, they always leak on me. I bought 2 hand cart types. It didn't take too long for the leaks. Changing O'rings did not help. The metal used just wore out. So I set to make my own. This is the prototype. I used the reel from the store bought model and made the feeder tube and swivel out of PVC. Any leaks I fix with some O'rings. So far no leaks. I just used it yesterday while burning my burn pile. Not pretty but it works.
I've been determined to make a better swiveling model for behind the shop. Just don't have the time. Some day.
If you decide to buy, these aren't cheap but you actually get what you pay for (and then some... Also all USA) :
Garden Hose Reels, Garden Hoses & Watering Tools – Eley Hose Reels
pmsmechanic
Elite Member
- Joined
- Dec 6, 2013
- Messages
- 4,430
- Location
- Southern Alberta, Canada
- Tractor
- 4410 and F-935 John Deere, MF 245
Oh electrical trouble shooting. I could not live without this tester. Both do the same thing. The left one is in my portable tool box and the right I keep at the airport. It helped me to troubleshoot a nose landing gear problem on a retractable geared airplane. I had a stuck on starter on my tractor I had to disconnect the battery to stop the starter. Using this tool I traced it to worn insulation on a wire in the stater circuit. Easy fix and in both cases I worked solo. Neat tool.
OK so can you tell us how it works and also a circuit diagram so that if I can use the idea I can make my own. Thanks
Oh electrical trouble shooting. I could not live without this tester. Both do the same thing. The left one is in my portable tool box and the right I keep at the airport. It helped me to troubleshoot a nose landing gear problem on a retractable geared airplane. I had a stuck on starter on my tractor I had to disconnect the battery to stop the starter. Using this tool I traced it to worn insulation on a wire in the stater circuit. Easy fix and in both cases I worked solo. Neat tool.
Continuity tester, or signal injector type (Fox/Hound) ?
Rgds, D.


crash325
Elite Member
What is your roller on the right made from and what are those teeth made from? Looks very usable. Nice job.
The compactors teeth are a combination of things, cut off R/R spikes, some pipe couplings & ?? The tanks is an old steam boiler. About 1,700 when filled with water.
ETpilot
Gold Member
I'm curious what you used to make the swivel. I need to make one of those at some point.
Aaron Z
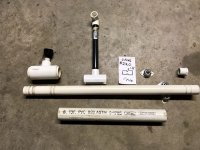
All parts for the water feed are PVC. I've pressure tested it to 70psi and no leaks. I made this a few years back. I will have to look at it and then give you some info. The swivel is just a slip and threaded PVC Tee. The main tool needed for fabrication is a table saw.
ETpilot
Gold Member
If you decide to buy these aren't cheap but you actually get what you pay for (and then some... Also all USA) :
Garden Hose Reels, Garden Hoses & Watering Tools Eley Hose Reels
Thanks, just too expensive for me. I'm sure I can fabricate a decent looking hose reel with PVC. I just need to find the time.
ETpilot
Gold Member
OK so can you tell us how it works and also a circuit diagram so that if I can use the idea I can make my own. Thanks
Ok, I should have added more info. I've posted this in a couple of forums but never got any interest nor a reply.
This is pretty simple. It works with a horn. Since I work on 24volt systems I use a horn in the 27-28V range. You can test down to 1.5V systems. The horn just has a very low sound. For continuity you switch to C or Cont. a 9V battery supplies the power. Good continuity, the horn will sound. For Voltage just switch to volts. The unit you are testing will supply the voltage. Good voltage the horn will sound.
You can also test for polarity on circuits where the wires are not identified. A 2 step test. Attach the leads if no sound reverse the leads. If you get sound the wire connected to the red test lead is positive. No sound at all means a fault.
In most cases we just want to know do we have continuity or voltage. No need to look at a meter or a light. Just listen for the horn. This makes it a good tool for solo work.
I have the circuit at the airport. I'll post it in a couple of days.
Spanner
Veteran Member
...
In most cases we just want to know do we have continuity or voltage. No need to look at a meter or a light. Just listen for the horn. This makes it a good tool for solo work.
I have the circuit at the airport. I'll post it in a couple of days.
I'm interested. Agree on Voltage/continuity. V more often than C. I use a simple Circuit Tester probe/lamp mostly and the Continuity function on the DMM if needed.
ETpilot
Gold Member
Ok here is the circuit for the tester. I'm including a photo of my 2 small testers with a ruler for size comparison. Not too large. The circuit is pretty simple. So it should not be a problem assembling a tester.
V= voltage test to the limit of horn voltage. Item being tested supplies the voltage. Test leads need to match circuit polarity. If polarity is unknown, connect the leads one way then reverse the leads. When you hear the horn, the wire connected to the red test lead is circuit positive. No sound at any time means a fault.
C= continuity test. The 9 volt battery supplies the voltage. Test leads can be attached in any manner. Polarity not necessary. No sound means a fault.
Short story: I assembled a simple item I had made. I went to test it and it did not work. Disassembled, checked everything could not find problem. I got the tester out started checking things. All ok. HUMMMM could it be the new battery. Battery ok. I then checked the battery leads and found the problem. The battery connector I had used, package of 10, was improperly manufactured. The wires on the connector were reversed so the circuit was not getting power. New connector and everything worked. This tester worked out too.
Enjoy. Happy Troubleshooting!!!
Attachments

Spanner
Veteran Member
Thanks ET.
ETpilot
Gold Member
I'm curious what you used to make the swivel. I need to make one of those at some point.
Aaron Z
Aczlan here is some info for you. I recalled I had a box with some my experiment parts. The metal feeder tube and handles came from my old hose reels. I used the feeder tube as my pattern.
The PVC parts, all schedule 40, is what I used to make the feeder tube. Going left to right, we start at the Tee, 1 1/4 x 1 1/4 x 3/4 or1/2 threaded end. Inside the Tee I glued 2 small pieces, a piece from each side, of 1 1/4 pipe leaving the area of the Tee threaded part open. The pipe pictured at the bottom is the 1 1/4 pipe The ends of these pieces are chamfered to slide easily over the O rings. The 1 1/4 pipe fits loose on the 1" pipe just under the Tee. To the Tee threaded end you attach a hose fitting for connection to your water source.
The Tee end of the 1" pipe needs to have grooves cut into it for the O'rings . Two O'rings on each side of the Tee, with a water entry hole drilled and centered on the Tee. With the Orings installed in the grooves you slide the Tee over them and center it on the entry hole. As part of the build you have keep the Tee in position and keep it from sliding left or right. The 1" pipe with O'rings just rotates in the Tee.
Now for water exit to the hose I used a snap fitting. The snap fitting is the one with the dark pipe attached. The fitting has a threaded end either 3/4 or 1/2 inch. The threaded end is sealed. So you determine where you want the fitting on the 1" pipe, apply PVC cement and press it in place. It will snap on and grip the pipe tightly. After it dries you drill a hole in the threaded end and into the 1" pipe wall for water exit. Don't go too deep or you may ruin the job thus far. The dark pipe is threaded to the fitting and a threaded elbow is added at the top. To this elbow you attach the water hose fitting. Note the elbow shown has a slip end but you need a threaded end.
Clean any debris inside the pipe and then the 1" pipe is plugged or capped at the end. You have to sand the plug down so it fits inside the 1" pipe. In my case I will fill the plug and end of pipe with a product called Marine Tex found at boat supply houses. This product will set solid then you can drill it or tap it for a handle. I didn't do this on my utility model but will do it on my next model.
Now cutting the grooves. You have to use a table saw and a homemade jig to allow you to rotate the pipe as you cut the grooves. Can't remember how I did it. Just come up with a safe way to do it. O'rings, finding the right ones may require looking around the box stores. I used O'rings from a very old set I had. Looking in the supply houses I could not match the numbered O'ring shown on the white card. I did find a suitable one at Home Depot but did not write down the number. A 3/32 or ⅛ inch will work. Cut the groove so half the O'ring sits in the groove and the other half sits proud of the pipe. You need a tight fit between the O'ring and the small pieces inside the Tee. For my tube I cut the grooves So I had a diameter of 1 1/8".
Finally you need bearings for the reel to easily rotate. I struggled with ideas for bearings, couldn't find anything locally. Finally, for my utility model, I used some ball bearing rollers I had on hand. It works pretty good for a utility model. Rollers are shown on right side of 1" pipe.
When you get the tube finished pressure test for leaks before moving on. Hope all this is clear.
This all sounds difficult but it's rather easy to do.. Good luck if you want to give it a try.
Attachments
Here are some similar links:
- Replies
- 118
- Views
- 17K