Pole barn

   / Pole barn #41  
cowboydoc:
The Menards here gives the book for free. I picked up a few prior to ordering the shed. Here the booklet sets out in front of the counter for the taking.
 
   / Pole barn #42  
Yea that doesn't surprise me. These guys here are real jerks.

18-35034-TRACTO~1.GIF
 
   / Pole barn
  • Thread Starter
#43  
Radman,

Sounds like you should have one of those nuclear fallout shelter signs on your pole barn.

Chuck
 
   / Pole barn #44  
We put up a 34x48x10 pole barn recently from Carter Lumber in PA. Our poles where 8' OC with trusses 4' OC with 2x4 girts 2' OC. The 4' truss spacing allowed 2x4 to be layed flat on top of trusses and were strong enough to climb on (not my favorite activity though). The trusses were definitely designed for 4' spacing (not 2'). I believe the reason our design was able to use the intermediate trusses was due to the use of double 2x12 girder used on the side walls (one on each side of pole). This seems like a better design than trying to make the girt span the distance between poles.
 
   / Pole barn #45  
Just put up a 30x56 pole barn. Fetterville Sales in PA put it up. Their price was almost exactly 1/2 the price Morton wanted. The pole barn was going to be a DIY project but after pricing the materials it looked like all I was goin to save was about $3 grand and it would take a while just by myself.
I could not justify the Morton price. At that rate I could build a conventional building with footings, etc.
4 years ago I got quotes for conventional and post framed 28x42 building. The Morton post frame price was the same as the conventional price. So, why pay Morton for a post framed building with metal sides and roof when I can put up a building using concrete footings and 16" OC walls w/25 year shingles and stained clapboard siding AND electrical AND 3 insulated garage doors w/openers AND a heated concrete floor AND Andersen casement windows.
Sorry to be so negative about Morton but they really are high priced. At least here in NJ.
 
   / Pole barn #46  
Those are my thoughts exactly Rich. They are just as overpriced here.

18-35034-TRACTO~1.GIF
 
   / Pole barn #47  
I built my whole barn w/sitework w/electrical w/plumbing w/concrete slab w/5 horse stalls w/wash stall w/tack room w/feedroom w/6 windows finished with 2x6 TG SYP thoughout interior for the same price as Morton wanted to construct the shell of the building.
 
   / Pole barn
  • Thread Starter
#48  
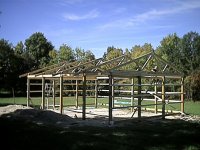
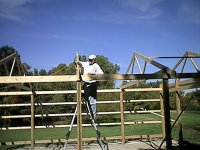
Since I started this thread I guess I ought to report my progress. I've got the frame of my 24x32' shed up, except for the purlins and wind bracing. If the weather cooperates, I hope to get it ready for the roof metal by next weekend when my galvalume is supposed to arrive. I used posts I laminated from 3 2x6's, with exterior grade construction cement and galvanized nails. I'll be adding some bolts to reinforce the lamination as I add the wind bracing. The poles are 8' OC as are the engineered trusses. The poles are direct bearing. The end trusses are set in notches on the outside of the poles, while the three inner trusses are in slots I made by cutting out the inside 2x6. That worked out very nicely because my son and I were able to set the trusses without other help. Those 24' trusses made up of 2x6's are fairly heavy, but we set them on the top horizontal girts upside down and braced against the poles that would support them. We then ran a rope from the truss peak, up and over, and one of us pulled the rope while the other pushed with a 2x4. When the truss was just short of vertical, we tied off the rope, climbed up, and set the truss one end at a time. The ones in the slots were then supported and essentially vertical. The end trusses were a bit more trouble, but a honking big C clamp came in handy to keep them in place until they could be nailed in. The slots didn't work out quite as I had planned. When I made the poles, I left the last two feet free of nails except for a single one right at the end, and I used minimal glue. My original plan was to trim the poles and cut the slots with my Husky chainsaw. Trimming the poles to an angle matching the truss pitch was no problem, but cutting the slots while hanging on the top of a ladder got interesting. I ended up using my antique brace-and-bit to put two overlapping 7/8" holes though the bottom of each inside 2x4. I was then able to break the glue joints with a brick cutting chisel and pop them out. I cleaned up the slots with a wood chisel and layed a bed of construction cement to give a smooth surface for the truss ends. Sounds like more trouble than it was. It's surprizing how fast a sharp Forstner bit will cut softwood. I'm going to try to attach a couple of photos. One is of my son sitting up there after we set the last truss. The other is me convincing one of the trusses to get all the way down in the slot. Since these were made, it has rained almost every day I could have worked on it. I managed to get a few purlins in a day later, then the rains came and I caught a cold just about the time the anthrax stories started to hit the news. I tried to convince my wife I had pulmonary anthrax, but she's a nurse and doesn't give me much sympathy. OOPs. Lokks like I'll have to try the pictures one at a time.

Chuck
 

Attachments

  • 8-74808-IMG_0168.jpg
    8-74808-IMG_0168.jpg
    107.9 KB · Views: 532
   / Pole barn
  • Thread Starter
#49  
And here's the second shot.........

Chuck
 

Attachments

  • 8-74818-IMG_0171.jpg
    8-74818-IMG_0171.jpg
    105.5 KB · Views: 494
   / Pole barn #50  
Chuck,
Gaterboy referenced this thread from another discussion. I enjoyed reading it last night. You left the thread die without ever showing the completed project. Do you have any more photo's to share of the building process or a completed shot?
 
   / Pole barn
  • Thread Starter
#51  
Aw Spence,

I finished it last year shortly after that last post, except for the gutters it really did need. Guess what? It still needs gutters. And this spring we had some additions done to our house and I told the excavators to pile the extra dirt from the excavations behind the barn. I had a culvert to put in a ditch on the property and figured I could use some of it there and some for other little projects around the place...most of it is fairly decent soil. Anyway, the upshot is that the piles of dirt are still there, covered with weeds, and don't make for a pretty picture. I'm getting a rear scoop for my tractor next week and will be moving some of it then for some landscaping. Tell you what...I'll take a couple of pictures this evening, and if they're not too embarassing I'll post them.

I suspect that the comments I got in that thread are probably more valuable to someone building a pole barn than seeing my shed. Some of the guys described much more elaborate structures than what I wanted and built. I did a shed with one open side and a plain gravel not-so-level floor. I did learn a lot building it however. I think that the laminated poles are a good idea, though I would probably do mine better if I built again. They let me make a neat slot to accept the trusses, which made setting the trusses easy and also let the poles directly bear the weight of the roof. And the most important thing I learned was how good a darn big C-clamp is for grabbing the poles when setting them and for any number of other things.

Chuck
 
   / Pole barn
  • Thread Starter
#52  
OK, Spence, you asked for it. Here it is warts and all. Note the neat pile of old bricks. I have a bunch more in the shed. The only reason there's free room in the shed right now is that my boy got out of the Navy and picked up his Jeep a week ago. In another week or so I'll fill that spot too.

This thread really does have lots of good information about pole barns. If you're still in the planning stages, there are many good suggestions.

Chuck
 
   / Pole barn
  • Thread Starter
#53  
All right, all right, so now here it is. Is there a way to edit a post and add a picture? At least I get more posts!

Chuck
 

Attachments

  • 8-197413-xms_0179.jpg
    8-197413-xms_0179.jpg
    76.7 KB · Views: 289
   / Pole barn #54  
Chuck,

Nice job. I for one don't mind the bricks, etc. I am surely not a neat-nik, and especially around barns.

You have built what I originally had in mind -- but over time, reading other posts, looking at other plans, I have decided to build a bigger one -- 32x72, with 40' totally enclosed, and the remaining 32' open.

It "hopefully" will look something like this, only on a smaller scale:
2286.gif


However, my door would be on the end rather than the side.

I have been reading on metal roofs, and the condensation thing has really gotten me worried. I had planned to put a metal roof right on the purlins -- but to avoid the inside "rain", I think I should put up plywood first. Does anyone know if trusses 8' O.C. with 2x4 purlins on edge 24" O.C. have enough strength to handle plywood being installed on it?

Cowboydoc had talked about insulating a metal roof. Does that mean putting some corning fiberglass between the purlins? I am confused -- pictures on how this is done would be very helpful, if anyone has the answers for me.
 
   / Pole barn #55  
When they built my pole barn, they put the truss rafters, eight foot on center, with 2X4's on their side with sheet metal on top. The roof is strong enough for a 30# per square foot snowload.

We finished off the 8Ft. tall section completely. There is a ridge vent and also a large vent on one end, with the other end being open to the 16Ft. section. The ceiling insulation and finish was accomplished by inseting 2X6's between the rafters on a 2ft center. Insulation was then installed, then painted metal installed on the ceiling, so the top attic so to speak is open for the venting.

The 16Ft section is uninsulated as of now. It also has a rige vent with a vent on one end.

I have not had a problem with interior rain at all. The only time there was is when all the vents were sealed up when they had the heaters going when the cement was curing, once this was done and the plastic sealing up everything was taken down, no problem.

So with proper venting, there in no inside rain.
 
   / Pole barn
  • Thread Starter
#56  
Gatorboy,

That's an ambitious undertaking! My shed's only 24x32', and if I can somehow learn to get rid of stuff I really have no use for, it will hold all the implements I have or will acquire. Looks like you plan to collect bigtime! As to the plywood on the 8' center trusses, I bet you'd have trouble getting that past the local building inspector, but I will defer to the greater wisdom of the group. Instead of the usual way of putting the purlins on top of the trusses, I used joist hangers and put them in even with the trusses. If my shed was enclosed and I wanted to heat it, I could potentially use rigid foam insulation between the purlins I suppose. Heck, it could be glued directly to the metal, and any seams filled with that expanding foam stuff. That should stop the condensation, though I don't know what R value you'd get.

Chuck
 
   / Pole barn #57  
My 42x64 pole barn has trusses on 8' centers with the 2x4's placed on their edges. I do not know how much they will hold. Instead of sheating I have rolled plastic with nylon webbing in it. It cost somewhere between 500 and a thousand dollars. It seems to work BUT.....(1) it was not attached properly at the eve so the end came loose. (2) it shows a lot of water markings. I think it is probably coming in at the ridge vent.
 
   / Pole barn #58  
Hi, Would any of you guys with the Menards pole barn catalogue be will to send it out to me. I'll send you a few bucks for postage. I dont have one anywhere near me and I'm planning a barn in the future. thanks, brett w
 
   / Pole barn #59  
I've got one but it's my only copy. I already sent my extra one to someone. I'm sure if you call Menards they would send you one for a price. Here is one of their local numbers. 1-563-288-6600.
 
   / Pole barn #60  
Dave the insulation for metal roofed buildings comes in rolls. It looks like fluffy carpet sorta kinda. They unroll it over the purlins and then screw down the sheeting over it as normal.

I've also see the applied insulation which is like a foam that's applied with an applicator and just shot on.

I don't know if it's been discussed here or not but the biggest drawback I've found with metal roofing is the screw maintenance. They have to be periodically checked for tightness. Also the rubber washers deteriorate over time in the weather. This also causes leaks.

I have a friend with a building about twenty years old. If I had every bad word he's ever used trying to get it to stop leaking we could ship them to Iraq and the invasion wouldn't be necessary.

He's replaced all the screws, caulked the heck out of anything that would stand still long enough for him to hit. And he still gets leaks.

What blows my mind about his building is a couple of acres away and old friend of mine built his shop with galvanied sheets of tin. They used pipe for the frame work and lead headed ties to attach the metal sheets to the framework. He's never had a leak no is he interested in discussing leaks as an issue.

The biggest difference between the two is where the sheet metal is pierced for attachment as I see it. The galvanized tin with the leadheaded ties is pierced on top of the ridges. The colored metal siding is pierced in the valleys.

Maybe the old guys knew what they were doing with the tin?
 

Tractor & Equipment Auctions

1999 Thompson H3 S/A Towable Vacuum Water Pump (A59228)
1999 Thompson H3...
2015 GENIE GS-4047 ELECTRIC SCISSOR LIFT (A52706)
2015 GENIE GS-4047...
UNUSED FUTURE WALK BEHIND POWER TROWELL (A52706)
UNUSED FUTURE WALK...
UNUSED AGT SSPOC HYD LOG GRABBER (A52706)
UNUSED AGT SSPOC...
DEUTZ MARATHON 60KW GENERATOR (A58214)
DEUTZ MARATHON...
2020 DRAGON ESP 150BBL ALUMINUM (A58214)
2020 DRAGON ESP...
 
Top