You are using an out of date browser. It may not display this or other websites correctly.
You should upgrade or use an alternative browser.
You should upgrade or use an alternative browser.
Patio/Outdoor Kitchen Project
- Thread starter polo1665
- Start date
- Views: 29091
More options
Who Replied?
/ Patio/Outdoor Kitchen Project
#21


OP
polo1665
Super Star Member


OP
polo1665
Super Star Member
In the prior post you'll notice all of the concrete blocks piled on the corner of the patio. These blocks are for the cornerstone of our outdoor kitchen.
A while back Prokop (czechsonofagun) had a thread about a wood fried baking oven in the rural living forum. This oven interested me and after doing quite a bit of research I decided that I would include a wood fired oven in my outdoor kitchen.
The oven I decided on is an Alan Scott designed barrel vault oven and the next part of this thread will outline the complete build of this oven. This oven will be quite a bit larger than the oven Prokop built. The interior dimensions are 32.5" X 38".
Stay tuned...........
OP
polo1665
Super Star Member
I started this wood fired oven project by buying plans from "OvenCrafters". This is a company started by a guy named Alan Scott. Alan roamed around the country baking bread and building ovens.
The oven I built called for a cement block base that was 64" wide by 72" deep. Four courses tall in all. I know, not that many blocks right. Before this I had never laid a cement block in my life. I could go another 45 years without laying another one and it wouldn't bother me.:laughing:
The oven I built called for a cement block base that was 64" wide by 72" deep. Four courses tall in all. I know, not that many blocks right. Before this I had never laid a cement block in my life. I could go another 45 years without laying another one and it wouldn't bother me.:laughing:
Attachments


OP
polo1665
Super Star Member
After the block base was built I began to prepare for the hearth slab by building framework inside the base. The framework was covered with plywood to support the first or insulating layer that consisted of a 6:1 mixture of vermiculite to portland cement.
Framework built
Framework built
Attachments


OP
polo1665
Super Star Member
The vermiculite/concrete mixture was reinforced with wire allowing the wire to protrude out of the top of the mixture. This protruding wire will be hooked to the rebar reinforcement of the concrete hearth slab. This will allow for the future removal of the framework under the hearth slab.
This mixture is 2" thick.
This mixture is 2" thick.
Attachments

OP
polo1665
Super Star Member
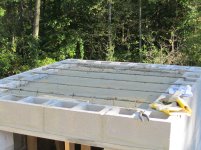
Once the vermicrete mixture had set up. Rebar was run north and south across the block base. 1X4's were then fitted around the perimeter of the hearth slab form. The hearth slab is kept separate from the block base this way. This is called a floating hearth and it is meant to keep the heat from transferring to the base.
Attachments


OP
polo1665
Super Star Member
The hearth slab is 3" thick and required close to 750 lbs of concrete. After this concrete cured sufficiently I was able to start laying the hard fire brick for the hearth or floor of the oven. I purchased the 275 firebrick from a local supplier for $1.16/brick. The hearth portion of the oven required 108 bricks.
These bricks were laid on a 1/4" thick mixture of fire clay and sand. The mixture was 1:1 with just enough water to make it a paste consistency.
This mixture does not have any bonding qualities and is used in case a brick needs to be replaced at a later date.
These bricks were laid on a 1/4" thick mixture of fire clay and sand. The mixture was 1:1 with just enough water to make it a paste consistency.
This mixture does not have any bonding qualities and is used in case a brick needs to be replaced at a later date.
Attachments


OP
polo1665
Super Star Member
To jump the gun here -- what is the 'vent' space for?
And, no rebar in the block walls? Is that due to the cap (floor)?
The vent space is an ash drop, I should have pointed that out.
No, there is no rebar in the block. Each corner and the center of each side and the back is filled with concrete from top to bottom, that process comes a bit later. Many of the pompeii style ovens are built on dry stacked block walls with some of the tubes filled with concrete.
OP
polo1665
Super Star Member


OP
polo1665
Super Star Member
Once happy with the spacing and lay out of the bricks I began the process of grouting them in place. The grout is made of a 10:3:1.5 mixture of sand, portland cement, and fire clay. The fire bricks must be dunked in water or they absorb all the water out of the grout making it very difficult to set the bricks.
AS this project goes on further I have a new respect for masons.
AS this project goes on further I have a new respect for masons.
Attachments


OP
polo1665
Super Star Member
Some more pics of wall building.
It is fairly important to keep the joints as thin as possible. I ended up with some joints that I thought were a little over what I was comfortable with, but so far everything is holding together well.
It is fairly important to keep the joints as thin as possible. I ended up with some joints that I thought were a little over what I was comfortable with, but so far everything is holding together well.
Attachments


OP
polo1665
Super Star Member


OP
polo1665
Super Star Member
The next stage of the construction involved the bracing and support of the walls of the oven in preparation for the arched roof. First I started to construct the the first bricks that would make up the entry way of the oven. The placement of these bricks is important because they are also the start of the oven's chimney.
Attachments


OP
polo1665
Super Star Member
As the shoring up process continued, an angle iron lintel was mortared across the opening of the oven. This angle is at a precise height (63% of the interior arch height). This proportion is important to insure proper airflow into the oven as well as allowing for the smoke to escape out and up the chimney.
After the angle was in place a wooden frame was completed around the oven to allow me to pour a section of the oven's cladding. This section of the cladding will hold the side walls of the oven up against the thrust of the arches.
The bricks you see propped up on the side walls are there to mock up the angle of starting arch brick. In the third pic you see that I've cut the bricks to the angel needed to begin the arches.
Attachments


OP
polo1665
Super Star Member
Support concrete poured, the first arch was constructed. I had laid the arch out previously and mad a form that could be removed after the arch was in place. It went very smoothly and the arches went up without a hitch.


