New House Build

   / New House Build #51  
I'll dig thru my drone pics for the best shot of the layout.

As in any profession there are hacks. How am I to know you aren't one? ;)

I'm using four different contractors. They all live within 20 miles of me. I've been personal friends with three of them since they were born. All four are considered the best locally. I have nothing in writing. No bids. Just a handshake. :)
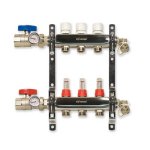
manifold.jpg

there is a big difference. The above is a radiant floor manifold.

And i did not mean to insult anybody. I can blow smoke up your butt like everybody else. People are complaining that there tankless boilers aren't lasting. There is a more correct way of doing it.

I am not a heating contractor. My son is he went to school for it and is journeymen HVAC tech. I had him look at it. I learned the hard way. We are looking at a tankless boiler for a room we added to the barn. I told him they don't last pointed to the post and he went on to explain. I am going to install it more correctly. I don't care to replace my tankless boiler in 3 years.

Without being able to shut off each loop separately then running water through it you are hoping you can get the air out through the separator over time. There is no why you can have even flow through the loops with your current manifold. The above measures flow in each loop and gives you a way to adjust, so then you know you have it correct. With what you have you are guessing. A tankless boiler does not like air going through it.

How do you get the air out of it if you have to replace the pump? Run the system, which will run the air through the boiler then over time it comes out the separator. Your tankless boiler does not like the air going through it.

I just replaced the manifold in the house garage, 18 years ago I did not bleed it right, there was still air in the system, i have an air sperator. I heard no noise, so for 18 years air has been running around in the system. I however do not have a tankless boiler, on that system.
 
   / New House Build
  • Thread Starter
#52  
I've never saw a manifold like that. Is that what you are using? All the systems I've saw use manifolds like mine with or without valves.

If air is trapped in a loop why would only opening that loop for flow fix the problem?

If you have no cavitation problems such as noise or poor flow how would you know there's air in the system?

As for proper flow. I've checked my system twice by IR temp readings on the hot side pex as it goes under the floor. I've got nine loops. They are all within .1F degrees. The return loop temps will vary 1.5F degrees.

Having valves to adjust flow thru each loop sounds like a good idea. How would I know what adjustments to make?

How did you decide you had air in your system for 18 years?

Do you have your water system hooked live to you radiant circuit? How much pressure?

No insult taken here. Thanks for your comments.
 
   / New House Build #53  
]I've never saw a manifold like that. Is that what you are using? All the systems I've saw use manifolds like mine with or without valves.
The one in the house garage looks like this:
IMG_0125.JPG
We will be replacing it with the one pictured above. On the top of the manifold those are plastic caps that screw down onto a poppet valve. you tighten the cap it opens the valve. On the bottom(supply) those are flow indicators, glass tube with a ball in it. When the flow increase ball moves up in the tube indicating increase in flow. So, if you restrict the return side poppet it that would decrees the flow. You would then set the flow the same all the way across. The manifold above is used in a closed system that has antifreeze in the system. It was filled with hard rust filled water 18 years ago. At Thanksgiving the kid noticed that the floor was not the same, warm and cold spots, so we went looking.

If air is trapped in a loop why would only opening that loop for flow fix the problem?
In my garage system it could be piped more correct. The manifold you are looking at is 60 ft from the buffer tank and pump and that is also where the air separator. So when we filled it originally we did it very similar to how you did it. Connected a garden hose filled it till water came out and started it up. One of the most common reason a loop is not heating is trapped air. So we hooked a transfer pump up, one end in bucket other on the loop, then hose from other side of the loop back to the bucket. Air came out into the bucket. On first start up some is to be expected. So how you bleed it is with the transfer pump running you close the other poppets(loosen the caps closing all but one). When we did that to one of the three we got more air. On the third poppet, it would not close. So since we could not close each one we could not correctly bleed it. We figure the dirt in the system is keeping the valve from closing. Also one of the flow indicators is broken. We are going to replace it. Add a pressure gauge, which it should have and add a purge t. Our thinking is it may have never been right. The kid seems to think that is possible, because he has seen it and I did not bleed it right when we put it in 18 years ago.
If you have no cavitation problems such as noise or poor flow how would you know there's air in the system?
We fould it by temp difference in the floor then feeling the supplies and returns.
As for proper flow. I've checked my system twice by IR temp readings on the hot side pex as it goes under the floor. I've got nine loops. They are all within .1F degrees. The return loop temps will vary 1.5F degrees.
Don't know if an IR temp gauge is going to be that accurate. If you want to measure temp like that they make a clamp on temp probe for your fluke. Also it is more about flow. Hence the flow indicators. You may very well be close. Once we saw your current manifold it sent up flags.
Having valves to adjust flow thru each loop sounds like a good idea. How would I know what adjustments to make?

Close or open the poppets until they are the same. They also make a coil for that, replacing that cap, allowing you to zone each loop. I did not use that Kid has seen it. Then with ECM pump you could zone all day long.
How did you decide you had air in your system for 18 years?
See above and if when I am done bleeding it and I can make the flow even across the manifold, then I will know for sure. I am also hoping that it it as that is the easier solution...
Do you have your water system hooked live to you radiant circuit? How much pressure?
Not on the one I am talking about above. The kid and are are still discussing that one, because you probably should. Which is why we are adding the gauge. Also we did not see one on yours, but your boiler may have one. I want to say you should have 12 psi. I will double check and if it is NOT 12 I will get back.
 
   / New House Build
  • Thread Starter
#54  
I checked my pressure and I'm at 12psi measured at the hot side of the heater.

My guy said the expansion tank and separator should always be installed higher than everything else.

I've walked all over my shop floor checking temps. I find a bit lower temp along the exterior walls and at my overhead doors. I expect that variance to grow when we get frost in the ground.

Thanks for your input.
 
   / New House Build #55  
I checked my pressure and I'm at 12psi measured at the hot side of the heater.
That I may be having issues with....
My guy said the expansion tank and separator should always be installed higher than everything else.
Agree! I messed up on the garage
I've walked all over my shop floor checking temps. I find a bit lower temp along the exterior walls and at my overhead doors. I expect that variance to grow when we get frost in the ground.
From a comfort stand point that would be ok in the shop, don't know if that would be ok in say the house. When the tubing is laid out, flow and loads calculated correctly that should not happen the slab should be the same temp, center to outside.
 
   / New House Build #56  
I'm gonna wait til the builders are done then address the drain. My only concern with your idea is the color of the fill material. Maybe cut an unusual shape, diamond or something and tint the fill material to make it look likecwe intended it to be that way. :)

Thanks for your comments.

I understand completely about waiting. The tint idea might work. Don’t guess I explained my idea very well.

Stop the fill concrete 1/4-1/2 inch short of final grade. Then inlay 9-12 maybe 15 sqft. of tile. Make it an accent piece. Flush with the floor of the rest of the room. I think a diamond would be a good shape for this. A lot cheaper than tile for the whole room and you keep your smooth floor.

How did you secure your walls to the slab? Curious how it’s done with the in floor heat. Interior walls would be my biggest concern.
 
   / New House Build #57  
I understand completely about waiting. The tint idea might work. Don稚 guess I explained my idea very well.

Stop the fill concrete 1/4-1/2 inch short of final grade. Then inlay 9-12 maybe 15 sqft. of tile. Make it an accent piece. Flush with the floor of the rest of the room. I think a diamond would be a good shape for this. A lot cheaper than tile for the whole room and you keep your smooth floor.

How did you secure your walls to the slab? Curious how it痴 done with the in floor heat. Interior walls would be my biggest concern.
Good concrete guys can match fresh concrete, as it ages match is harder to make.i have had patches made that were almost impossible to tell.
Ps I am not good concrete guy I just verify their work is acceptable
 
   / New House Build
  • Thread Starter
#58  
I understand completely about waiting. The tint idea might work. Don’t guess I explained my idea very well.

Stop the fill concrete 1/4-1/2 inch short of final grade. Then inlay 9-12 maybe 15 sqft. of tile. Make it an accent piece. Flush with the floor of the rest of the room. I think a diamond would be a good shape for this. A lot cheaper than tile for the whole room and you keep your smooth floor.

How did you secure your walls to the slab? Curious how it’s done with the in floor heat. Interior walls would be my biggest concern.

Awww, now I get it. Very good idea!!!

Exterior walls secured with large concrete lag bolts. Not positive about length but guessing 6" thru an 1 1/2" sill plate. Interior walls are secured with 4" tapcons again thru a sill plate. At the exterior walls there isn't any tubing that close to the edge. The floor is 5" with the pex at the bottom.
 
   / New House Build #59  
Awww, now I get it. Very good idea!!!

Exterior walls secured with large concrete lag bolts. Not positive about length but guessing 6" thru an 1 1/2" sill plate. Interior walls are secured with 4" tapcons again thru a sill plate. At the exterior walls there isn't any tubing that close to the edge. The floor is 5" with the pex at the bottom.

Thank you. That’s what I was unsure of. Didn’t know it the risked the tapcons or if it was glued. But you have a pretty good safety margin there. Exterior isn’t a problem like you said no pex there.
 
   / New House Build
  • Thread Starter
#60  
Forgot how far behind I am on this project. So, I'll try to catch up a little..... Sorry.....

On the 15th of November the builders showed up and started laying out walls. Had a lot of weather delays. November was the coldest on record here this year. They worked on a few days when I couldn't have. I spent a lot of time watching from the warm shop window.

Here's a series of pics of wall construction.


20181116 (3).JPG


20181116 (7).JPG


20181121 (9).JPG


20181121 (13).JPG


20181208 (6).JPG


20181208 (11).JPG
 

Tractor & Equipment Auctions

Kinze 840 Grain Cart (A50514)
Kinze 840 Grain...
2015 MACK GU713 (A50854)
2015 MACK GU713...
IngersollRand 185 Aircompressor (A49461)
IngersollRand 185...
2016 Nissan NV200 Cargo Van (A50323)
2016 Nissan NV200...
NEW 2025 Load Trail 83IN X 14IN Single Axle Utility Trailer (A51039)
NEW 2025 Load...
2020 INTERNATIONAL LT625 SLEEPER (A50854)
2020 INTERNATIONAL...
 
Top