I've been planning a new bridge for my creek crossing for some time and finally took a week off to get it started. I have two old bridges - a high bridge which is very rotten and a low bridge which we still use but only for light traffic.
I had thought about using a flat rack shipping container, but in the end went for a timber bridge. Plan was to replace the high bridge and had an excavator booked to come and lift out the old beams and place some new bed logs either side. Got the phone call at 6pm the night before to say he was held up on another job - so I learnt lesson number one of bridge building - how to swear...
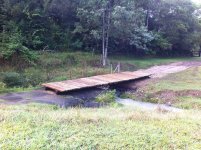
I had my neighbour working with me who has an 80hp New Holland with a bucket, but the high bridge was beyond what we could do, so we decided to tackle the low bridge. We cut through the existing beams and lifted the old bridge out. That took half a day. I should say at this point I am in awe of those guys who post photos of each stage of construction. I kept forgetting or was too exhausted! Just the one pic of the almost finished bridge deck.
We then spent another day stabilising one bank and burying a notched bed log to hold the stringers. The stringers came from a neighbour's property - 40 foot long Tallowood - very hard and very strong. They were logging his place and he sold them to me for $100 each.
My neighbour levelled off one edge of each beam with his chainsaw - amazing to watch and way beyond my skill or my back. We positioned the two stringers across the creek - that took almost a day of manouvering (and swearing) with his tractor and my little 20HP Jinma on the other side.
I had decided on treated pine planks for the bridge deck rather than hardwood. Too expensive and heavy. We spent two days laying 50 planks. Pre-drilled them in position, and then used heavy gal square washers and lag screws. I ran both the drill and a high torque impact driver off generators so we weren't always charging batteries. The impact driver was great - plenty of grunt - snapped a few screws tho.
In the pic you can see one end is sitting on a concrete bed - that was part of the old bridge. We have two metal straps going over the beams that are bolted to threaded rod we set into holes we drilled into the concrete and used concrete epoxy to fix.
Then it rained for 5 days and everything ground to a holt. More swearing.
We finally got a few loads of roadbase at one end for the approaches but had to give up as it was too wet to shape. We've since put more loads down than I can remember - there's a quarry 4 miles up the road that we can use, so we cut the gravel out and bring it down in a small tip truck. Have learnt not to overload it - blew two tyres and spent half a day replacing them. More swearing.
Bridge isn't quite finished. Still have to put a kerb on it and finish the approaches, but we can at least drive over it and stop driving through my neighbours fields to get to our house.
We've put the big tractor over and a loaded tip truck and it barely flexes so we are quite happy with its strength. I know its not an engineering certificate, but when a local will drive his expensive tractor over it, you know its ok!
I had thought about using a flat rack shipping container, but in the end went for a timber bridge. Plan was to replace the high bridge and had an excavator booked to come and lift out the old beams and place some new bed logs either side. Got the phone call at 6pm the night before to say he was held up on another job - so I learnt lesson number one of bridge building - how to swear...
I had my neighbour working with me who has an 80hp New Holland with a bucket, but the high bridge was beyond what we could do, so we decided to tackle the low bridge. We cut through the existing beams and lifted the old bridge out. That took half a day. I should say at this point I am in awe of those guys who post photos of each stage of construction. I kept forgetting or was too exhausted! Just the one pic of the almost finished bridge deck.
We then spent another day stabilising one bank and burying a notched bed log to hold the stringers. The stringers came from a neighbour's property - 40 foot long Tallowood - very hard and very strong. They were logging his place and he sold them to me for $100 each.
My neighbour levelled off one edge of each beam with his chainsaw - amazing to watch and way beyond my skill or my back. We positioned the two stringers across the creek - that took almost a day of manouvering (and swearing) with his tractor and my little 20HP Jinma on the other side.
I had decided on treated pine planks for the bridge deck rather than hardwood. Too expensive and heavy. We spent two days laying 50 planks. Pre-drilled them in position, and then used heavy gal square washers and lag screws. I ran both the drill and a high torque impact driver off generators so we weren't always charging batteries. The impact driver was great - plenty of grunt - snapped a few screws tho.
In the pic you can see one end is sitting on a concrete bed - that was part of the old bridge. We have two metal straps going over the beams that are bolted to threaded rod we set into holes we drilled into the concrete and used concrete epoxy to fix.
Then it rained for 5 days and everything ground to a holt. More swearing.
We finally got a few loads of roadbase at one end for the approaches but had to give up as it was too wet to shape. We've since put more loads down than I can remember - there's a quarry 4 miles up the road that we can use, so we cut the gravel out and bring it down in a small tip truck. Have learnt not to overload it - blew two tyres and spent half a day replacing them. More swearing.
Bridge isn't quite finished. Still have to put a kerb on it and finish the approaches, but we can at least drive over it and stop driving through my neighbours fields to get to our house.
We've put the big tractor over and a loaded tip truck and it barely flexes so we are quite happy with its strength. I know its not an engineering certificate, but when a local will drive his expensive tractor over it, you know its ok!