My biggest project yet - a rear blade.

   / My biggest project yet - a rear blade. #1  

BGL990

Gold Member
Joined
May 15, 2004
Messages
379
Location
Near Edmonton, Alberta, Canada
Tractor
John Deere 990 4x4
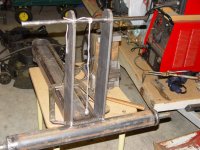
The first project I was going to build when I got my tractor was a rear blade. As many of you may have noticed, it didn't turn out that way. Finally I have completed it and for those who might be interested, here is the story ....

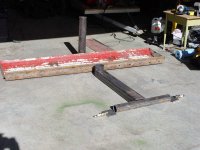
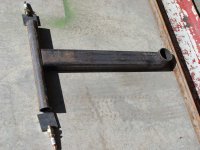
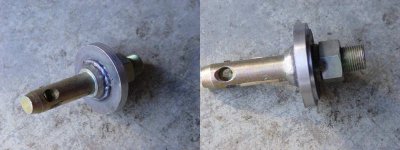
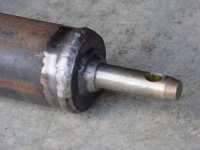
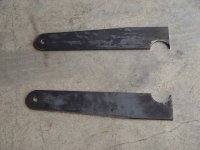
First shot is of some of the raw materials. The blade itself I got along with the old Ford 9N I bought a few years ago. It appears to be homebuilt but is done quite nicely and is fairly heavy. The rest are just a few of the raw steel bits I bought at the local steel vendor.
 

Attachments

  • 509793-01.jpg
    509793-01.jpg
    46.7 KB · Views: 1,212
   / My biggest project yet - a rear blade.
  • Thread Starter
#2  
Here I've done a little bit of cutting and layed some of the pieces out to help me plan things out in my head. I had a general idea of what I was going to do but mainly made it up as I went along (my favorite way to do things).
 

Attachments

  • 509794-02.jpg
    509794-02.jpg
    56.9 KB · Views: 923
   / My biggest project yet - a rear blade.
  • Thread Starter
#3  
Another angle of the initial layout. You can see the main beam has been cut out to fit the large diameter pipe. I just traced around the pipe and free-handed the cut with my plasma cutter as close to the line as I could. A bit of grinder work finished it up for a nice fit.
 

Attachments

  • 509796-03.jpg
    509796-03.jpg
    59.8 KB · Views: 831
   / My biggest project yet - a rear blade.
  • Thread Starter
#4  
Normally I am a bit reluctant to hide bolts inside something where you can't get at them, but in this case I relented. The 3pt pins needed to stick out of the ends of a piece of round pipe and it just didn't seem right to cut open the pipe enough to get at the nuts. I made some round pieces of flat bar and bolted AND welded the pins in place. I also machined a small shoulder in the pieces, mainly to help hold them in place while I welded them on the ends of the pipe, but I think being slightly recessed into the pipe ends will also add some strength.
 

Attachments

  • 509797-04.jpg
    509797-04.jpg
    30.3 KB · Views: 878
   / My biggest project yet - a rear blade.
  • Thread Starter
#5  
Here's an end cap welded in place (a bit fuzzy - sorry). I almost forgot to make sure the lynch pin holes were lined up the way I wanted. Remembered before welding luckily.
 

Attachments

  • 509799-05.jpg
    509799-05.jpg
    39.3 KB · Views: 802
   / My biggest project yet - a rear blade.
  • Thread Starter
#6  
The main beam parts all stuck together. The horizontal pipe was fitted to the main beam the same was as the larger piece of pipe. Trace around the pipe where I wanted it and a bit of plasma cutter and angle grinder action. I also bevelled the edges of all the cutouts to leave a bit of a 'V' to weld into along the seam, hopefully creating a stronger weld.
 

Attachments

  • 509801-06.jpg
    509801-06.jpg
    46.7 KB · Views: 761
   / My biggest project yet - a rear blade.
  • Thread Starter
#7  
For the top link attachment I more or less copied my JD landscape rake. I needed to make two identical pieces and didn't want it to look too square and clunky, so a cardboard template proved useful.
 

Attachments

  • 509802-07.jpg
    509802-07.jpg
    47.8 KB · Views: 766
   / My biggest project yet - a rear blade.
  • Thread Starter
#8  
Almost a full evening of playing with the plasma cutter, bandsaw, grinder, and hole saw yeilded these pieces. This was the point I started to question what I had gotten into with this project. My back and feet were sore and a few hours of work only produced these two pieces. Basically it just takes some time and effort to cut and shape 1/4" and 3/8" thick material (which most of this project uses).
 

Attachments

  • 509803-08.jpg
    509803-08.jpg
    49.2 KB · Views: 778
   / My biggest project yet - a rear blade.
  • Thread Starter
#9  
The two pieces I just made will sit something like this ...
 

Attachments

  • 509804-09.jpg
    509804-09.jpg
    40.9 KB · Views: 734
   / My biggest project yet - a rear blade.
  • Thread Starter
#10  
I'm a believer in eyeballing things where it makes sense. I don't mean standing back and going "hmm... good enough", but rather pick a reference point or edge and line something up with it by sight. In this case I wanted the top link pin holes to be centered above the horizontal pipe and of course they had to be parallel to it. The string and weight let me know when the holes were directly above the pipe centerline and the solid bar inserted through the holes is where the 'eyeballing' came in. Standing above the assembly, with your head in just the right position, you can get the edge of the solid bar and the edge of the lift arm attachment pipe to line up. Any misalignment is very obvious and with a little practice you can align things extremely accurately using this method.
 

Attachments

  • 509805-10.jpg
    509805-10.jpg
    75.4 KB · Views: 925
   / My biggest project yet - a rear blade.
  • Thread Starter
#11  
After welding the parts in place, an oxy-acetylene torch assisted with making the required bends.
 

Attachments

  • 509806-11.jpg
    509806-11.jpg
    45.6 KB · Views: 651
   / My biggest project yet - a rear blade.
  • Thread Starter
#12  
Again copying my landscape rake, I added a reinforcement bar at an angle to the uprights. I could have attached it to the uprights at a lower position. This way it looks a little goofy because it has to narrow down so much to fit the close-together end of the uprights. Oh well ...
 

Attachments

  • 509807-12.jpg
    509807-12.jpg
    54.4 KB · Views: 658
   / My biggest project yet - a rear blade.
  • Thread Starter
#13  
Time to make sure it fits the tractor.
 

Attachments

  • 509808-13.jpg
    509808-13.jpg
    69.6 KB · Views: 661
   / My biggest project yet - a rear blade.
  • Thread Starter
#14  
Now on to the blade itself. You have probably figured out that the short, large diameter piece of pipe on the end of the main beam is where the blade will hang and pivot. There needs to be a corresponding pipe sticking up from the blade itself. This is that piece, with a piece welded in the end which has 1/2" nuts welded on the back side of it. Their use will become clear in the next picture.
 

Attachments

  • 509809-14.jpg
    509809-14.jpg
    35.6 KB · Views: 658
   / My biggest project yet - a rear blade.
  • Thread Starter
#15  
This is how the blade will hang from the main beam. The pipes fit together, with a stopper ring welded to the blade-side pipe as a lower stop,and a cap bolted on the top. The inner pipe is already tacked to the blade in this picture, but it was a bit of a nuisance to get it lined up.
 

Attachments

  • 509810-15.jpg
    509810-15.jpg
    55.9 KB · Views: 690
   / My biggest project yet - a rear blade.
  • Thread Starter
#16  
This is how I did it. I got the main beam set to just the right height and nicely levelled in all directions and dropped the inner pipe through the end of it. I then hung the blade from an engine hoist and tweaked it until it was level and just touching the vertical pipe. When everything was OK, I tacked it in place with the welder.
 

Attachments

  • 509812-16.jpg
    509812-16.jpg
    83.4 KB · Views: 665
   / My biggest project yet - a rear blade.
  • Thread Starter
#17  
To complete the attachment of the pipe to the blade, I welded more heavily where I had tacked it earlier and then added a couple of horizontal support plates. The extra support plates spread forces out along the top and bottom of the blade where it is already reinforced with heavy angle iron. In this picture you can also see a pin I added to the top edge of the blade. This is where the hydraulic angle cylinder will ultimately attach. There will be a lot of force on this pin, so I drilled out a piece of plate, inserted the bar through it and welded both top and bottom. The plate was then attached to the top edge of the blade.
 

Attachments

  • 509813-17.jpg
    509813-17.jpg
    60.5 KB · Views: 651
   / My biggest project yet - a rear blade.
  • Thread Starter
#18  
Here is a side view of how everything fits together.
 

Attachments

  • 509814-18.jpg
    509814-18.jpg
    52 KB · Views: 668
   / My biggest project yet - a rear blade.
  • Thread Starter
#19  
Back to the 3pt hitch end. I added brackets for the other end of the angle cylider and a parking stand.
 

Attachments

  • 509816-19.jpg
    509816-19.jpg
    57 KB · Views: 592
   / My biggest project yet - a rear blade.
  • Thread Starter
#20  
Finally getting close to the end. Here is everything put together. I don't have any rear hydraulic outlets on my tractor yet, so for now I will just hold the blade in position with a fixed bar. The angle cylinder mounts are 26" from pin to pin, which works out nicely for a 14" stroke cylinder available at a local farm supply store. I probably could have moved the mounts closer to the pivot point and used a smaller cylinder, but this way there will be less force on everything and the cylinders are not that much different in price.
 

Attachments

  • 509818-20.jpg
    509818-20.jpg
    59.4 KB · Views: 692

Marketplace Items

2020 CATERPILLAR 242D3 SKID STEER (A60429)
2020 CATERPILLAR...
2005 JOHN DEERE 310SG BACKHOE (A60429)
2005 JOHN DEERE...
2016 Dodge Grand Caravan SE Plus (A59231)
2016 Dodge Grand...
2002 Ford E-450 Enclosed Service Van (A59230)
2002 Ford E-450...
2021 CATERPILLAR GP30N STRAIGHT MAST FORKLIFT (A60429)
2021 CATERPILLAR...
2001 Dorsey 48ft Flatbed T/A Trailer (A56857)
2001 Dorsey 48ft...
 
Top