425…changing implements

/ 425…changing implements #1  

Modrob

Gold Member
Joined
May 21, 2020
Messages
265
Tractor
Power Trac
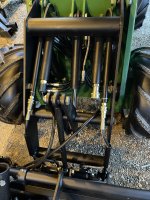
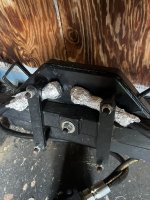
Our new 425 has the quick-attach feature that our old one didn’t have. I’m about ready to swap out the grapple bucket and put on the auger head. I got the run down from Terry on how to take off the grapple, but I didn’t think about any particulars hooking up the auger. I know there are the 4 hose attachments on the front end—the bucket currently uses two of them but the hoses to the quick connect are not hooked up. He did mention that the hoses only hook to particular connectors—can’t make a mistake. So, I drop the bucket all way down, then close grapple completely. Shut off engine. Move the lower PTO lever up and down several times to relieve any pressure, then unhook it all. Don’t I have to couple up the quick connect after that to position for the auger? And if so, after that connect auger hoses? Then unhook Connect hoses? 😯
 
/ 425…changing implements
  • Thread Starter
#2  
Here is a pic of my hose connectors:
 

Attachments

  • IMG_8291.jpeg
    IMG_8291.jpeg
    5.6 MB · Views: 113
/ 425…changing implements #3  
Here is a pic of my hose connectors:
The outer two are for Q/A and a few other attachments that need it. E.g. post driver, 4n1, etc. Normally they stay hooked up. For my sanity, I put a colored zip tie on one of them, and then on one hose for each piece of equipment that I have that uses that circuit so the lever under the dash works the same way every time.

The inner two are the PTO supply and return, male and female, so you can't mix them up.

All the best, Peter
 
/ 425…changing implements
  • Thread Starter
#4  
The outer two are for Q/A and a few other attachments that need it. E.g. post driver, 4n1, etc. Normally they stay hooked up. For my sanity, I put a colored zip tie on one of them, and then on one hose for each piece of equipment that I have that uses that circuit so the lever under the dash works the same way every time.

The inner two are the PTO supply and return, male and female, so you can't mix them up.

All the best, Peter
Thanks again…
I tried it today (the part about removing implement) and did what Terry told me. I then hooked up the Connect hoses to the Outside feeds (same ones the bucket came off of) and moved the PTO lever to make it “unhook”. I had some trouble though—one side the connector from the Quick Connect was not going on fully so the sliding sleeve would lock it in place. I thought I’d never get it, but I finally did…whew! (Danged hot and HUMID and sweating [swearing? LOL] profusely 😜)
I’m still confused though…the lever directly under the joystick—is it a PTO control? I believe I need to get deeper into the routing so I might understand what I’m looking at, and why they work certain ways…again, on mine, I’m using the two outside feed lines—smaller. Those bigger ones on the insides, what are they for?
 
/ 425…changing implements
  • Thread Starter
#5  
Also, when it comes time to mount the auger head, I think Terry told me that the lever underneath would control the auger—so that would tell me that the auger head’s two hoses are basically a On/Off turned on by that lever, right? And when using these implements, the Quick Connect is disconnected, since it uses the same feed lines? I don’t know why I’m making this thought process so hard…it is easier when I’m actually in front of it and working with it. Just didn’t want to do something that might cause oil to shoot out somehow! LOL
 
/ 425…changing implements #6  
So the FAT hose connectors on the FEL arms are the MAIN PTO. These are for things like the mower, brush cutter, etc... things with hydraulic motors that spin fast. They are operated by the PTO switch on the dash.

The SMALL hose connectors on the FEL arms are the AUX PTO connections. They are operated by the lever by your right knee under the joystick. They are usually used to open and close the Quick Attach.

For things like the grapple, power angle snow blade, etc... you first pick up the implement and lock it in place with the quick attach, then remove the quick attach cylinder hoses from those small connectors on the FEL arms and let them hang. You'd then connect the small hoses for the grapple, power angle snow blade, etc... to those small connectors on the FEL arm.

Now, the lever by your right knew controls the grapple or the angle of the plow.

When you're done, remove them in reverse order, reconnect the Quick Attach hoses, and you can then unlock and drop the implement off of the FEL arms.

Make sense?
 
/ 425…changing implements #7  
You want to be sure that all the connectors are clean before connecting them so that dirt doesn't enter the hydraulic system. I don't know if it's the best option, but I sometimes spray the connectors with carb cleaner and then wipe them with clean shop towels. There's a lot of dust and debris from mowing with the front mount cutter.

When I got my 1445, I was also confused by the multiple PT hydraulic connectors and the quick attach that is hydraulically controlled. Kubota just uses a simple pair of hand operated latches for its quick attach system.
 
/ 425…changing implements #8  
@Modrob one other tip on the Q/A hoses: if they are hard to connect, it means that there is pressure in the hose. For implements that need the Q/A hydraulics to control something, I find that after I put an implement on and lock it, that it helps to turn the tractor off, cycle the Q/A lever back and forth and then remove the Q/A hoses that the hoses have depressurized, and the poppets can be pressed in easily to meet the hoses on the attachment. Once in a blue moon the attachment hose is under pressure, and I use something like a short metal dowel or drift and a hammer.

While I just wiped my connectors initially, I have gone to shooting brake or carb cleaner into or onto the hydraulic quick connects to make sure that there is no debris in the connectors. There's no filter on anything that comes back on the return lines.

All the best,

Peter
 
/ 425…changing implements #9  
@Modrob one other tip on the Q/A hoses: if they are hard to connect, it means that there is pressure in the hose. For implements that need the Q/A hydraulics to control something, I find that after I put an implement on and lock it, that it helps to turn the tractor off, cycle the Q/A lever back and forth and then remove the Q/A hoses that the hoses have depressurized, and the poppets can be pressed in easily to meet the hoses on the attachment. Once in a blue moon the attachment hose is under pressure, and I use something like a short metal dowel or drift and a hammer.

While I just wiped my connectors initially, I have gone to shooting brake or carb cleaner into or onto the hydraulic quick connects to make sure that there is no debris in the connectors. There's no filter on anything that comes back on the return lines.

All the best,

Peter
That's a good point to mention for new PT owners regarding hydraulic connectors that won't connect. I found the same issue when I first got mine.

I left the mower disconnected in direct sunlight. For the life of me, I could not get the connectors to attach to the machine. I resorted to taking a wrench and cracking the connection on the hose open to let some fluid out.

Later, it was Bird (RIP Bird) who told me to put a flat punch in a rag, push it against the bump in the connector and give it a light rap with a hammer. It only took one drop of hydraulic fluid to come out to relieve that pressure.

So over the years, I've had to do that 3-4 times.
 
/ 425…changing implements
  • Thread Starter
#11  
So the FAT hose connectors on the FEL arms are the MAIN PTO. These are for things like the mower, brush cutter, etc... things with hydraulic motors that spin fast. They are operated by the PTO switch on the dash.

The SMALL hose connectors on the FEL arms are the AUX PTO connections. They are operated by the lever by your right knee under the joystick. They are usually used to open and close the Quick Attach.

For things like the grapple, power angle snow blade, etc... you first pick up the implement and lock it in place with the quick attach, then remove the quick attach cylinder hoses from those small connectors on the FEL arms and let them hang. You'd then connect the small hoses for the grapple, power angle snow blade, etc... to those small connectors on the FEL arm.

Now, the lever by your right knew controls the grapple or the angle of the plow.

When you're done, remove them in reverse order, reconnect the Quick Attach hoses, and you can then unlock and drop the implement off of the FEL arms.

Make sense?

Got it! Yay!! Makes plenty of sense to me now. LOL
 
/ 425…changing implements
  • Thread Starter
#12  
@Modrob one other tip on the Q/A hoses: if they are hard to connect, it means that there is pressure in the hose. For implements that need the Q/A hydraulics to control something, I find that after I put an implement on and lock it, that it helps to turn the tractor off, cycle the Q/A lever back and forth and then remove the Q/A hoses that the hoses have depressurized, and the poppets can be pressed in easily to meet the hoses on the attachment. Once in a blue moon the attachment hose is under pressure, and I use something like a short metal dowel or drift and a hammer.

While I just wiped my connectors initially, I have gone to shooting brake or carb cleaner into or onto the hydraulic quick connects to make sure that there is no debris in the connectors. There's no filter on anything that comes back on the return lines.

All the best,

Peter

Again, thanks for the great info and tips…
Yes, I was looking at those connectors and thinking “how do I keep them clean?” I’m thinking there has to be caps available somewhere that cover and protect them when not in use—I believe my hydraulic portapower set has them…I’ll spend a few minutes in net land and see if I can find some…otherwise I thought I’d wrap a sandwich bag around them with a rubber band…
 
/ 425…changing implements
  • Thread Starter
#13  
That's a good point to mention for new PT owners regarding hydraulic connectors that won't connect. I found the same issue when I first got mine.

I left the mower disconnected in direct sunlight. For the life of me, I could not get the connectors to attach to the machine. I resorted to taking a wrench and cracking the connection on the hose open to let some fluid out.

Later, it was Bird (RIP Bird) who told me to put a flat punch in a rag, push it against the bump in the connector and give it a light rap with a hammer. It only took one drop of hydraulic fluid to come out to relieve that pressure.

So over the years, I've had to do that 3-4 times.
I finally got around to seeing that little nib down in there and on the feeder line (maybe I should call it “tractor” line?) It did cross my mind that maybe a little pressure could be holding things up, so I did press on them and they moved. Still was having no luck…but it was soooo close. Both were difficult but one side went on a little easier with just some maneuvering/twisting. It was as if they were so new that they were just really tight fitting. I lubed up the locking collars a bit and with a little more fiddling, it finally went on and locked. Whew!
 
/ 425…changing implements #14  
I buy caps from PT, or Summit racing, the latter either via Amazon or directly. Just make sure that you are getting the size right. I prefer the softer ones as some of the hard vinyl caps that I have bought over the years hardened to the point where they wouldn't come off, or go back on.

I couple all of my implement hoses together M/F. It helps the couplers stay cleaner, and keeps the pressure equalized for the most part.

Even with caps, at least around here, it seems like dirt gets in there, but caps are way better than no caps. Also, the sliding collar of the coupler needs to be clean outside and inside because the locking balls can carry dirt into the coupler. Every so often, I will blast air, then brake cleaner then air until everything moves freely, and then lubricate with PTFE laced silicone (SuperLube). Yes, it attracts dirt, but less than dry lubricants for me because the dry lubricants don't keep dirt out of the collar.

All the best,

Peter
 
/ 425…changing implements #15  
I use aluminum foil to cover my connectors, inexpensive and it works!
Always use a fresh piece, keeps them clean!
 

Attachments

  • IMG_5337.jpg
    IMG_5337.jpg
    4 MB · Views: 74
  • IMG_5338.jpg
    IMG_5338.jpg
    4.7 MB · Views: 71
  • IMG_5339.jpg
    IMG_5339.jpg
    5.3 MB · Views: 74
/ 425…changing implements #17  
I replaced mine with flat face connectors - easier to keep clean and connect.
I have some on other equipment, and love them. They do stay much cleaner and are easier to connect. I do wish I had them on the PT, but the total expense seemed like a personal extravagance. I will probably get there.

All the best, Peter
 
/ 425…changing implements
  • Thread Starter
#18  
I replaced mine with flat face connectors - easier to keep clean and connect.
Hmmmm…what are “flat face” connectors? (I’ll try a search…😉)
That was quick—I found them. Thanks! 😊
 
/ 425…changing implements #19  
If you decide to go the flat face route, check that the couplings are up to the flow and pressure of your PT.

All the best,

Peter
 
/ 425…changing implements #20  
Here is a pic of my hose connectors:
Something I notice on this new model compared to one’s made around 2016 is that the pipes for the hydraulic couplers are in a higher position. So, obviously the hoses hook up on top of that rotating pipe. With mine it fits better when running the hoses underneath that rotating part on the FEL.
 
 
Top