JD 2240: Rebuilding my 3PH

   / JD 2240: Rebuilding my 3PH
  • Thread Starter
#11  
Piston seal looks OK but looks are deceiving, Change it no matter what, any seals you see change them, cut the piston seal off without scoring the sides of the groove, (some guys try prying between the seal and the groove and it scars the side of the groove), you're gonna change it anyways....also grease the rubber energizer ring (you'll see this underneath )before the new teflon outer ring goes on....stretch it gently just enough to get it on......then shrink...

Rubber energizer ring? The parts breakdown only shows a single seal. I haven't received the new seal yet for comparison.

Any suggestions for the method for cutting the old seal so as not to damage anything?
 
   / JD 2240: Rebuilding my 3PH #12  
John Deere may do it differently but the energizer ring underneath comes with the piston seal, check your repair kit, (http://www.herculesus.com/home.php?cat=1067)

we use many different styles but they work basically the same.....that example may not be your exact seal but you'll get the picture....

cut seal off with box cutter or stab with small flat head screw driver on an angle....just bump it with your open hand....
 
   / JD 2240: Rebuilding my 3PH
  • Thread Starter
#13  
John Deere may do it differently but the energizer ring underneath comes with the piston seal, check your repair kit, (http://www.herculesus.com/home.php?cat=1067)

we use many different styles but they work basically the same.....that example may not be your exact seal but you'll get the picture....

cut seal off with box cutter or stab with small flat head screw driver on an angle....just bump it with your open hand....

Copy that. Even so, just to be sure, I'll wait until the new seal arrives so that I can look at it first.

I plan to try again to disassemble the valves after work tonight. Should have more to post then.
 
   / JD 2240: Rebuilding my 3PH
  • Thread Starter
#14  
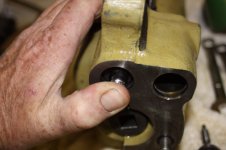
I had a few minutes while waiting for my carpool partner this morning and got the relieve valve disassembled. No C-clamp required. Just a small socket and used my thumb to depress the end face and remove the snap ring. Worked fine.

I did find an issue with the valve which needs to be corrected. There is an O-ring missing. This could be causing the issue with the 3PH dropping when the tractor is shut off. I'll finish disassembly tonight and get lots of pix.
 
Last edited:
   / JD 2240: Rebuilding my 3PH
  • Thread Starter
#15  
Finished disassembly tonight. Both the pressure and relief valves had the outer O-rings missing on the valve end caps, but I'm getting ahead of myself.

I found that I could depress the valve end cap with nothing more than just a small socket and my thumb, then use the pick to remove the snap ring.
3PH Rebuild_030.jpg

After removing the valve parts and setting each to its own area so that they wouldn't get mixed up, I took some time to look them over. The pictures below are of the relief valve (below left) and pressure valve (below right). 3PH Rebuild_031.jpg 3PH Rebuild_032.jpg
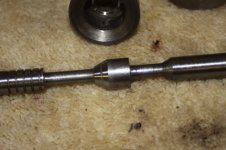
The relief valve has a slight line around it where it sets into the valve seat and when set into the seat and wiggled it can be felt just a little. The pressure valve has a much deeper line around it and when set into the seat sets quite tightly with very little ability to wiggle. I'm not sure which is considered a good condition, but I figure that at least one of them would be considered badly worn. I called the dealer just before closing tonight and ordered one set of valve and seat. Once I receive it I can make a comparison with a known good valve and decide if I will need to replace both or just one.

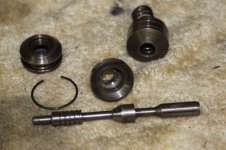
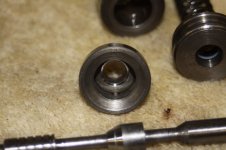
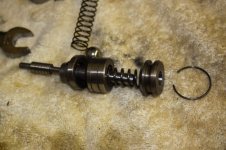
The pix below are (from left to right) the pressure valve, pressure valve seat, and pressure valve assembly. When looking at the valve assembly in the right pic, the piece on the right near the snap ring is the valve end cap. It has an O-ring and backup ring inside where the valve stem slides. The parts book also calls for an O-ringaround the outside of it in the groove for sealing to the valve housing. This is the O-ring which was missing during disassembly.
3PH Rebuild_033.jpg 3PH Rebuild_034.jpg 3PH Rebuild_035.jpg

Any opinions on the valves is appreciated though I don't plan to do anything further until I receive the new valves. Except possibly order a second set if it looks like I should.
 
   / JD 2240: Rebuilding my 3PH #16  
Your delving into territory I've never been, and I hope not to have to go there either.

My only suggestion is to get a pair of good snap ring pliers as they will make your life easier. Channelock has two pairs (large & small) that will cover most anything and as a bonus, they switch from internal to external.

I got one or both pairs at Home Despot.
 
   / JD 2240: Rebuilding my 3PH
  • Thread Starter
#17  
Your delving into territory I've never been, and I hope not to have to go there either.

My only suggestion is to get a pair of good snap ring pliers as they will make your life easier. Channelock has two pairs (large & small) that will cover most anything and as a bonus, they switch from internal to external.

I got one or both pairs at Home Despot.

The snap ring pliers won't help here. In the last pic, the "C" shaped wire to the right of the valve assembly is the snap ring.

I don't mind doing this kind of work. My largest problem, is that I usually try to go too fast and don't give my brain time to work out the issues. Having slept on it, I'm expecting to find that the new valves have no line around the seat and that this is from wear. I'll probably just call and order a second valve and seat today, but we'll see what happens.

It's just like the issue I had with the snap rings, once I walked away and had time to think about it, the answer was easy. I had it figured out before I got home and I only live 15 minutes away from the farm.:laughing:
 
   / JD 2240: Rebuilding my 3PH #18  
Cyril,

You're doin' fine....just keep your assemblies separate on clean paper towels or cloths when they come apart....most guys take things apart too fast and lose something or put parts back in backwards.....

Got thinking about what you said about orings missing.....in normal valves that live outside of your tractor housing it would be needed to keep oil in and dirt out....but in housing of tractor it would just drip inside to keep "self oiling" stuff inside....they probably left them out intentionally....?Not Needed?

As far as valves holding a load...the orings on control valve spools (like the one on you FEL) doesn't hold the load....its the precision clearances between the spools and the housing that holds the load...

I could wrong about the orings but you're better safe to put them in as OEM tells you to....never know who's been in there before you...

Also watch those C rings when they fly to parts unknown....:confused2:
 
   / JD 2240: Rebuilding my 3PH #19  
Thanks for the feedback. Have you talked to your folks and considered comming to the picnic in August?

Not yet, but i will tell them.
 
   / JD 2240: Rebuilding my 3PH #20  
In the last pic, the "C" shaped wire to the right of the valve assembly is the snap ring.

And here I thought that was a broken O-ring. Those type of rings appear to be a PITA since there is nothing to grab onto.
 

Tractor & Equipment Auctions

2015 KOMATSU PC170LC-10 EXCAVATOR (A50458)
2015 KOMATSU...
AMCO F42B-3626CS 13ft Pull-Behind Wheel Offset Harrow Tiller (A49461)
AMCO F42B-3626CS...
2019 CATERPILLAR D3K2 XL CRAWLER DOZER (A51242)
2019 CATERPILLAR...
2006 CHEVROLET SILVERADO 4X4 PICKUP TRUCK (A51222)
2006 CHEVROLET...
2010 Keystone Cougar 5th Wheel T/A Travel Trailer (A48082)
2010 Keystone...
2023 John Deere 6110M Utility Tractor (A50657)
2023 John Deere...
 
Top