You are using an out of date browser. It may not display this or other websites correctly.
You should upgrade or use an alternative browser.
You should upgrade or use an alternative browser.
Toothbar Tutorial (my Version)
- Thread starter Inspector507
- Start date
- Views: 6040
More options
Who Replied?
/ Toothbar Tutorial (my Version)
#1
OP
Inspector507
Super Member

OP
Inspector507
Super Member

OP
Inspector507
Super Member

OP
Inspector507
Super Member
OP
Inspector507
Super Member
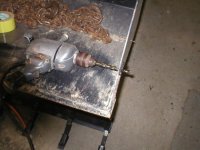
Thought you'd like to see the late 50's, early 60's era 1/2" Craftsman Drill I used. It only runs at 600 RPM, but as you can see has enough torque to snap the rear handle off of it. I did that years ago. While drilling these holes, I think the RPM may have dropped to 595..... /forums/images/graemlins/grin.gif
Attachments
OP
Inspector507
Super Member
OP
Inspector507
Super Member
OP
Inspector507
Super Member
OP
Inspector507
Super Member
GreenMtnMan
Silver Member
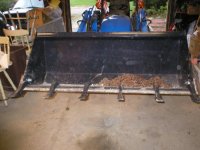
Thanks a lot for posting these! I found them very helpful, and thanks to you I will order a toothbar for my bucket.
JohnMiller3
Elite Member
- Joined
- Jan 15, 2001
- Messages
- 2,517
- Location
- Capital District, Upstate New York
- Tractor
- Satoh S650G, MF135, MF165, JD5205
Nice job Jerry... /forums/images/graemlins/smile.gif
OP
Inspector507
Super Member
Bird,
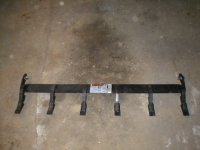
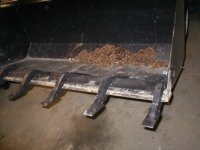
Thats a toothbar from WR Long.
Ken,
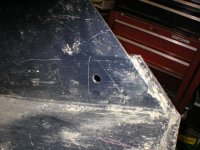
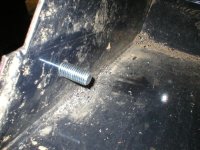
You're welcome. I see a few posts now and then about people wondering how to install one. I can tell some of them fret about how to drill a 3/4" hole in 1/4" steel.........it isn't that hard to do at all.
Thats a toothbar from WR Long.
Ken,
You're welcome. I see a few posts now and then about people wondering how to install one. I can tell some of them fret about how to drill a 3/4" hole in 1/4" steel.........it isn't that hard to do at all.
B7500
Platinum Member
Nice Job,
You did a better job then I did. Mine ended up with about a 1/4th inch space between it and the bucket. Works ok just fills with small rocks and stuff in the gap.
-Terry
You did a better job then I did. Mine ended up with about a 1/4th inch space between it and the bucket. Works ok just fills with small rocks and stuff in the gap.
-Terry
Spencer
Veteran Member
- Joined
- Jan 2, 2002
- Messages
- 1,267
- Location
- Western Michigan
- Tractor
- NH TC33D w/R4 Tires, Rear Remote, Hydraulic Toplink, 2 Auxiliary Work Lights, 7308 Loader w/Kasco Uni-Hitch (Quick Tach)
Nice job Inspector. Your going to love that toothbar. /forums/images/graemlins/grin.gif
I have the same toothbar, only the 48" version. I love it. It really helps to dig.
2 suggestions: use anti-sieze on the bolts if you intend on taking the toothbar off in the winter
and I put the nuts on the outside because I also have a few exposed threads. I think the most wear would occur inside the bucket, not outside. This is again to aid in taking it off in the winter.
Dave R.
Dougwatts
New member
Inspector,
I'm in the midst of installing a toothbar on my JD FEL. I did exactly as you did through drilling the 1/2" holes. I've worn out two unibits trying to get from 1/2 to 3/4. I thought about buying a 3/4 bit or two, but I don't have a drill with a 1/2" chuck. Is there a secret to getting a unibit to last long enough to drill my holes? Or do you have any other thoughts on how I might finish this little project. I'm a little frustrated as I can't play with my new toothbar.
Thanks.
OP
Inspector507
Super Member
Doug,
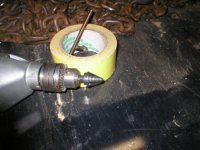
You need to make sure you're using a step drill without the very small steps to it. The one I used has maybe 6 steps and not 13. The 13 step bits are for thinner material and will burn up in a hurry with ¼" material. GO SLOW use a lubricant
You need to make sure you're using a step drill without the very small steps to it. The one I used has maybe 6 steps and not 13. The 13 step bits are for thinner material and will burn up in a hurry with ¼" material. GO SLOW use a lubricant
JASTN70D
Gold Member
Just curious as to why the holes were placed in the front of the slot as opposed to the rear. I put my tooth bar on a couple of weeks ago and I put the holes to the rear of the slot. I have used the heck out of it on stumps and have not noticed any problems. I just want to be sure I did it correctly