Start of something big.....

/ Start of something big..... #1  

wroughtn_harv

Super Member
Joined
May 12, 2002
Messages
6,092
Location
Denison, Texas
Tractor
2013 Volvo MC85C
I know. Most of y'all thought I had went to the big project in the sky since it's been so long since I've posted a project here. I've been doing stuff. It's just been little stuff. The kind of stuff that keeps the bills paid in these tough times. TBN is still my home page on the puter. And projects is still my favorite forums.

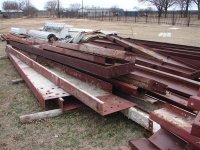
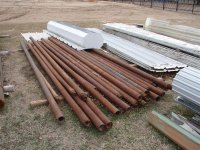
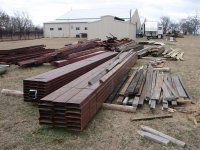
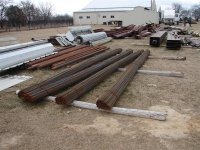
Late last year a friend approached me about a barn. He had purchased a forty by one forty metal building. It was a tear down but they had taken pictures of the demo so we had an idea of what all the parts were.

When I looked at the pictures and the pieces I found out a very interesting fact about the building he'd purchased. It was two buildings by two different manufacturers. One of them used structural steel for the major framework. The other used formed sheet metal components. The structural design has the purlins running between the arches. The formed design has the purlins running on the outside of the arches.

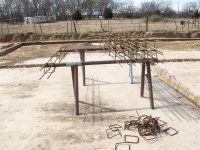
When we talked about how we should build it I suggested a twenty foot covered apron. He had me come up with what I thought I needed in addition to the materials we had from the demolition of the building. Which by the way was a strip shopping center in some west Texas town.

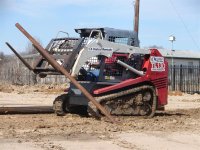
The next thing I know is he has the material all in place and it's ready to start when I am.
 

Attachments

  • DSC03601 (Medium).JPG
    DSC03601 (Medium).JPG
    123.1 KB · Views: 488
  • DSC03602 (Medium).JPG
    DSC03602 (Medium).JPG
    125.8 KB · Views: 385
  • DSC03603 (Medium).JPG
    DSC03603 (Medium).JPG
    116 KB · Views: 423
  • DSC03604 (Medium).JPG
    DSC03604 (Medium).JPG
    121.4 KB · Views: 409
/ Start of something big.....
  • Thread Starter
#2  
We decided on a sixty by one hundred twenty under roof metal building. He had one of his employees make the pad. It's like a table top.

I decided to do it in two pours. The first one will be of the main framework, forty by one twenty. Then I'll do the twenty by one twenty approach on the second pour. This is keep us from needing a pump truck. Besides that the approach won't be laid out to the same specs as the main room.

The pad was so good I decided to have it finished grade for the concrete bed. He had a small trencher which helped with digging the beams. I did the three long beams and the one end. I used his Ford 340 skip loader to remove the tailings. It wasn't that bad and I had help. I used paint to guide the trencher and then I had help making a four inch cut twelve inches wide.
 

Attachments

  • DSC03612 (Medium).JPG
    DSC03612 (Medium).JPG
    99.5 KB · Views: 334
  • DSC03610 (Medium).JPG
    DSC03610 (Medium).JPG
    104 KB · Views: 523
  • DSC03609 (Medium).JPG
    DSC03609 (Medium).JPG
    112.5 KB · Views: 750
  • DSC03608 (Medium).JPG
    DSC03608 (Medium).JPG
    101.4 KB · Views: 408
  • DSC03613 (Medium).JPG
    DSC03613 (Medium).JPG
    85.8 KB · Views: 429
  • DSC03614 (Medium).JPG
    DSC03614 (Medium).JPG
    98.1 KB · Views: 328
  • DSC03615 (Medium).JPG
    DSC03615 (Medium).JPG
    97.9 KB · Views: 385
  • DSC03616 (Medium).JPG
    DSC03616 (Medium).JPG
    100.8 KB · Views: 451
/ Start of something big.....
  • Thread Starter
#3  
We rented a Takekuchi track loader to drill the pier holes. There's sixteen in the main pad. I also used it to drill the holes for the drill stem posts for the canopy. The piers are eight feet deep and the Take worked great for putting those heavy pieces of drill stem into their holes. I don't know what they weigh but they're three and a half inches in diameter with about a one and a quarter center hole for mud and water flow.

One of the neat things about the Take is I could run all over that pad and not hurt a beam. Too kewel for words. The drill stem is damaged material. One end or the other is messed up. So I put the messed up end down. That way when it comes to framing up the canopy I can screw on an extension with no problem.

This will be weekly updates it seems. That's because there's no internet up there where I'm at. So I'll post progress reports and pictures when I come home. This next week I'll be doing the forming and the rebar. My wife will be at home doing home stuff this week. So I'll be on my own, with the weiner dog of course.

I need to let the engineers in on a secret. This is in the country. It's a farm shed and there's no permits, drawings, or real plan. I will be doing this thing my way. Some of the fun stuff will be designing ways to raise the walls about three feet higher than they were originally designed. Another will be designing and installing the canopy. One of the fun things we're considering is the doors to the main room will be all double slides that will over lap when opening.

I will be doing most of it by myself most of the time. I will bring in a crew to handle the concrete pour and finish when I have it formed and ready for concrete. Between a hundred and forty and a hundred and fifty yards of concrete kind of pour doesn't interest me.
 

Attachments

  • DSC03624 (Medium).JPG
    DSC03624 (Medium).JPG
    103.4 KB · Views: 481
  • DSC03623 (Medium).JPG
    DSC03623 (Medium).JPG
    106.9 KB · Views: 453
  • DSC03622 (Medium).JPG
    DSC03622 (Medium).JPG
    127.3 KB · Views: 384
/ Start of something big..... #5  
Hey Harvey,

Good to see a new thread and project from you. Looks like Glenda is enjoying her retirement too!!!!

Are you guys staying in the RV? I was wondering why you rented the skid steer and didn't use your JCB, but then thought that you must be a good ways away from home and pulled the RV there.

Will you be hiring a crew, or is this a job for the two of you?

Eddie
 
/ Start of something big..... #6  
Good to see you again, Harv.
Will be watching your thread with great interest. You always come up with some good stuff. Good luck to you.
 
/ Start of something big..... #7  
Hey Harv,
I have been looking for a project by you for quite a while now. It will be interesting to see how you solve some of the constructions issues that come up as you go.

Did you ever have any luck with your new fastener system?

Mike
 
/ Start of something big.....
  • Thread Starter
#8  
I apologize for not being more diligent in updating the project. I've done the bulk of the work by myself. So it's almost like needing to drive a stake to measure progress.

One of the interesting challenges was forming up long lines (120 feet) by myself. The way I did it was pulling string for line. Then I drove in enough stakes for a sixteen foot two by six. I used regular old Vice Grip C clamps to hold the two by in what I guesstimated was height. I have a Hilti laser set up for shooting grade. I would then check and align for height the board. The first one was always the hardest. After that it was a matter of lining up one end with the previous board and setting the other for height with the laser.

The way it worked out I used approximately one stake every two feet. One of them was for height every three to four feet. Another was used to establish line about the same spacing. So after a hundred feet or so I was tired. The ten pound sledge and me bonded. We're buds for life.

I used the old pipe saw horses for making the iron work for the pier holes. I also used my trusty Riley made bender to form the rings and right angles as needed out of rebar.
 

Attachments

  • whitts building february 2009 011 (Medium).jpg
    whitts building february 2009 011 (Medium).jpg
    112.3 KB · Views: 442
  • whitts building february 2009 012 (Medium).jpg
    whitts building february 2009 012 (Medium).jpg
    98.7 KB · Views: 456
  • whitts building february 2009 009 (Medium).jpg
    whitts building february 2009 009 (Medium).jpg
    97.9 KB · Views: 412
  • whitts building february 2009 010 (Medium).jpg
    whitts building february 2009 010 (Medium).jpg
    100.8 KB · Views: 336
  • whitts building february 2009 030 (Medium).jpg
    whitts building february 2009 030 (Medium).jpg
    64.1 KB · Views: 432
  • whitts building february 2009 014 (Medium).jpg
    whitts building february 2009 014 (Medium).jpg
    82 KB · Views: 482
/ Start of something big.....
  • Thread Starter
#9  
We had to cut a ton of two foot long pieces of rebar for the beams. Keep in mind I'm not a concrete guy and I don't always do things the way professionals would.

The way I did the beams was to pull a string and then pound into place pieces of rebar every four feet. I then tied two horizontal pieces of rebar to every vertical.
 

Attachments

  • whitts building february 2009 022 (Medium).jpg
    whitts building february 2009 022 (Medium).jpg
    89.8 KB · Views: 364
  • whitts building february 2009 032 (Medium).jpg
    whitts building february 2009 032 (Medium).jpg
    79 KB · Views: 383
  • whitts building february 2009 026 (Medium).jpg
    whitts building february 2009 026 (Medium).jpg
    71.3 KB · Views: 399
/ Start of something big.....
  • Thread Starter
#11  
I'm hoping to have it poured and finished Friday the 6th. I have sixteen hunded feet ready and the first pour will be forty eight hundred square feet. I have to fabricate and install thirty plus weld plates. The plates will be tied into the rebar skeleton of course.

I won't be doing the pour and finish myself. That's subcontracted out and they're charging us forty cents a square foot to pour and finish. The concrete is costing us $106.00 a cubic yard. We only have three choices with the concrete supplier. I chose the one that was joined at the hip with the subcontractor that's handling the pour and finish. They're both local and I really wasn't interested in bringing in crews from the city to do the work. I could just see ten to eleven trucks sitting there and a crew with mechanical issues forty miles away.

I've came up with the design fo the sliding doors. There will be two of them per opening, six openings, and the design and construction might interest some of you.

I understand that some might consider me crazy to be bent over tying rebar all day when there are plenty of young people out there needing the experience. I'm not a ********* and I do feel the pain. But one of the principles that I believe in is doing it for the doing. So whether it's tying the rebar, digging the beam, welding the steel framework up, or just problem solving. Each task comes with a reward and a cost. Embracing the task as a whole, having a cost and providing a reward, is good enough.
 

Attachments

  • whitts building february 2009 033 (Medium).jpg
    whitts building february 2009 033 (Medium).jpg
    84.1 KB · Views: 341
  • whitts building february 2009 029 (Medium).jpg
    whitts building february 2009 029 (Medium).jpg
    92.5 KB · Views: 376
  • whitts building february 2009 020 (Medium).jpg
    whitts building february 2009 020 (Medium).jpg
    89 KB · Views: 374
/ Start of something big..... #12  
Harv,

You should have a group of carpenter/construction students following you.
The main thing they would learn - hopefully - is work ethic and than technic.

As I once said to my blacksmith friend with 20 years of experience: you make it look so easy. Somethings he does in 30 second stakes me 30 minutes.

A true master.

lloyd
 
/ Start of something big..... #13  
Sure looks good Harv,TLC should do a show of your work, looks a lot more interesting than some of the stuff the have now!
 
/ Start of something big..... #14  
Harvey,

With the new law going into effect last September, how has it been dealing with the inspectors for your foundation? At the CE class that I had to go to for my Contractors License, there was allot of confusion on the new regulations requiring all buildings in the state to be inspected. Most of the confusion was about the foundation design and who engineered it. In the end, the clarification was that it didn't have to have an engineers stamp, but did have to pass the code that the inspector you hire follows. Since there are different codes all over the state, it's mostly a localized standard.

I haven't hired any one for out of city limits inspections yet, so I don't have any knowledge of how it's working out. I've had some send me their cards and price lists for doing the inspections, but I'll cross that bridge when I have to.

Most of my jobs outside of city limits are under $10,000 which is under the limit for the new law requiring that all new buildings in the state of Texas pass three inspections.

Eddie
 
/ Start of something big..... #15  
Harv, looking good - I'm taking notes as you go, so please supply lots of pictures so I can build my own 30x48 garage/woodshop this spring!
 
/ Start of something big..... #17  
I believe it's the professionals that should be taking hints from you.

Nice work Harv.

I agree. The pro's tend to take too many shortcuts. Keep it up Harv, you are The Man!
 
/ Start of something big..... #18  
I have a question regarding the concrete forms - what is the purpose behind the flat 2x4 nailed on top of the form boards - is this to help keep them straight or for some other purpose? I don't spend much time around construction sites so maybe this is normal but the few jobs I have seen only had the vertical 2x form boards.

Thanks for sharing - am looking forward to following this project.
 
/ Start of something big..... #19  
The flat 2x4 is for the siding to overlap the sil plate and bring the water below the concrete that the sil plate is attached to. On wood frame construction, this is also done as a brick ledge to support the brick on the wall.

Eddie
 
/ Start of something big..... #20  
Thanks Eddie - that makes sense. I don't have a lot of experience with slab foundations so I see where that would be the way to go to keep the water out. The forms I have experience with were for sidewalks or driveways which wouldn't need the lip.
 
 
Top