scrapyard box blade...first fabrication project

   / scrapyard box blade...first fabrication project #1  

stormpetrel

Gold Member
Joined
Oct 16, 2010
Messages
353
Location
Block Island R.I.
Tractor
ym2210D
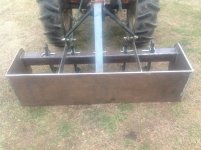
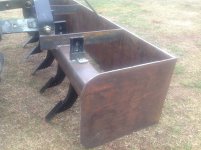
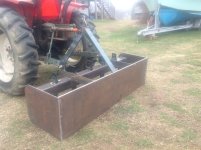
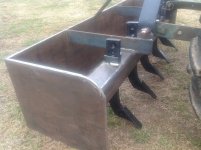
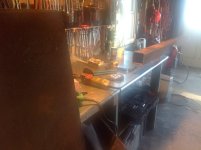
I finally did it!:cool2: It still needs: a second 1/4" plate on one side (the back and other side are made up of two 1/4" plates welded together) and the front and rear cutting blades.

I lucked out the day I went to the scrap yard, they had a 60" 4"x4" square tube and a piece of 1/4" plate steel that was about 59 & 3/4". I got the scarifier shanks and teeth from Agri-supply, as well as the A-frame support.

In order to start I had to get the old beat up Cutmaster 38 I got off of ebay working. I finally got the right torch, and inline filter, the correct consumables, and a cutting guide. There was a learning curve just to get the thing cutting right.....too much air, not enough air, no pilot arc (wrong amperage tip) power turned up too much, bad ground. My garage only has 110v, so the machine wasn't operating at full power. It was plenty for cutting 1/4" material though.

I didn't have any plans. What I did was to google "Box blade images" and to carefully study all the photos of box blades for dimensions, ratios, and other features/techniques.

The blade is on the tractor so I could weld with it in the air, and not hunched over the floor. I thought I was building it heavy, but it doesn't even come close to the weight of the 30 gal. barrel counterweight I made. Any guesses what this thing might weigh?

The steel didn't cost all that much, the scarifiers and other stuff I bought new was relatively cheap. It sure is a good thing I didn't have to pay anyone to do this...it would have cost a ton!! Even though it's not quite done, it sure is a nice feeling building your own (sort of large and heavy) tractor attachment. I learned a lot.

I wanted help with: (a)how to cut the forward (inside) cutting edge. Since it's a little less than 60", and the blade will be 60", I'll need to cut it. Can you plasma-cut hardened steel without it losing it's temper? (b) is it better to hinge the rear cutting blade, or not? (c) method of obtaining the 30 degree angle required for the cutting edges; can I weld some steel angle on to do that?

Oh. And yes, the welds are a little rough. AND....made with a little Lincoln 125 (gasp!) flux core welder. Interestingly enough, it was a **** getting the welds apart the couple of times I had to re-weld. It was NOT easy......them welds were *strong*. Now that I have used my tractor grapple to move big-*** stones for a few weeks without the welds I made attaching a new 1/4" top to the bucket cracking I have confidence in them.
 

Attachments

  • image.jpg
    image.jpg
    538.7 KB · Views: 1,677
  • image.jpg
    image.jpg
    529.9 KB · Views: 2,259
  • image.jpg
    image.jpg
    542.2 KB · Views: 967
  • image.jpg
    image.jpg
    562.7 KB · Views: 1,120
  • image.jpg
    image.jpg
    308.1 KB · Views: 836
   / scrapyard box blade...first fabrication project #2  
Don't worry about cutting the edge. I'm assuming you'd be cutting off one end. you aren't going to weaken it at all. I'd cut with Plasma if you got it.

I prefer a hinged rear blade that can be bolted/pinned if needed.

Most blades have an angle iron welded into the frame that the cutter edge bolts to. I've saw some where the front and rear cutters were bolted to the same angle iron.

Looks real nice. I love it when a guy invents his own equipment without plans!!!

Keep in mind that when the scarifiers are down the box wants to dump real bad!!!! In other words it will put a lot of compression force on the piece of flat iron you have welded to the back wall of the box and the top of the hitch triangle. If it fails or buckles, it will also twist and distort the flat irons that create the triangle.

As it appears now your box assembly is a LOT stronger than your hitch triangle. May be fine, I'm not familiar with your tractor so don't know it's weight. HP is secondary. Tractor weight is what will test your box blade.

Again, nice job!!! :thumbsup:
 
   / scrapyard box blade...first fabrication project #3  
The blade is on the tractor so I could weld with it in the air, and not hunched over the floor. I thought I was building it heavy, but it doesn't even come close to the weight of the 30 gal. barrel counterweight I made. Any guesses what this thing might weigh?

It looks like you have done a very good job. As far as the weight, 1" plate weighs 40lbs. a square foot, 1/2" plate weighs 20lbs. and so on, so your 1/4" weighs 10lbs. a square foot. All you have to do is measure each piece and do a little math.
 
   / scrapyard box blade...first fabrication project #4  
looks like a very good job on the fabrication...my only thought is if I had the basic materials and the need of a (different) box blade...I would make one with hydraulic scarifiers...or at least start with a design than would allow an adaptation...

again, very nice work...don't know how powerful your tractor is but if you use that bb enough you will find out which is tougher...good luck...
 
   / scrapyard box blade...first fabrication project #5  
Looks great! Good job.

Personally, I prefer that the rear blade be fixed, not hinged. I don't think it really makes a lot of difference though.
 
   / scrapyard box blade...first fabrication project #6  
Looks great! Good job.

Personally, I prefer that the rear blade be fixed, not hinged. I don't think it really makes a lot of difference though.


Why do you prefer a fixed??


With a smaller tractor/box blade it might not matter much. Where a hinged blade comes in handy is if trying to dig. With the rear blade floating, the box blade will have to be carried by the 3pt to keep it from digging until it stalls the tractor.

If you have TnT you can overcome a fixed blade by shortening the top link to get the front blade to cut deeper. If not, you're kinda stuck with a 1/4" cut at a time.

I rarely fasten my hinged rear blade. Just let it swing. I've gotten used to it and can control the cut very well.
 
   / scrapyard box blade...first fabrication project #7  
Box blade which have 2 blades in back, one facing forwards which is fixed, & the rear one which floats while going forward but is pushed against stops when pushing against the back of the blade while driving the tractor backwards are very handy & practical. As one poster mentioned if the second blade did not hinge out of the way, it would work as a gauge & prevent the first blade from digging in.

Stormpetrel's box blade only has the one fixed blade in back which it looks like his cutting edge will be fastened to. I would recommend he weld a strong back across the back of the blade to keep it from bowing.
 
   / scrapyard box blade...first fabrication project #8  
Looks pretty good, few things the top edge (back edge without some bracing will bend.)

Here is a close up pick of mine which is BENT at the top 90 degrees to reinforce the top AND a 2x2x1/4" angle welded across the top back INSIDE the box area.
(NOTE: this was taken because I added the Receiver tube to my Box Blade. I USED to have a plate welded to that 90 degree bend and had a ball bolted in but had to un-bolt ball every time I wanted to switch from one ball size to the other (I have all 3 sizes of balls on different trailers.)


and INSIDE of the box back plate w Receiver tube welded in. note this reinforces the box blade a lot too the tube was A HF 18" one paid 12 bucks for it.


The BOTTOM of my box blade is a 3x3x3/8" angle welded on point to the 1/4" back plate. there is no cutting edge that is removable. SOME use the 3x3 and then drill and bolt hardened plate to the base. the angle is upside down between the side plates. On your's you would have to cut out the back plate some to install it.

Mark
 
   / scrapyard box blade...first fabrication project
  • Thread Starter
#9  
Thanks for the comments, folks! I LOVE the receiver tube/reinforcement trick...nice.

My box blade walls are 1/2" thick (except for the left side, 'cause I ran out)...I welded two 1/4" sheets together to make the right side and rear panels. I have considered: (a) beefing up the top with a 3/8" thick x 2" wide strip welded along the entire thing and (b) "boxing in" the support that goes from the top of the back of the box blade to the hitch a-frame support top with a 1/4" x 2" strip on both the left and the right sides, running the full length.

Can anyone post a photo (or drawing/diagram) of how the angle iron would be mounted, and how the cutting blade would be bolted? I can't quite wrap my head around how this'll work. I was thinking I would weld angle iron on at the bottom of the back side and the front (inside) of the back of the BB to create the 30 degree angle necessary, and hang the cutting edge an inch or so below the bottom. Is that not right?

THe Yanmar 2210D weighs around 3500-3600 w/ loader, grapple and tooth bar. In 4wd and in low gear it's quite a powerful little 26 hp machine.

Thanks again for the kind words and suggestions. I have a lot of time, thought and work into this project, and want it to come out right........
 
   / scrapyard box blade...first fabrication project #10  
some thing like this, the BACK is actually shorter than the sides, BUT the ANGLE or welded in plates make up the rest of the height of the BACK part of the box blade.


I simulated bolted on cutting edge in that angle on back. & added the simulated box tubing & cutters 3 pt hookup... just quick sketch.

Mark
 

Tractor & Equipment Auctions

24 Foot Wells Cargo Enclosed Trailer (A50324)
24 Foot Wells...
LINK BELT LB-98 LOG LINE YARDER WITH MOTORIZED CARRIAGE (A51222)
LINK BELT LB-98...
2015 JOHN DEERE 624K WHEEL LOADER (A51406)
2015 JOHN DEERE...
2024 Ford F-350 Super Duty XLT FX4 - Like-New, Loaded, Only 780 Miles (A52128)
2024 Ford F-350...
2019 Ford Explorer AWD SUV (A50324)
2019 Ford Explorer...
2008 BMW 528i Sedan (A50324)
2008 BMW 528i...
 
Top