Rear Remotes

   / Rear Remotes
  • Thread Starter
#21  
Remotes finally arrived this week.
Had to go to a step-niece-in-law's-baby's first year birthday, which took up all day, yesterday.
Got to drink beer with the other 2 guys who weren't smart enough to have an excuse to miss it, either.
Common topic of discussion was "How did I let this happen?"
Cute kid, though, and she'll only turn 1 once, so I guess I made the right choice.
Spent today getting everything ready for surgery - power washed with lots of detergent and rinsed to remove all of the grit & grime that I could.
Now, next weekend, when I have plenty of time & won't need to rush, I can go at it carefully and do it right the first time.
Will post lots of pictures, too.
 
Last edited:
   / Rear Remotes
  • Thread Starter
#22  
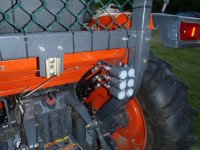
Almost all done. Kit was short 3 of the tiny hair pins that secure the links to the levers. So I used tiny finish nails, just to get everything pinned together so I could check that nothing was binding. Will get some at the hardware store and pull the nails. The tiny pivot pins that secure the link to the valve had their cross drilled holes undersize so the hair pins would not fit. Had to open them up with a teeny-tiny drill The 3pt valve actuator had some kind of clevis (for draft control?)that interfered with the valve stack, so it got cut off, since I don't have draft control. Have one small drip on the first valve coupler that I need to tighten, but it was getting dark and the skeeters were hungry.

P6230126 red (640x480).jpg

Will post more pictures if anyone is curious.

Hey Brian, how about a TnT kit?
 
   / Rear Remotes #23  
Almost all done. Kit was short 3 of the tiny hair pins that secure the links to the levers. So I used tiny finish nails, just to get everything pinned together so I could check that nothing was binding. Will get some at the hardware store and pull the nails. The tiny pivot pins that secure the link to the valve had their cross drilled holes undersize so the hair pins would not fit. Had to open them up with a teeny-tiny drill The 3pt valve actuator had some kind of clevis (for draft control?)that interfered with the valve stack, so it got cut off, since I don't have draft control. Have one small drip on the first valve coupler that I need to tighten, but it was getting dark and the skeeters were hungry.

View attachment 324347

Will post more pictures if anyone is curious.

Hey Brian, how about a TnT kit?[/QUOTE]

$585 + shipping cost. I sure do like those Kubota rear remote outlets. :thumbsup: ;)
 
   / Rear Remotes
  • Thread Starter
#24  
Sold! Should I go to the Fit Rite site to order?
And while I have your ear - about those remotes:
The mating fittings, supplied with the kits, pop in okay, but what's the prefered way to remove them?
Do you pull back on the hose that comes out the back of the mountings to release it, or do you just yank on the implement line?
 
   / Rear Remotes #25  
Sold! Should I go to the Fit Rite site to order?
And while I have your ear - about those remotes:
The mating fittings, supplied with the kits, pop in okay, but what's the prefered way to remove them?
Do you pull back on the hose that comes out the back of the mountings to release it, or do you just yank on the implement line?

Yes, fill out the contact form and we will go from there.

As far as the remote outlets, with your hand on the male end and the hose itself, you push in and then pull out all in one quick motion. These are breakaway QDs :thumbsup: :thumbsup: and if you were to pull away from a disconnected implement, but forgot to disconnect the hydraulic lines, they are suppose to pull out on their own with no damage to anything.
 
   / Rear Remotes
  • Thread Starter
#26  
Aha! That sounds like a good thing for forgetful me.
My garage would really like me to get a breakaway ROPS.
I'll go through the site when I get back from work, tonight.
Thanks!
 
   / Rear Remotes #27  
Nice looking job on the remotes.Did you find it to be difficult or complicated?I had contemplated putting them on my 3240 when I had it but never did. The tractor is gone now so I am just curious.
 
   / Rear Remotes
  • Thread Starter
#28  
Nice looking job on the remotes.Did you find it to be difficult or complicated?I had contemplated putting them on my 3240 when I had it but never did. The tractor is gone now so I am just curious.
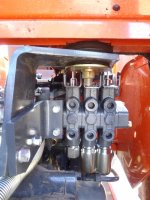
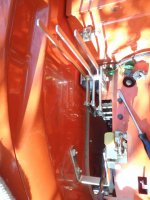
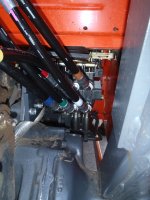
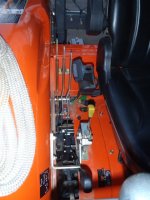
Thanks! Yes, I remember the mountain you moved with your L3240 - that really impressed me. I'd put the installation somewhere between the "challenging" and "maddening" categories, partly because it was HOT yesterday and I was a tad hungover. Mostly, it was difficult because there just isn't a whole lotta space where all that stuff has to go, and once it's there, there's no room left for fingers. Secondary issues were missing bits, bits that didn't fit and a piece of my loader control that interfered with the first valve and the tube set that connects it to the transmission. Definitely easier with my buddy, Enzo, helping me out with 3rd and 4th hands as well as making some very solid suggestions at key moments in the build.

There were a few "2 step forward, 1 step back" drills. For instance, after getting the valve stack together & bolted in, I realized that there was no conceivable hope of connecting the spools to the linkages, so I had to unbolt the whole assembly, rock it back about 60 degrees, attach the links and then rotate it back into position and re-secure the tubes/bolts. Trying to secure all of the hoses to the valve stack was another tight operation where I was glad to have a 22mm combination wrench, as it just fit. Trying to get the 3 connector housings aligned and bolted to the mounting bracket went a little like an Abbott & Costello routine where we'd wrestle everything into place just to have something misaligned, preventing the 8" bolts from clearing all the holes, or both bolts would simultaneously drop out and everything would go in a different direction. But we got it all together with just average mechanical skills.

I cannot even imagine trying to buy all of the components from 3rd party suppliers and get everything to fit in there. Now that it's done, I'm very happy with how it looks, and do not regret the considerable expense. Now that I have a clear understanding of the order of assembly, and have parts cut/drilled to fit right, I could probably do the job again in 1/3 the time: 2 hrs instead of 6.

P6230119 (480x640).jpg P6230124 (480x640).jpg

P6230125 (480x640).jpg P6230127 (480x640).jpg
 
Last edited:
   / Rear Remotes
  • Thread Starter
#29  
Brian - there should be a new message in your Fit Right in box.
 
   / Rear Remotes #30  
Thanks! Yes, I remember the mountain you moved with your L3240 - that really impressed me. I'd put the installation somewhere between the "challenging" and "maddening" categories, partly because it was HOT yesterday and I was a tad hungover. Mostly, it was difficult because there just isn't a whole lotta space where all that stuff has to go, and once it's there, there's no room left for fingers. Secondary issues were missing bits, bits that didn't fit and a piece of my loader control that interfered with the first valve and the tube set that connects it to the transmission. Definitely easier with my buddy, Enzo, helping me out with 3rd and 4th hands as well as making some very solid suggestions at key moments in the build.

There were a few "2 step forward, 1 step back" drills. For instance, after getting the valve stack together & bolted in, I realized that there was no conceivable hope of connecting the spools to the linkages, so I had to unbolt the whole assembly, rock it back about 60 degrees, attach the links and then rotate it back into position and re-secure the tubes/bolts. Trying to secure all of the hoses to the valve stack was another tight operation where I was glad to have a 22mm combination wrench, as it just fit. Trying to get the 3 connector housings aligned and bolted to the mounting bracket went a little like an Abbott & Costello routine where we'd wrestle everything into place just to have something misaligned, preventing the 8" bolts from clearing all the holes, or both bolts would simultaneously drop out and everything would go in a different direction. But we got it all together with just average mechanical skills.

I cannot even imagine trying to buy all of the components from 3rd party suppliers and get everything to fit in there. Now that it's done, I'm very happy with how it looks, and do not regret the considerable expense. Now that I have a clear understanding of the order of assembly, and have parts cut/drilled to fit right, I could probably do the job again in 1/3 the time: 2 hrs instead of 6.

View attachment 324454 View attachment 324455

View attachment 324456 View attachment 324457
Definitely sounds like there is more to it than I would have thought,but a lot of things are that way.Glad you were able to get it done and are happy with it.Yes,I did quite a bit of work with my L3240 but it is all done now and I don't really have a need for it.After much deliberation I finally sold it even though I enjoyed owning it.They are a nice size tractor.
 

Tractor & Equipment Auctions

1994 Mack CH613 T/A Wet Kit Day Cab Truck Tractor (A49461)
1994 Mack CH613...
2025 JMR 36in Mini Skid Steer Bucket Attachment (A50322)
2025 JMR 36in Mini...
2006 Kobelco SK210LC Hydraulic Excavator (A49461)
2006 Kobelco...
2016 FREIGHTLINER CASCADIA TANDEM AXLE 6X4 MID ROOF SLEEPER TRUCK (A51219)
2016 FREIGHTLINER...
2012 Geringhoff NS1200 Corn Head (A50657)
2012 Geringhoff...
FUEL TANK (A50854)
FUEL TANK (A50854)
 
Top