You are using an out of date browser. It may not display this or other websites correctly.
You should upgrade or use an alternative browser.
You should upgrade or use an alternative browser.
Naked 430
- Thread starter BravoXray
- Start date
- Views: 12144
More options
Who Replied?
/ Naked 430
#21
Amvcane
Platinum Member
- Joined
- May 24, 2013
- Messages
- 664
- Location
- NEPA
- Tractor
- 2012 Kioti CK35hst tlb; 1988 JD 420; 1990 JD 322; 1987 JD 332; 1985 JD 318; 2010 JD ProGator 2030A;
Excellent work Bravo.
I like the idea with the tape on the bottom of the grill, will have to try. Do you have a favorite brand and type that you use?
My low fuel sensor wire on my 322 also leaked. It wasn't working, so I just deleted it. Would be intrested in your results with the rtv. Can't wait to see it in action.
I like the idea with the tape on the bottom of the grill, will have to try. Do you have a favorite brand and type that you use?
My low fuel sensor wire on my 322 also leaked. It wasn't working, so I just deleted it. Would be intrested in your results with the rtv. Can't wait to see it in action.
OP
BravoXray
Elite Member
- Joined
- Dec 17, 2019
- Messages
- 3,667
- Location
- Nothern Indiana
- Tractor
- Kubota BX2230, John Deere 430 Diesel
Excellent work Bravo.
I like the idea with the tape on the bottom of the grill, will have to try. Do you have a favorite brand and type that you use?
My low fuel sensor wire on my 322 also leaked. It wasn't working, so I just deleted it. Would be intrested in your results with the rtv. Can't wait to see it in action.
Thanks for the compliments.
Link to the tape: UHMW TAPE 19-2�A-.75-18 Tape with Acrylic Adhesive.
") " UHMW with .��2" Thick Acrylic Adhesive.75" Width x 18 yd, 3" ID Core, Transparent/Opaque: Amazon.com: Industrial & Scientific
" UHMW with .��2" Thick Acrylic Adhesive.75" Width x 18 yd, 3" ID Core, Transparent/Opaque: Amazon.com: Industrial & ScientificI also put some on the sides of the snow blower mount where it rubs on the outside of the front of the frame. I don't know how well it will hold up, but I figured it was worth a try.
One thing I did to try to get a better bond with the tape was to heat the metal up first with a heat gun, then apply the tape and use a roller to get it adhered as well as possible.
I hope the RTV does the trick on the fitting. We'll see.
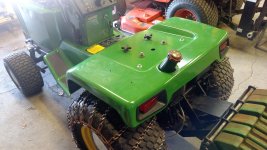
I put the tail lights in the seat pan today, and put it on the tractor. But, I had to take it back off, because when I tidied up the wiring, I didn't leave enough slack in the tail light wires to get the left one plugged in. I had to cut a tyrap to get enough slack. Put the pan back on and bolted it down. It's starting to look like a tractor again.
I also painted the seat suspension with frame paint. After it dries tomorrow, I'm going to set in in place on the pan and see how it looks to install the new seat I have. From the measurements I have made, It looks like it's just going to be too long, front to rear, to fit. With it back as far as it could go without hitting the fuel filler, it would extend to within six or seven inches of the dash panel. That would make it hard getting on and off I think.
Attachments


OP
BravoXray
Elite Member
- Joined
- Dec 17, 2019
- Messages
- 3,667
- Location
- Nothern Indiana
- Tractor
- Kubota BX2230, John Deere 430 Diesel
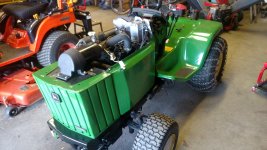
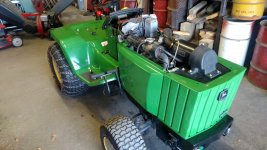
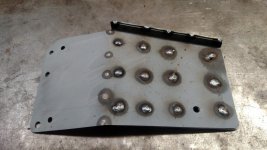
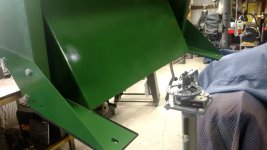
I decided to freshen up the 430 cab while I was at it. It had some rust on the rear corners and on the front posts. I pulled the corners off, blasted and painted them and put in new bolts to replace the old rusty ones. The step plates and angles that mount the front post to the seat pan were really rusty too, so those got blasted and painted too. The step plates were never very heavy, probably only 16 or 18 gauge metal, and the right side one was bent from me putting 250 lbs. on it many times,so I picked up some 14 ga. checker plate to reinforce them. I cut it to size, bent the lip on the outside edge, blasted them on both sides and put a coat of weld through primer on the bottom. I drilled about a dozen holes in the old step plates, clamped the new one in place and plug welded them together. They're a lot stronger now, and with the checker plate, non-slip too.
Not wanting to mess up the new powder coating on the seat pan, I bought a 12" X 24" sheet of 3/16" thick adhesive backed rubber from McMaster-Carr and put pieces on the bottom of all the parts that will be bolted to it. I also made up a couple of 1" X3/32" pieces of strap 7" long and welded 1/4" X 1" bolts to it through holes on 6" centers. These go up through the seat pan above the rear tires and into the rear corners of the cab and are secured with SS washers and nylock nuts. I use SS hardware on all the attach points, since they are exposed to mud, snow and whatever else my be present, and fighting rusty frozen bolts and nuts aren't any fun.
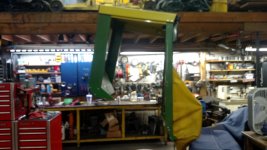
I took off the front fabric cover that goes over the hood and down around the engine side panels, it was really dirty and looked bad. the GF volunteered to give it a good scrubbing and now it looks like new. I gave the doors the same treatment, and they look a lot better now also.
I'm still waiting on my friend to get the hood painted so I can get that installed. I guess he got it all prepped, gave it a coat of the JD green, but after it dried he decided to give it another coat. Well, something happened and that coat had a reaction and turned all wrinkly on him. So he's going let it cure out for a few days, sand it down, put on a coat of sealer and try it again. Maybe I'll get it back this weekend.
Sorry about some of the blurry pictures, but the camera in my phone has developed a problem of some sort focusing on anything more than a few feet away. I suppose it's about time for a new one, I've had this one, a Motorola Droid Turbo for over 5 years, and other than replacing the battery a couple of months ago, it's been a great phone.
Once I get the hood, doors and front cover on, I'll post a couple more pictures.
Always the critic, the GF said "aren't you going to paint the suitcase weights too? They look pretty rusty."
Might need another rattle can of JD green.:confused3:
A man's work never ends.
Not wanting to mess up the new powder coating on the seat pan, I bought a 12" X 24" sheet of 3/16" thick adhesive backed rubber from McMaster-Carr and put pieces on the bottom of all the parts that will be bolted to it. I also made up a couple of 1" X3/32" pieces of strap 7" long and welded 1/4" X 1" bolts to it through holes on 6" centers. These go up through the seat pan above the rear tires and into the rear corners of the cab and are secured with SS washers and nylock nuts. I use SS hardware on all the attach points, since they are exposed to mud, snow and whatever else my be present, and fighting rusty frozen bolts and nuts aren't any fun.
I took off the front fabric cover that goes over the hood and down around the engine side panels, it was really dirty and looked bad. the GF volunteered to give it a good scrubbing and now it looks like new. I gave the doors the same treatment, and they look a lot better now also.
I'm still waiting on my friend to get the hood painted so I can get that installed. I guess he got it all prepped, gave it a coat of the JD green, but after it dried he decided to give it another coat. Well, something happened and that coat had a reaction and turned all wrinkly on him. So he's going let it cure out for a few days, sand it down, put on a coat of sealer and try it again. Maybe I'll get it back this weekend.
Sorry about some of the blurry pictures, but the camera in my phone has developed a problem of some sort focusing on anything more than a few feet away. I suppose it's about time for a new one, I've had this one, a Motorola Droid Turbo for over 5 years, and other than replacing the battery a couple of months ago, it's been a great phone.
Once I get the hood, doors and front cover on, I'll post a couple more pictures.
Always the critic, the GF said "aren't you going to paint the suitcase weights too? They look pretty rusty."
Might need another rattle can of JD green.:confused3:
A man's work never ends.
Attachments
-
 IMG_20201117_153514889 (Custom).jpg316.8 KB · Views: 164
 -
 IMG_20201117_152346272 (Custom).jpg285.4 KB · Views: 150
 -
 IMG_20201112_175732245 (Custom).jpg351.6 KB · Views: 142
 -
 IMG_20201112_175619979 (Custom).jpg318.3 KB · Views: 146
 -
 IMG_20201112_164420657 (Custom).jpg308.1 KB · Views: 162
 -
 IMG_20201112_161422225 (Custom).jpg319.4 KB · Views: 142
 -
 IMG_20201117_145827968 (Custom).jpg327.5 KB · Views: 152
 -
 IMG_20201117_145815676 (Custom).jpg323.4 KB · Views: 156
 -
 IMG_20201114_161529609 (Custom).jpg336.5 KB · Views: 157
TCowner
Platinum Member
I know what you mean when you say don't want to mess up the new powder coating on the seat pan. Cabs tend to "scar" up the pan quite a bit. Several years ago I purchased the Cozy Cab for my 430. This is a full ROPS and was bolted to the frame with brackets that take four 5/8" bolts in each corner. I don't like having a cab on in the warmer months so it came off in the spring. Of course I was left with all these ugly holes in the pan. They were even ugly with the bolts in.
My solution was a little expensive but I got a new pan from John Deere that would go on after I took the bolts on. I convinced my John Deere dealer to sell me the pan at cost as he would get an "un-scarred" pan if and when I traded the tractor.
Taking the pan on an off is a little awkward but isn't bad if you have a helper.
A 430 John Deere when new, or with new paint, is probably the sharpest looking garden tractor Deere ever made. I just couldn't deal with the ugly holes I made.
LouNY
Super Star Member
- Joined
- Jul 4, 2015
- Messages
- 14,887
- Location
- Greenwich, NY
- Tractor
- Branson 8050, IH 574, Oliver 1550 Diesel Utility (traded in on Branson) NH 8160. Kioti CK2620SECH
I decided to freshen up the 430 cab while I was at it. It had some rust on the rear corners and on the front posts. I pulled the corners off, blasted and painted them and put in new bolts to replace the old rusty ones. The step plates and angles that mount the front post to the seat pan were really rusty too, so those got blasted and painted too. The step plates were never very heavy, probably only 16 or 18 gauge metal, and the right side one was bent from me putting 250 lbs. on it many times,so I picked up some 14 ga. checker plate to reinforce them. I cut it to size, bent the lip on the outside edge, blasted them on both sides and put a coat of weld through primer on the bottom. I drilled about a dozen holes in the old step plates, clamped the new one in place and plug welded them together. They're a lot stronger now, and with the checker plate, non-slip too.
Not wanting to mess up the new powder coating on the seat pan, I bought a 12" X 24" sheet of 3/16" thick adhesive backed rubber from McMaster-Carr and put pieces on the bottom of all the parts that will be bolted to it. I also made up a couple of 1" X3/32" pieces of strap 7" long and welded 1/4" X 1" bolts to it through holes on 6" centers. These go up through the seat pan above the rear tires and into the rear corners of the cab and are secured with SS washers and nylock nuts. I use SS hardware on all the attach points, since they are exposed to mud, snow and whatever else my be present, and fighting rusty frozen bolts and nuts aren't any fun.
I took off the front fabric cover that goes over the hood and down around the engine side panels, it was really dirty and looked bad. the GF volunteered to give it a good scrubbing and now it looks like new. I gave the doors the same treatment, and they look a lot better now also.
I'm still waiting on my friend to get the hood painted so I can get that installed. I guess he got it all prepped, gave it a coat of the JD green, but after it dried he decided to give it another coat. Well, something happened and that coat had a reaction and turned all wrinkly on him. So he's going let it cure out for a few days, sand it down, put on a coat of sealer and try it again. Maybe I'll get it back this weekend.
Sorry about some of the blurry pictures, but the camera in my phone has developed a problem of some sort focusing on anything more than a few feet away. I suppose it's about time for a new one, I've had this one, a Motorola Droid Turbo for over 5 years, and other than replacing the battery a couple of months ago, it's been a great phone.
Once I get the hood, doors and front cover on, I'll post a couple more pictures.
Always the critic, the GF said "aren't you going to paint the suitcase weights too? They look pretty rusty."
Might need another rattle can of JD green.:confused3:
A man's work never ends.
My Motorola Droid developed a focus issue with the camera also.
After I had ordered my new phone I took the old one out of the outter box to get the sim card out and while it was out cleaned it real good,
guess I must have gotten something on the lens that was messing with the auto focus as it works good now.
OP
BravoXray
Elite Member
- Joined
- Dec 17, 2019
- Messages
- 3,667
- Location
- Nothern Indiana
- Tractor
- Kubota BX2230, John Deere 430 Diesel
My Motorola Droid developed a focus issue with the camera also.
After I had ordered my new phone I took the old one out of the outter box to get the sim card out and while it was out cleaned it real good,
guess I must have gotten something on the lens that was messing with the auto focus as it works good now.
I don't have mine in a case, but I have cleaned the lens and it didn't help. I have another identical phone that developed other problems, so I'm thinking I might try to swap the camera out of that phone to mine to see if that fixes the problem. There are just a few screws that hold it in the chassis.
OP
BravoXray
Elite Member
- Joined
- Dec 17, 2019
- Messages
- 3,667
- Location
- Nothern Indiana
- Tractor
- Kubota BX2230, John Deere 430 Diesel
I know what you mean when you say don't want to mess up the new powder coating on the seat pan. Cabs tend to "scar" up the pan quite a bit. Several years ago I purchased the Cozy Cab for my 430. This is a full ROPS and was bolted to the frame with brackets that take four 5/8" bolts in each corner. I don't like having a cab on in the warmer months so it came off in the spring. Of course I was left with all these ugly holes in the pan. They were even ugly with the bolts in.
My solution was a little expensive but I got a new pan from John Deere that would go on after I took the bolts on. I convinced my John Deere dealer to sell me the pan at cost as he would get an "un-scarred" pan if and when I traded the tractor.
Taking the pan on an off is a little awkward but isn't bad if you have a helper.
A 430 John Deere when new, or with new paint, is probably the sharpest looking garden tractor Deere ever made. I just couldn't deal with the ugly holes I made.
The holes didn't bother me as much until they started rusting around them, and the rust kept spreading. So I just decided that since the cab will probably stay on full time now, to get it refurbished and try to protect as well as I could.
Yep, I always thought the 430 was a good looking LGT.
My only two quibbles with it is that it is pretty noisy when running, and the seat, even adjusted all the way back is too far forward by about 6 inches. My Kubota BX seat is a lot further back and more comfortable. My neighbor lady even remarked that the BX is a lot quieter than the 430. If there was room, I would try to put a different muffler on to quiet it down, but as on most sub-compact rtractors, there just isn't much room to work with. I think a certain amount of the noise is from the intake too. Not sure what could be done about that.
Richard001
Veteran Member
You know that a cell phone is NOT a camara, right.
You wouldn't' use a soldering iron to weld with, why would you use a cell phone to take a picture?
Other that that, your work is excellent !
Richard
You wouldn't' use a soldering iron to weld with, why would you use a cell phone to take a picture?
Other that that, your work is excellent !
Richard
OP
BravoXray
Elite Member
- Joined
- Dec 17, 2019
- Messages
- 3,667
- Location
- Nothern Indiana
- Tractor
- Kubota BX2230, John Deere 430 Diesel
You know that a cell phone is NOT a camara, right.
You wouldn't' use a soldering iron to weld with, why would you use a cell phone to take a picture?
Other that that, your work is excellent !
Richard
Thanks for the comment.
Ah, but it has two cameras in it. Besides, I only took my good camera to the shop to take pictures once years ago, it didn't turn out well. The camera in the phone does just fine most of the time. Like I said, it's over 5 years old, might be time to replace it.
OP
BravoXray
Elite Member
- Joined
- Dec 17, 2019
- Messages
- 3,667
- Location
- Nothern Indiana
- Tractor
- Kubota BX2230, John Deere 430 Diesel
Worked in the 430 this afternoon. Was so nice outside, in the 60's, I opened the overhead door and let the sun and breeze in. Not going to have any more days like this for a while.
I modified the front cover by removing two of the brass grommets and replaced them with stainless steel marine twist fasteners, like the clasps on some women's purses, Now I can put the twist locks on the side panels and hood to seal out a lot of the cold that would come in around them. Once I get the hood back, that will be about the last thing to do to finish this project up.
After I got those installed, I slid the metal anchoring bars into the pockets and fastened them the the front posts on the cab and did the same with the one that attaches below the front window. I connected the wire for the cab lights and when I turned them on, nothing, no lights. AHA! Then it dawned on me, that I had mounted the cab on rubber pads and they insulated the cab from the chassis. The seat pan is mounted on rubber mounts too, now that I think about it, so I wonder how they ever got a ground before. Hmmmm.
Oh well, after I ran a ground wire to the chassis, the lights work fine.
I got the doors mounted too, so it's starting to look like a real snow fighting machine again.
One other thing that needed attention, as the GF pointed out, were the six 20kg suitcase weights. They really are pretty bad looking. I pulled a couple off, scuffed them up with some 80 grit sandpaper, wiped them down with paint thinner, let them dry and gave them a couple coats of JD green. Tomorrow or Sunday I'll get the rest of them spruced up.
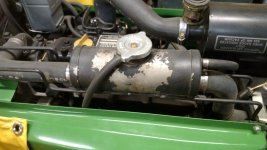
Oh yeah, one other thing that's bugging me is the cooling system surge tank on the engine. The antifreeze has taken the paint/powder coating off and it has a lot of bare metal showing. I'll drain the cooling system so I can remove it, and clean it up, prime and paint it while I'm in the mood.
Gotta check with Brian in the morning to see how the paint on the hood is coming.
I modified the front cover by removing two of the brass grommets and replaced them with stainless steel marine twist fasteners, like the clasps on some women's purses, Now I can put the twist locks on the side panels and hood to seal out a lot of the cold that would come in around them. Once I get the hood back, that will be about the last thing to do to finish this project up.
After I got those installed, I slid the metal anchoring bars into the pockets and fastened them the the front posts on the cab and did the same with the one that attaches below the front window. I connected the wire for the cab lights and when I turned them on, nothing, no lights. AHA! Then it dawned on me, that I had mounted the cab on rubber pads and they insulated the cab from the chassis. The seat pan is mounted on rubber mounts too, now that I think about it, so I wonder how they ever got a ground before. Hmmmm.
Oh well, after I ran a ground wire to the chassis, the lights work fine.
I got the doors mounted too, so it's starting to look like a real snow fighting machine again.
One other thing that needed attention, as the GF pointed out, were the six 20kg suitcase weights. They really are pretty bad looking. I pulled a couple off, scuffed them up with some 80 grit sandpaper, wiped them down with paint thinner, let them dry and gave them a couple coats of JD green. Tomorrow or Sunday I'll get the rest of them spruced up.
Oh yeah, one other thing that's bugging me is the cooling system surge tank on the engine. The antifreeze has taken the paint/powder coating off and it has a lot of bare metal showing. I'll drain the cooling system so I can remove it, and clean it up, prime and paint it while I'm in the mood.
Gotta check with Brian in the morning to see how the paint on the hood is coming.
Attachments

OP
BravoXray
Elite Member
- Joined
- Dec 17, 2019
- Messages
- 3,667
- Location
- Nothern Indiana
- Tractor
- Kubota BX2230, John Deere 430 Diesel
Well, I got the hood back from my painter friend, he did a great job on it. Had another friend come over today and give me a hand putting the 3 foot long decals on the sides of the hood. He has done a lot of work with decals and paint masks in the past, so he was the man to call. Went pretty smoothly, the only problem is that the decals were probably 20 years old and had a ridge where the split in the backing paper was at. It may flatten out when it warms up some or the hood gets good and warm from engine heat.
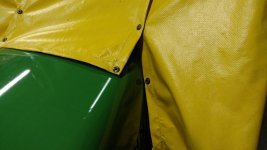
Tomorrow I'll get it installed on the tractor, and then I need to get some protective film to install where the front fabric drapes over the hood. Previously it had rubbed completely through the paint and down to the plastic/fiberglass, and I don't want it to that again.
Looks like I'm going to need it soon, they're predicting 6-8 inches of snow this week. Time to give the blower overhaul and new mount a workout.
Attachments


Kish318420
Gold Member
A heat gun or hair blower might help on the fold problem.
OP
BravoXray
Elite Member
- Joined
- Dec 17, 2019
- Messages
- 3,667
- Location
- Nothern Indiana
- Tractor
- Kubota BX2230, John Deere 430 Diesel
We tried to flatten it out with a heat gun, helped a little.
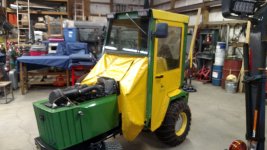
Got the hood installed this afternoon. looks pretty good with all the pieces back on it. I still have to put the protective film on the hood where the fabric drapes across it, and put a couple of snaps on the side panels to secure the sides of the fairing. The film will be here tomorrow and I'll get it applied and the snaps installed.
I'm also making a light bar for the rear of the cab. It will have four flashing LED lights on it. I got the bar they mount on drilled, tapped and painted Sunday, and I'll try to get the lights installed and wired up in a day or two.
Attachments

beenthere
Super Star Member
- Joined
- Aug 16, 2001
- Messages
- 18,691
- Location
- Southern Wisconsin, USA
- Tractor
- JD_4x2_Gator, JD_4300, JD_425, JD_455 AWS, added JD_455, JD_110, JD_X485(sold)
She's a beauty... very nice work and restoration.
OP
BravoXray
Elite Member
- Joined
- Dec 17, 2019
- Messages
- 3,667
- Location
- Nothern Indiana
- Tractor
- Kubota BX2230, John Deere 430 Diesel
Thanks. I'm the kind of guy that hates to let a piece of equipment just rust away. Besides, it was a lot cheaper than buying a new one, or putting a blower and cab on my Kubota. Of course, if we don't get any more snow than we've had for the last couple of years, it will barely get used. Good insurance I guess.
OP
BravoXray
Elite Member
- Joined
- Dec 17, 2019
- Messages
- 3,667
- Location
- Nothern Indiana
- Tractor
- Kubota BX2230, John Deere 430 Diesel
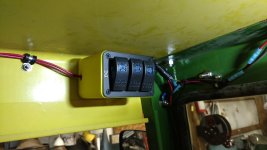
I installed a box with three switched in it above the left cab door this afternoon. I got the gang switch off Amazon for $20, and its all wired up right out of the box, Just connect 12 volts, ground and the leads to the three lights, pretty slick. I printed up a box to mount it in on my 3D printer, with a couple of holes to run wires in and out. I had a cigarette lighter socket I don't use any more mounted where I wanted put the switch box, so I removed it and used that hole to mount the plastic box. So now I have separate switches for the strobe on top of the cab, the four light bar I just installed on the back of the cab, and the flood lights on the front.
Link to the switch: Amazon.com : FXC Rocker Switch Aluminum Panel 3 Gang Toggle Switches Dash 5 Pin ON/Off 2 LED Backlit for Boat Car Marine Blue : Sports & Outdoors
The light bar has four 12 led lights that can be set to different flash patterns, by grounding one of the wires, and are synchronized by connecting all the sync wires together. I mounted them in a 1 1/2" square tube and 3D printed caps for both ends, one with a hole where I mounted a weatherproof push button switch so I can change the flash pattern if I want. It only draws about 1.5 amps maximum as my power supply showed.
I got the 3M adhesive stone guard material today, laid out where I want it on the hood, and have it taped down in place. Saturday I'll turn the heat on in the shop so it will get warm enough to apply it properly.
Now I have to talk to a local tarp shop about modifying the center piece of the front fabric cover so I can get all the snaps fastened. Since I modified the formers that frame the area where the pedals and your feet go, they won't pull together enough to get them snapped. I need the piece remade about 2-3 inches wider so they can snap together. We'll see what they say.
Attachments

Richard001
Veteran Member
Great work BX, and rather clever using a 3D printer to create a box for the switches.
BUT, isn't there always a but.
I'm not to excited about your use of crimps to connect your wires. Moisture, time and a little salt mist will cause the connections to fail. The copper wire strands will corrord away, starting with intermittent and then total failure.
A much better way is to solder them and then use shrink tubing that has sealant in it. The tubing protects the connection from any unintentional contact with other wires or frame and the sealant seals out any moisture.
Richard