OP
BravoXray
Elite Member
- Joined
- Dec 17, 2019
- Messages
- 3,481
- Location
- Nothern Indiana
- Tractor
- Kubota BX2230, John Deere 430 Diesel
Well, just when I thought I had the mower finished up, I started it up and mowed a patch in front of the shop to see how it ran and mowed. At first it seemed okay, but then after a couple of minutes it started smoking blue smoke out the exhaust and missing sometimes.
I pulled it back into the shop and noticed a lot of oil on the frame behind the engine and running down onto the mower deck. When I pulled the dipstick, oil and vapor sprayed out all over because the was so much blowby in the crankcase.
Well, *****!
After I shut it down and pulled the dipstick again, the oil on it was already black as coal. Not good.
So, after mulling over what to do, I figured the engine had to come off and be checked out. I HOPE that a new set of rings, maybe a piston, and honing out the
cylinder will take care of it, but until I get it all apart, it's hard to say.
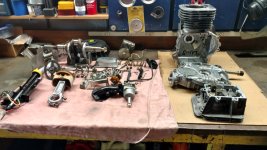
It was easy to get the engine out, only took about a half hour. Four bolts hold it to the frame, an electrical connector, starter cable, throttle cable, fuel line, remove the mower belt and finally take the bolt out of the drive pulley on the bottom and it slid right off the crankshaft. It not even that heavy, so I lugged it over and set it on the bench. Probably pull it apart tomorrow and see shat the verdict it.
I pulled it back into the shop and noticed a lot of oil on the frame behind the engine and running down onto the mower deck. When I pulled the dipstick, oil and vapor sprayed out all over because the was so much blowby in the crankcase.
Well, *****!
After I shut it down and pulled the dipstick again, the oil on it was already black as coal. Not good.
So, after mulling over what to do, I figured the engine had to come off and be checked out. I HOPE that a new set of rings, maybe a piston, and honing out the
cylinder will take care of it, but until I get it all apart, it's hard to say.
It was easy to get the engine out, only took about a half hour. Four bolts hold it to the frame, an electrical connector, starter cable, throttle cable, fuel line, remove the mower belt and finally take the bolt out of the drive pulley on the bottom and it slid right off the crankshaft. It not even that heavy, so I lugged it over and set it on the bench. Probably pull it apart tomorrow and see shat the verdict it.


")