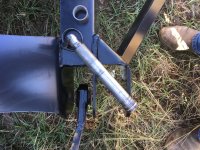
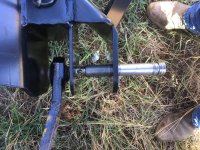
My solution to the ROPS pin

   / My solution to the ROPS pin #1  

ctgoldwing

Platinum Member
Joined
Jun 3, 2009
Messages
555
Location
Central Connecticut
Tractor
L3800HST
My L3800's ROPS has screw in pins for locking it in place, up or down. The factory pins have no handle of any kind to aid in screwing them in. It's a tedious process putting the ROPS up and down - the tractor is garage kept and of course the erected ROPS doesn't make it through the door. I tried another poster's idea of just getting a smaller diameter pin and sliding it through the threaded welded on nuts. That works but there is some expected play. I wasn't really good with the solution.

I thought of just drilling out the threads but could bring myself to do it.

My son that lives in MD has a nice garage set up including a Bridgeport and full metal working shop. I sent him 2 hitch pins and a crude drawing. He is going to fab them today:
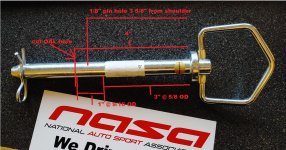
rops pin mod.JPG

The pin will be full size where it goes through the support holes and will reduce only going through the welded on threaded bolt. I have high hopes here!
 
   / My solution to the ROPS pin #2  
You could weld something onto the head of the bolt to give you something to grip to unscrew it. A pin will be quicker than screwing in the bolt. Once removed the bolts you can send the old bolts to your son and have him to remove some of the threads so you wouldn't have as many turns to screw it in if your pin idea doesn't work.
 
   / My solution to the ROPS pin
  • Thread Starter
#3  
yep, good call crazyal (most of my friends call me crazy Jerry). The bad news is I can't weld. The good news is Adam (son) can. If my pin idea doesn't work out I will try asking him to turn down some of the threads and weld 'something' onto the handle. If there was even a 1/8" rod 2" or 3" long it wouldn't be such a pain. As I plan to use the tractor for snow removal, taking those screwed pins out/in just sounds painful.
 
   / My solution to the ROPS pin #4  
My solution was different.


I built a taller shed.


No more pin issues. No more risk of bonking or pinching something important when raising or lowering.
 
   / My solution to the ROPS pin
  • Thread Starter
#5  
not funny :(

I've bonked the top trim piece, I don't really know how many times with my old L3400. Just to show I never learn, I did it the first day again with the L3800. I seriously thought about re-framing the opening.

My son just sent me a pix of the finished product. I should get it by Wednesday (he isn't Prime).

rops pin mod finished.jpg
 
   / My solution to the ROPS pin #6  
Just leave mine folded down. What they should do is build a ROPS as part of the FEL protector thing in front of the radiator high enough so that the rear one could stay just below 8' 6" to go under garage doors.
 
   / My solution to the ROPS pin #7  
not funny :(

I've bonked the top trim piece, I don't really know how many times with my old L3400. Just to show I never learn, I did it the first day again with the L3800. I seriously thought about re-framing the opening.

My son just sent me a pix of the finished product. I should get it by Wednesday (he isn't Prime).

View attachment 677458

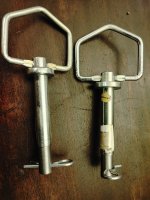
I did a similar thing with the pins for the lower lift arms on my snowblower. The original pins required bushings for both diameter and width which was just something else to lose and a pain to get in place so I made a step pin that was full size all the way through except through the last flange where it stepped down. Then the click pin held it in place. The only bushing required was to reduce side slop of the lift arm between the two flanges.

Your idea should work good but I would get rid of the hair pin clip, instead get a click pin which should be easier to get in and out.
IMG_0289.JPG IMG_0288.JPG
 
   / My solution to the ROPS pin
  • Thread Starter
#8  
I did a similar thing with the pins for the lower lift arms on my snowblower. The original pins required bushings for both diameter and width which was just something else to lose and a pain to get in place so I made a step pin that was full size all the way through except through the last flange where it stepped down. Then the click pin held it in place. The only bushing required was to reduce side slop of the lift arm between the two flanges.

Your idea should work good but I would get rid of the hair pin clip, instead get a click pin which should be easier to get in and out.
View attachment 677521 View attachment 677522

I agree :) those are the clips that came with the hitch pins. One of the first things I did when I picked up this tractor was buy a large assortment of click pins. It came with way too many hair pins.
 
   / My solution to the ROPS pin #9  
Would't it be easier to just keep a 1/4" impact with socket adapter handy? Bolt goes in or out in a second or two. I made my own quick-change and that's how I use it rather than a pin or latch. Works fine for me.
 
   / My solution to the ROPS pin #10  
I've got ROPS tracks on my limestone lintel.

Hope you report back, whether it works as shown or how you tweeked it. It would really be a freak accident if you ever rolled it AND it sheared the 9/16 diameter when it wouldn't have it were full diameter. I was going to do it Not2old's way but the impactor battery would probably be dead when I needed it.
 

Tractor & Equipment Auctions

UNUSED Clear Corrugated Polycarbonate Roof Panels (A50860)
UNUSED Clear...
2012 Big Tex 14GP-24 Gooseneck Trailer (A50860)
2012 Big Tex...
20 ft Angle Boom (A50860)
20 ft Angle Boom...
1982 LeeBoy Motor Grader (A51039)
1982 LeeBoy Motor...
2017 Peterbilt 567 Tri-Axle Dump Truck (A48081)
2017 Peterbilt 567...
2014 GMC Terrain SLE2 SUV (A48082)
2014 GMC Terrain...
 
Top