OP
Capricious
Platinum Member
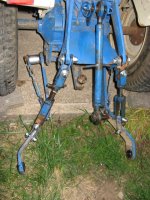
Tuesday night: freed-up the other downlink. Was rusted up pretty bad. I hope that i have not damaged the downlinks as i had to wrench on both of them pretty bad to free them up.
My set-up is exactly as shown on this photo from Valley Power:
Satoh Parts
Except that if the downlinks are installed correctly in the photo, mine were installed upside down.
Each downlink has (4) pins holding all the pieces together. I was missing (2) pins which had been replaced by big rusty bolts. The remaining pins were locked in place with old nails and so forth. Rather thatn buy (2) new pins and all new cotter keys, I elected to just replace everything with new bolts. I figured that would be a bit cheaper, but it wasn't. I selected extra-long bolts so that the nuts would bottom on the threads, and there would be no threads in the load-bearing areas of the bolts (the extra length to be cut-off once everything is tightened-up.) I also placed washers under the heads and nuts, and used nylon locking nuts.
The geometry of this hitch seems a little different. From what i have seen most downlinks are usually vertical & parrallel. The downlinks on this hitch actually splay outward. In other words, the tops are closer together than the bottoms. That is why there are so many links/pieces to the set-up- to allow for this. With a sideways force on the downlinks i was concerned about the the pins being held in place by mere cotter pins/cotter keys. One of the clevis pieces, a flat bar weldment, was already a bit "spread" and if it were to spread a bit more i doubt a cotter key would have kept the pin in place. The bolts and nuts will certainly stay in place.