MT160D

   / MT160D
  • Thread Starter
#71  
Tuesday night: freed-up the other downlink. Was rusted up pretty bad. I hope that i have not damaged the downlinks as i had to wrench on both of them pretty bad to free them up.

My set-up is exactly as shown on this photo from Valley Power:
Satoh Parts

Except that if the downlinks are installed correctly in the photo, mine were installed upside down.

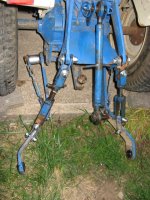
Each downlink has (4) pins holding all the pieces together. I was missing (2) pins which had been replaced by big rusty bolts. The remaining pins were locked in place with old nails and so forth. Rather thatn buy (2) new pins and all new cotter keys, I elected to just replace everything with new bolts. I figured that would be a bit cheaper, but it wasn't. I selected extra-long bolts so that the nuts would bottom on the threads, and there would be no threads in the load-bearing areas of the bolts (the extra length to be cut-off once everything is tightened-up.) I also placed washers under the heads and nuts, and used nylon locking nuts.

The geometry of this hitch seems a little different. From what i have seen most downlinks are usually vertical & parrallel. The downlinks on this hitch actually splay outward. In other words, the tops are closer together than the bottoms. That is why there are so many links/pieces to the set-up- to allow for this. With a sideways force on the downlinks i was concerned about the the pins being held in place by mere cotter pins/cotter keys. One of the clevis pieces, a flat bar weldment, was already a bit "spread" and if it were to spread a bit more i doubt a cotter key would have kept the pin in place. The bolts and nuts will certainly stay in place.
 
   / MT160D #72  
"With a sideways force on the downlinks i was concerned about the the pins being held in place by mere cotter pins/cotter keys."

I well know that problem. Once snow blowing 1 mile down the road one of those pins fell off and got blown away.
Fortunately I had something in the toolbox to temporarily replace the pin. Since then I always carry a spare for every occasion.

An other thing that needs a safety is the 3-point turnbuckle barrels. I lost one somewhere in the snow and an original part was so pricy that I simply purchased a complete pair of generic adjusters for a fraction of the price. Mine are always now safety-ed with wire.
 
   / MT160D
  • Thread Starter
#74  
"..I simply purchased a complete pair of generic adjusters for a fraction of the price..."


I thought about replacing the things, since mine are in such sad shape. I found some stuff like this...

Double HH 24182 Double Hh Mfg Lift Arm Lev Assembly

....but they looked to be a bit too long (although the bottoms maybe can be re-drilled to shorten them somewhat) plus I was concerning about having to bend them to take the proper angle, as the downlinks on the tractor do not hang straight down.
 
   / MT160D
  • Thread Starter
#75  
Sounds like you are getting there...


Still need to change the front axle oil. And there are other things that need to be done, but I hope to hook-up the rotary cutter this weekend and see if the tractor will lift it and spin it. I don't have any heavy grass/brush to try it out on, but if the "dry run" looks good, I'll spring for the ignition switch and also a slip clutch for the PTO, and I'll start making plans to haul this thing down to the Missouri Ozarks and see if it really works.
 
   / MT160D #76  
Neat! Good luck. Btw. Where abouts in Missouri are you. I went to school at Truman state...but it was still NMSU then.
 
   / MT160D
  • Thread Starter
#77  
Neat! Good luck. Btw. Where abouts in Missouri are you. I went to school at Truman state...but it was still NMSU then.


Just outside of St. Louis. Went to school in Springfield, Mo, at what used to be called SMSU. But that was over 30 years ago. Yeh, I'm old enough to get the senior coffee @ McDonalds.

The place where this tractor will be used is just about 50 miles or so north of Springfield, or about 135 miles south by southeast of KC
 
   / MT160D
  • Thread Starter
#78  
Got a lttle bit more done on the tractor today. Tightened-up all of the bolts that i had installed finger-tight in the 3 point linkages yesterday, and cut off the excess of each. Also tried to pack some grease into those ball joint thingies that take the pins of the impements. I use boat trailer wheel bearing grease on everything, so hopefully some of it will stay in place when it rains. Those balls hadn't seen grease in a long time. Also shot some oil into the holes that the newly-installed bolts are in.

I had mentioned many posts back that there were a couple of "spacers" missing, where the lower arms attach to a steel rod running crosswise under the differential. I cut a couple of 2 inch long sections of steel pipe and installed them in place of the missing spacers. You can see the left one in the photo below- I hit it with some silver spray paint so it would stand out from the rest of the rusty steel.

005.JPG


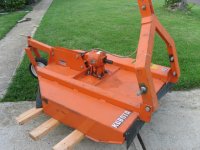
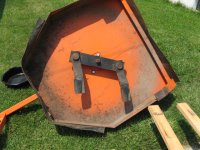
This is what the underside of the cutter looks like. Not too bad considering that this thing is at least 20 years old, and maybe closer to 30.

001.JPG
 
Last edited:
   / MT160D
  • Thread Starter
#79  
Had to mow the lawn last night so did not have much time to spend on the tractor. I did play with the 3 point lift a bit.

As i understand it, this tractor has "position control." If I push the control lever for the hitch to any position within its arc of
movement, the hitch should position itself in a similar position within its arc of movement.

I noticed that if the control lever was in the full down position, and the hitch in the full down position, nothing much would happen if I raised the control lever until it reached about the half-way position, at which point the hitch would begin to raise. Once the control lever was in its highest position and the hitch had stopped raising, I could manually lift the lift arms several more inches. I decided that there must be some issue with the linkages as i could reach under the seat and pull on something and then the hitch would raise higher. There is a tie rod connecting the lift arms to some sort of hydraulic valve. It appeared to me that this tie rod needed adjusting, but there was no more "travel" available in the adjustment set-up. A few mintues poking around my cluttered garage yielded something that I could use as a "spacer" to gain a bit more adjustment in the tie rod, and once I installed that the hitch would raise up to its limits of travel and top-out the cylinder, loading the pump and slowing the engine. The control lever itself has an adjustable stop to limit its travel, and I reset the stop so that with the control lever at the highest setting the hitch would still have about (1) inch of free play before topping out.

This all seems to work now, but i'm going to have to mull over this whole system to try to determine why it needs more adjustment travel than the tie rod could supply. There is something not right somewhere.
 

Tractor & Equipment Auctions

PICKUP TIRE CHAINS (A50854)
PICKUP TIRE CHAINS...
2013 JOHN DEERE 470G LC EXCAVATOR (A51242)
2013 JOHN DEERE...
2016 FORD TRANSIT 250 VAN (A51406)
2016 FORD TRANSIT...
Ford NAA Jubilee Tractor (A51039)
Ford NAA Jubilee...
SANY SY75C EXCAVATOR (A51242)
SANY SY75C...
2015 John Deere 35G Mini Excavator (A49461)
2015 John Deere...
 
Top