You are using an out of date browser. It may not display this or other websites correctly.
You should upgrade or use an alternative browser.
You should upgrade or use an alternative browser.
Flail Mower Let's talk flail mowers
- Thread starter TNhobbyfarmer
- Start date
- Views: 3637554
More options
Who Replied?
/ Let's talk flail mowers
#5,101
Ricn
Platinum Member
- Joined
- Sep 18, 2015
- Messages
- 536
- Location
- WA
- Tractor
- Kubota U-35, kx-040, Ford 8n, JD-280, JD380, JD1020, JD40C, Satoh Bull, Kubota L2501,
Taking all this advice seriously, and I thank you guys for it! My Son came by taking off the flail and putting on the rotary then hauling the tractor somewhere to mow making some bucks. He does that on occasion for good customers as part of the trac-hoe services for the gentleman farmers around here. When he gets back tomorrow, I asked he put the Land Plane on smoothing out the drive then put the flail back on; good to have boys around here so my old bones are no longer worked to hard. I plan to order a new shaft soon, not sure though where and from whom to get one, I do like quality stuff although another one from Woodmaxx would be ok maybe. My younger Son is the welder/fab guy around here so he can make the hook extension when having time but if finding one on line I could swing the price, might be faster that way.
Ricn
Ricn
Fallon
Super Member
Taking all this advice seriously, and I thank you guys for it! My Son came by taking off the flail and putting on the rotary then hauling the tractor somewhere to mow making some bucks. He does that on occasion for good customers as part of the trac-hoe services for the gentleman farmers around here. When he gets back tomorrow, I asked he put the Land Plane on smoothing out the drive then put the flail back on; good to have boys around here so my old bones are no longer worked to hard. I plan to order a new shaft soon, not sure though where and from whom to get one, I do like quality stuff although another one from Woodmaxx would be ok maybe. My younger Son is the welder/fab guy around here so he can make the hook extension when having time but if finding one on line I could swing the price, might be faster that way.
Ricn
How to Measure and Cut a Tractor PTO Shaft - YouTube shows how to measure & cut a PTO shaft. Only takes 20 minutes or less. You want 1/3 of the shaft to overlap so it wont come apart at max extension. At least several inches before it bottoms out minimum operating length to avoid the aforementioned issues.
No need for a new shaft unless it's to short. Easy & safe to cut em shorter if needed.
ronjhall
Super Star Member
That's the video I used. The instruction provided by PTO companies are confusing.How to Measure and Cut a Tractor PTO Shaft - YouTube shows how to measure & cut a PTO shaft. Only takes 20 minutes or less. You want 1/3 of the shaft to overlap so it wont come apart at max extension. At least several inches before it bottoms out minimum operating length to avoid the aforementioned issues.
No need for a new shaft unless it's to short. Easy & safe to cut em shorter if needed.
I have cut 3 PTO shafts this year. Using my HF portable band saw to cut. Using it paid for itself. $99.
Ricn
Platinum Member
- Joined
- Sep 18, 2015
- Messages
- 536
- Location
- WA
- Tractor
- Kubota U-35, kx-040, Ford 8n, JD-280, JD380, JD1020, JD40C, Satoh Bull, Kubota L2501,
Good video. I had watched that before keeping it in my bookmarks. My Woodmaxx shaft was cut about 3 or 4 inches shorter following the instructions that came with the shaft and we had little trouble following them. Once installing the quick hitch and moving things back another 4 inches or so, this existing shaft may not be long enough to handle cutting it a second time so another shaft will be needed perhaps.
Ricn
Ricn
Jerik
New member
Good video. I had watched that before keeping it in my bookmarks. My Woodmaxx shaft was cut about 3 or 4 inches shorter following the instructions that came with the shaft and we had little trouble following them. Once installing the quick hitch and moving things back another 4 inches or so, this existing shaft may not be long enough to handle cutting it a second time so another shaft will be needed perhaps.
Ricn
Got my Caroni TL1500 in yesterday, and I also used the video to shorten my PTO shaft. Unfortunately my top link wasn't long enough to reach the Caroni, so I had to buy a longer one. That was too wide to fit into the B2650's bracket, so I had to grind down the nubs to get it in.
My current issue is setting the cutting height. What I've read here is to generally have the skids up high and put the roller where you want for cutting height. But the Caroni manual says to keep the skids and roller at the same height, and I can't see how to adjust the roller separate from the skids. There are two bolts on each side of the bracket for the guides and another bolt for the roller. If you remove one fo the two bolts to pivot the bracket down, then it doesn't look like you can get that bold back in. Can someone weigh in on this, please?
leonz
Super Member
The skids on the flail mower protect the flail mower rotor by preventing it from nose diving into the ground and damaging the knives and knife hangers.
The skids must be level when mounting them in a lower position
Lower the skids 2 bolt holes and then lower the rear roller- the new drawings for the flail mowers are not the greatest and I will check with Ms. Caroni about this too.
Apparently they have changed the old design for the rear roller mounting to attach it to the skids making the skids a sacrificial wear part also making it a ground engaging wear part of the flail mower.
Bear with me I will be back in a couple of minutes.
I am back,
The ends of the rear rollers ride on the tail portion of the skid when mowing so they have changed the design of the skids making them skis being wider and a bit longer with upturned ends to protect the mower more.
Lower the skids two holes and then position the rear roller lower as you should have plenty of room to work after lowering the skids where you can bolt the rear roller back to the side weldments.
More than pissed off I cannot watch the hockey game, I have to listen to it on the internet!!!!!!!!!!!!!!!!!!!
The design for the rear roller mounting has changed and the rear roller is "not" part of the skid and also bolted to the side weldment's of the flail mower.
Last edited:
jthibodeau89
Gold Member
I picked up a used JD 25a flail to mow some over grown pastures on our TN hill farm. Farm was an estate sale and pastures were let go for a few years. Over grown with briars and scrub brush. Just finished going over the mower replacing scoop blades with a full set of side slicers from Flailmaster. My question is how to grease the rotor shaft bearings. I found the zerts for the roller and belt drive shaft, but can't find a way to grease the rotor shaft bearings. I pulled the guards from both ends of the rotor shaft and don't find any zerts or ports. Any suggestions how to grease the rotor bearings on a JD 25A?
Jerik
New member
My current issue is setting the cutting height. What I've read here is to generally have the skids up high and put the roller where you want for cutting height. But the Caroni manual says to keep the skids and roller at the same height, and I can't see how to adjust the roller separate from the skids. There are two bolts on each side of the bracket for the guides and another bolt for the roller. If you remove one fo the two bolts to pivot the bracket down, then it doesn't look like you can get that bold back in. Can someone weigh in on this, please?
I believe I have figured out how to adjust cutting height on the Caroni TL1500, and hopefully this will benefit future users. My original thought (indicated in my previous post) was that I couldn’t adjust the roller separate from the skids. But it is possible. On the side of the mower are the skids, each attached via 4 bolts, as shown (I had already removed the bolt for the roller from the hole with the arrow).
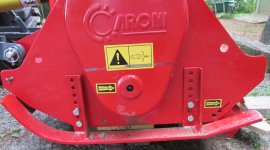
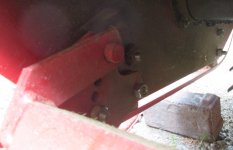
Each support for the skid has 7 holes, where the two bolts are 2 holes apart. So there are 5 possible positions for the skid (#1 & #3, #2 & #4, etc.), and the mower comes with the skids attached at the highest point (bolts in the lowest holes). The bracket holding the roller uses the bottom skid bolt (roller side) as the pivot point on the roller bracket, which has a series of 5 holes in an arc to set the cutting height.

You can see the four bolts for the skid. So if you want to leave the skids in the highest position (as recommended by a number of people in this forum), then all you have to do is to loosen, but not remove, the pivot point bolt on the skid support. Then remove the roller bolt and reposition it to a higher hole. I put mine in the middle hole, which puts the roller about 3” below the skid.
leonz
Super Member
Hello jthibodeau89,
I want to welcome you as the newest resident member of the Flail Mower Nations from the Great State of Tennessee.
DID they sell you enough side slicer pairs to convert it to a finish flail mower? I do not remeber exactly but I think pops had 72 pairs of side slicers-24 on each of the three mounting plates that were also fixed air paddles.
Have you purchased enough side slicer pairs and the required number of knife hanging straps, nuts and bolts and D rings to correctly mount the side slicers? on each of the three mounting rows?
You will have unwanted grass strips if they did not sell you the required number of replacement knife sets, mounting straps, nuts and bolts and hangers.
You have the same flail mower my father owned. have you dug away all the grass and rubber dust from under the V belt guard housing?????????????????????????????????????????????????????????????????????????????????????????
The flail mower rotor bearings should have easily accessed grease fittings on on the exterior flange bearing housings on the exterior of the flail mowers side weldment's(side plates) , they are probably buried with grass dust and not easily visible on the bearing housings.
You will need to dig around the bearing flanges castings to find the grease fittings with a small jewelers screw driver or an O ring pick to find them.
I certainly hope that the previous owner did not install the bearing flanges with the grease fittings on the interior of the flail mower if the bearings were replaced previously.
I also hope that they did not purchase sealed bearings if they replaced them.
Please do not pump more than 4 pumps of grease in each flail mower rotor bearing before your first mowing and only 4 pumps of grease after the first mowing.
Last edited:
leonz
Super Member
Hello Jerik,
You can lower the skids to the roller height and have plenty of good mowing and prevent the mower from scalping and nose diving
if you want to mow higher.
The newest Caroni flail mower design lets you mow with the three point hitch in the float position with the mower skids on the ground as the new skids and rear roller mounting have been constructed to prevent them from digging into the ground.
You will have to mow with it to see if you are happy with the mowing job in that position to decide.
Welcome to the "Flail Mower Nations".
RoyJackson
Rest in Peace
- Joined
- Nov 17, 2001
- Messages
- 24,646
- Location
- Bethel, Vermont
- Tractor
- John Deere 4052R Cab,, Deere 855D UTV, Z920A Zero Turn Mower and assorted implements
Hello Jerik,
You can lower the skids to the roller height and have plenty of good mowing and prevent the mower from scalping and nose diving
if you want to mow higher.
The newest Caroni flail mower design lets you mow with the three point hitch in the float position with the mower skids on the ground as the new skids and rear roller mounting have been constructed to prevent them from digging into the ground.
You will have to mow with it to see if you are happy with the mowing job in that position to decide.
Welcome to the "Flail Mower Nations".
Something to watch for is interference with a QH frame. I ran mine in float and the PTO driveshaft hit the horizontal member of the QH. Now, I can use the stop on the rockshaft lever to prevent any interference, but not all tractors have that feature. I wasn't crossing anything like a ditch...just a pretty level flat...
Jerik
New member
Anyone have an opinion on whether I should detach the QA bucket off my loader when I am mowing? Visibility and maneuverability would be better, but i have no front weights.
ronjhall
Super Star Member
Anyone have an opinion on whether I should detach the QA bucket off my loader when I am mowing? Visibility and maneuverability would be better, but i have no front weights.
I run my 62” Woodmaxx with bucket off FEL frame. Works well. I use the FEL arms as a guide for cutting location of tractor.
Fallon
Super Member
Depends on the balance of your machine & what you are mowing. I dump my bucket when mowing grass but have never dropped my loader (just helped my brothers father-in-law reattach the loader to his L4330 & it was as easy as expected, a 5 min job). Half my jobs are in brush & yucca. The bucket stays on & gets used as a plow to knock the heavier stuff down before the tractor runs it over.Anyone have an opinion on whether I should detach the QA bucket off my loader when I am mowing? Visibility and maneuverability would be better, but i have no front weights.
See if your machine is stable with the mower lifted on flat ground, then try driving up a hill with the mower barely off the ground. If its stable there with the loader off, you are probably fine.
bandit67
Veteran Member
- Joined
- May 27, 2004
- Messages
- 1,610
- Location
- Lake Hartwell, SC
- Tractor
- 2012 B3000 HSDCC 2020 Z251 Zero Turn
The first mowing I did this year was the first time I've ever detached the loader for mowing. I actually decided to do it mid-mow, mostly because the section I was mowing has quite a few trees, and I've been tiring of constantly having to raise and lower the FEL so many times during the mow. Much of my property is not flat, so I always thought the FEL was required to counter balance since I have no front weights. However, I was pleasantly surprised at how much easier the mow was without the loader on. There were certainly situations where the front tires slid sideways a bit in an uphill turn, but overall, I was pleased enough that I will mow sans FEL from here on out. I also made sure not to raise the mower too high while making a turn, but that's a habit I've developed over the years just to keep the angle of the PTO shaft from getting too extreme.
jthibodeau89
Gold Member
Thank you LEONZ. There are 36 hangers, 72 blades. I replaced all 36 scoop blades with 72 side slicers. I test ran it today. I love this thing!!!!. I cut an overgrown pasture beside where my wife cut yesterday with a 5' rotary cutter. There is no comparison. Clean cut with no wind rows! Ì then cut a few passes on the heavily overgrown side hill. This hillside is covered with 5' tall briars and scrub. Cut it clean on the 2" setting. I did have to occassionally slow the tractor when the RPMs started to drop in the really heavy stuff. Did I mention it is attached to a JD 4300HST with 12.4 R1 tires filled with Rimguard. I mow the fields with the 430 FEL attached.
Now for the down side. I didn't replace the hangers and D-rings for my trial. Wound up loosing 5 D-rings (10 blades). A full set of new D-rings and hangers already ordered. I definitely do not have any grease fittings on the bearing housings that i can find. I dont see how the housings could be installed backwards. Also, the drive shaft keeps walking out. It was contacting the safety cover when I bought it, and I reset it to the correct location and secured the lock ring. It walked back out with about 4 hours running. Photos of my mowing and mower below.

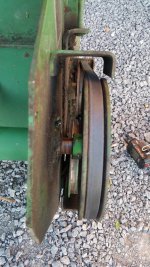
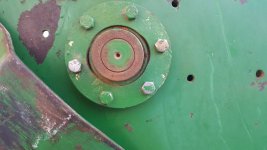

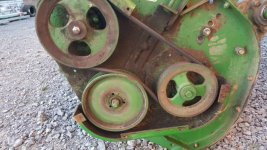
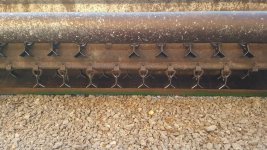
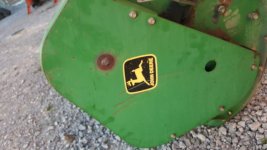
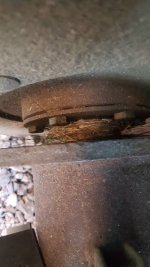
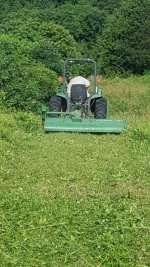
Now for the down side. I didn't replace the hangers and D-rings for my trial. Wound up loosing 5 D-rings (10 blades). A full set of new D-rings and hangers already ordered. I definitely do not have any grease fittings on the bearing housings that i can find. I dont see how the housings could be installed backwards. Also, the drive shaft keeps walking out. It was contacting the safety cover when I bought it, and I reset it to the correct location and secured the lock ring. It walked back out with about 4 hours running. Photos of my mowing and mower below.


leonz
Super Member
Hello Mr. Thibodeau89,
If at all possible and if the identification tag is still intact you need to visit a JD dealer and see about purchasing a replacement operators and owners manual as well as a parts list.
About the moving flail mower rotor shaft; both set screws are going to be removed and a small dimple drilled in the shafts to assure the shaft does not walk anymore.
I believe that JD did make a flail mower with sealed bearings at one time and that was a bad idea for many reasons.
Please keep us in the loop with your progress with it as you need a bit more work to do and you will have a forever mower.
Leon
Happy mowing
jthibodeau89
Gold Member
S/N tag is preseng and legible. I already picked up the operator manual. The drve shaft bearing is a cam lock type with a single set screw on the collar. The set screw is tight to the shaft. The collar came loose from the cam on the bearing. Perhaps I secured the cam in the wrong direction. Will resecure so that the forward rotation tightens it. I didnt think that the bearing drag would be enough to loosen the cam. May just need a new bearing.
Will pick up new hangers today from Flailmaster. I work a few miles from thier shop.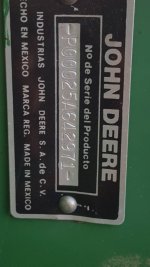
Will pick up new hangers today from Flailmaster. I work a few miles from thier shop.

Here are some similar links:
Quick Hitches
Recommend me a quick hitch please
- Replies
- 22
- Views
- 7K
