Comes with the installer. Repair Sleeve: Yanmar Tractor Parts
You are using an out of date browser. It may not display this or other websites correctly.
You should upgrade or use an alternative browser.
You should upgrade or use an alternative browser.
Knuckle Seal and more ym2000bd
- Thread starter driceman
- Start date
- Views: 7969
/ Knuckle Seal and more ym2000bd
#31
clemsonfor
Super Member
I have to click your link winston. We must be talking about 2 different things?
Jtullis13
Platinum Member
Yep that's the one I'm talking about Winston
woolyAcres
Platinum Member
@driceman, @Jtullis13-
Not sure if you'll find anything useful here, but I went through a similar process last summer. My front axle locked up and I had no choice but to tear it down and replace some of the bearings.
In case you haven't already seen it:
http://www.tractorbynet.com/forums/...-problems-ym240d-post4548357.html#post4548357
I will say one of the nicest thing about these tractors is they are pretty easy to work on once you get past the concern of 'what if I can't fix it'. With the help of the folks here I don't think there is anything on the machines that isn't fixable.
As for snap-ring pliers. I went with Channellock. I'm partial to them. Made in my hometown. They do work great.
Best of luck.
clemsonfor
Super Member
Still made in USA!!!????? I would of thought every tool company moved production to china, just keeping an office here in USA. Haha
Neat 1500
Platinum Member
Still made in USA!!!????? I would of thought every tool company moved production to china, just keeping an office here in USA. Haha
It is a shock sometimes isn't it. I bought a new pair of electricians pliers a few weeks ago and blow me down, made in Japan. They are very well made and roughly the same price as chinese ones that don't last very long.
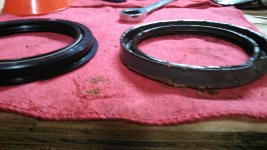
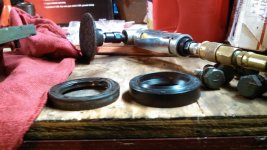
So I finally got it all back together. Sorry for the delay but I had a few things that tore me away from this project. I found on the other side that the wheel seal had a broken edge (pic 1) so I'm very glad I decided to go this deep and replace them along with the knuckle seals. Also, all of the seals were very worn when compared to the new ones. Its also worth mentioning that the new knuckle seal seems to be an improved design around the lip, definitely different from the original (pic 2). Even the wheel seal (pic 3) seems a lot more"beefed up" if you will.
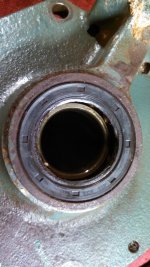


To drive in the new wheel seal, it turns out that a 2" socket works very well as a seal driver (pic 1) I also coated the seal with a very light smearing of wheel bearing grease to ease the intstall (I've done this on vehicle seals before and it seems to help from driving too hard and damaging the new seal). After that I slid on the spacer, and 3 shims (#10 on diagram) over the axle in the exact order they were removed (The larger bearing #A in the Hoye diagram was never taken off the axle). When reassembling the axle into the hub, it was just as tight of a fit going on as it was coming off so I used my vise and a scrap of wood to EVENLY beat around the edges of the hub to drive it down on the axle (pic 2) matching the gap I had on the side not done yet. Then I put the lock ring and axle nut on and tightened it to what I thought to be what it was during removal which was finger tight then about a 1/8 turn. Bent up 3 tabs on the lock ring, everything turned freely, So then I used my Black Permatex RTV sealant/gasket maker to coat both sides of the mounting surface for the housing and tightened it down to the housing with the 6 bolts using the exact torque spec of the German unit of "guudentight".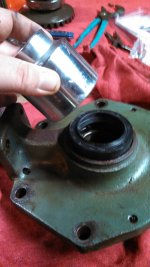
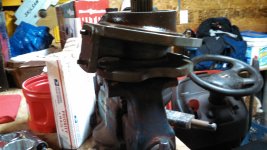


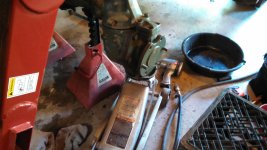
The final bit of reassembly was probably the hardest or at least the most tedious. Driving the new knuckle seal in was tedious. I again gave it a light coat of grease to help it go in, I used a scrap piece of 2x6 wood as a seal driver (pic 1). In hindsight, a scrap piece of 2x8 would have worked better to cover the entire seal while driving it. I went slow and tapped lightly checking between every couple blows that it was going in evenly. Finally, I used a floor jack (pic2) to lift the whole "chunk" up onto the tractor. (Don't forget the spacer #51 on the vertical shaft). Wiggling and bumping it around I finally got it mounted. I suppose you could have a buddy or a trained gorilla lift it instead of using a floor jack while you guided it on but I figure it would dramatically increase the possibility of a smashed finger or toe if it gets away from you.


Of course filled her up with 80-90 GL-5. I toyed with the idea of flipping my front wheels around for more stability but I don't think I've ever seen anyone else do this. I have some pretty hilly property that I have to mow that I think it would help with but I wonder if there would be any downside to doing this. Anyway, Its been almost 2 days and no more leaks. Hooray! Of course the 8 hours of mowing I need to do will be the true test. Thanks a ton to all of you for the friendly knowledge. Other than buying some snap ring pliers that I didn't need the whole thing went very well. Of course I'll keep my new pliers around. Keeping them will help to assure that I will never need them. Some kind of voodoo I've experienced is if you have the specialty tool, you never seem to need it.
