Installing a loader on a Zetor 7745

   / Installing a loader on a Zetor 7745 #11  
I think I really do need one of those manuals! It would have saved me so much time up to this point already!

Thank you for taking the time to dig up that fantastic information ZetorSteve - it is exactly what I was looking for! It even has the warning for the push bars right on that page + the part numbers and everything.
i have that same manual too , that is the way i would fit a loader too but you need to use a spool valve that is made for power beyond , high presure cary over
 
   / Installing a loader on a Zetor 7745
  • Thread Starter
#12  
Thanks cropgrower. My spool valve actually does have the power beyond built in (unlike the princess auto ones that you need to add the adapter). I'm currently still working on the fabricating of the push bars and mounts, but hydraulics is going to be soon! I will try to update the post with a couple pictures once everything is done in case it helps anyone else in the future :)
 
   / Installing a loader on a Zetor 7745
  • Thread Starter
#13  
I thought I would post an update on the install for anyone it might help. It is mounted and working but there's still some work to do before it is done. I did not purchase the hydraulic pump adapter line, but rather ran it through the remotes. I wanted a second remote anyway (in this case for a hydraulic toplink). I took the original remotes and ran them into a flow controller/divider. This is because I wanted to be able to slow the loader down for fine work - and I had one. From there and any oil I'm not using goes back to the remote and the oil that I am using continues to the joystick. From the output of the joystick it goes to 2 normal lever valves which control my 2 sets of remotes. At this point I don't need a float on my remotes nor a constant flow, but that is easily added with a hydraulic ball valve and a mechanical catch for the lever in the future. This method however gives the issue that when you engage your remote to use your hydraulics your 3 point hitch will no longer lift. This gave me probably a really bad idea. My 3 point hitch sags about 1 inch per minute with 1000 lbs on it. I had already removed my external cylinder and just blocked the line, so I decided to take my oil at the end and send it into that line where the external cylinder came out ( bottom hose in first picture). Essentially the external and internal cylinder share the same oil pressure, so I am just constantly putting oil into the 3 point hitch. Once it is high enough - the high switch dumps the excess oil the same way it would if you lower the hitch. This worked well the first day. The next time I used the tractor it was -15 and the hitch will now only go all the way up, or all the way down. The oil used to leak out on the left arm, but I put some extra rubber washers in there. Now it leaks internally down and out the bottom of the casting. I tapped it with a 3/8 plug and have put a drain spout in it. I may filter and re-use or I may discard, but at least it isn't going on the ground. I mostly used parts that I had around - old hoses and valves, so it isn't the most clean installation. I also replaced the fender as it was rotted out.

I had hoped that the flow control would give me control over the lowering speed as well, however this wasn't the case. It still lets me turn the snowblower chute very accurately however as well as raising and tilting are slowed. Gravity overrides the lowering. I also added a gauge on the lift hydraulic line so I would crudely know how much I was lifting. The loader itself puts the gauge to 500 psi and I set my max PSI to 2000, and read a max of 2500 from the tractor.
 

Attachments

  • 20220114_135553.jpg
    20220114_135553.jpg
    249.5 KB · Views: 235
  • 20220114_135938.jpg
    20220114_135938.jpg
    391.2 KB · Views: 179
Last edited:
   / Installing a loader on a Zetor 7745
  • Thread Starter
#14  
As far as the mechanical, my 3/4" plates left a bit to be desired. At the end of the bucket, with 100 lbs of person bouncing on it would deflect the bucket at least an inch. You can see the deflection in the mount, however I doubt it is any more than a 1/16 or so.

I still have not reinforced it from the rear axle, although I have the pieces cut and ready to weld or bolt together. Welding is easier, but I'm not sure I could ever remove it without making a cut somewhere if I needed to do any maintenance and it was in the way.

I am going to box in the front of the mount with another piece of steel going down at the same angle to avoid the tire. I expected it to be plenty strong, otherwise my big gussets (MWM engraved) might have just been plates that went straight across as well.

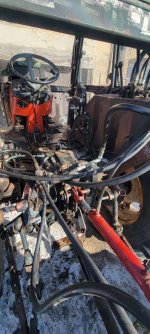
I had to move the fuel tank so the filler wasn't covered by the loader arms. I had to be very careful in the design as the wheels had the ability to articulate into the loader frame I built on extreme angles and steering. I considered widening the stance of the tractor to help with this, but was able to design my way out of it. Because I didn't widen the stance I removed the ladder from the passengers side door as then it would be wider than the wheels which is a recipe for mistakes.

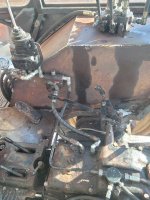
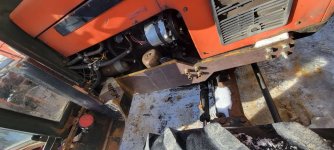
On the passengers side I had to kick the mount out an extra 3/4" to give myself clearance for the hydraulic filters. On the drivers side, which I didn't picture I had to make a semi-circle cut out to leave access for checking the engine oil. I cut the dipstick handle and welded a piece of threaded rod in the centre to extend it a bit too. I just drilled a small hole in it about 1/2" deep on each end to keep it straight.

There is something to be said for buying a kit, but for an older tractor on a budget it wasn't feasible. It might make sense to find one from a scrap yard however. I wouldn't want to count the hours that have been put into this.

I do hope this helps someone else and I thank everyone for their help and advice. :)
 

Attachments

  • 20220114_140034.jpg
    20220114_140034.jpg
    309.7 KB · Views: 158
  • 20220114_140010.jpg
    20220114_140010.jpg
    357.9 KB · Views: 149
Last edited:
   / Installing a loader on a Zetor 7745 #15  
You need a service manual!

Here is how and what you need to properly hook up the loader valve hydraulically to the tractor. The first page is for hydraulic pumps in the transmission case and the second page is for the externally mounted pumps on the engine.


View attachment 717658View attachment 717659
Is there a specific Zetor number for the Plate 94 7011 4641 and also the Valve block number? I've tried searching for the 94 7011 4641 plate on-line with no luck. Does this come in kit form. I'm not sure what valve is fitted to the tractor.
 
   / Installing a loader on a Zetor 7745 #16  
Is there a specific Zetor number for the Plate 94 7011 4641 and also the Valve block number? I've tried searching for the 94 7011 4641 plate on-line with no luck. Does this come in kit form. I'm not sure what valve is fitted to the tractor.
 
   / Installing a loader on a Zetor 7745 #17  
Thank you. I have a service manual on order, the tractor has the pump mounted under the gear box.
 
   / Installing a loader on a Zetor 7745 #18  
Thank you. I have a service manual on order, the tractor has the pump mounted under the gear box.


Call Brent at Ridgeway. He will know where to get it if it is still an active part.


800-360-0616
Ridgeway tractor parts.com
 
   / Installing a loader on a Zetor 7745 #19  
Where can one find that manual?? Do you have a part number? Maybe pictures of the front cover and publishing page?
The one I got for my 5245 is horrible.. Its basically a bad google translation for some chech manual, it really does not have much info in it at all..


You need a service manual!

Here is how and what you need to properly hook up the loader valve hydraulically to the tractor. The first page is for hydraulic pumps in the transmission case and the second page is for the externally mounted pumps on the engine.


View attachment 717658View attachment 717659
 
   / Installing a loader on a Zetor 7745 #20  
I got lucky on eBay a few years ago.
 
 
Top