HELP welding a stub shaft

/ HELP welding a stub shaft
  • Thread Starter
#41  
And then the more I think about it..... Just go spend your money on a mower that does what you want it to do and that you can still buy parts for. I know!! I don't like to throw stuff away either but this to me looks like a repair that in the end is just going to break again. There is just too much heavy stuff being thrown around inside that gearbox. That's my thoughts.

I hear you, but keeping the hope alive.

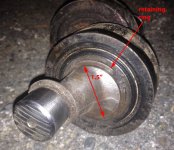
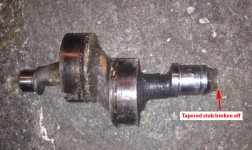
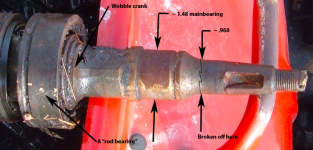
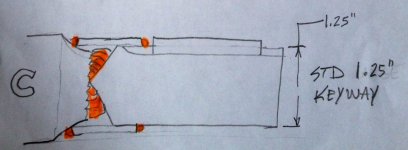
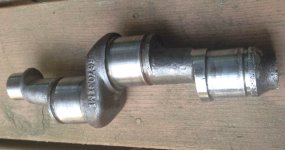
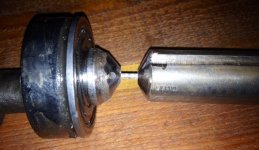
I'm stuck for the moment because the wobble crank is being kind of a bugger. Until it comes out, I can't proceed. Heres a pic of a plate on the mower showing the wobble crank business. It does a bunch of monkey-motion to balance out the shaking of the sickle bar. Massey-Ferguson calls it "Dyna Balance".

attachment.php


I've found a sheave (not adjustable speed) for $35, browning style hub $20, shaft for $30, and a belt for $20 = $110. Welding is easy for me but certainly it will take some head-scratching which I'm not against.

If I can get the wobble crank out, I'll weld it myself and put it back together. If it breaks, THEN I'll scrap it. I already have a field mower but want to know if a sickle mower works better. I want to mow knapweed without disturbing the grass so much. I want to extend the mower under bushes and off the roadside. I know what the field mower does, it makes a mess that takes 2 weeks to look nice, and also it only follows the tractor, and can't reach under bushes and trees.

Of course after I bought this broken one for $150 some working mowers pop upfor $400 now, but they look kinda worn out. Mine's in nice condition except for one very important part.
 

Attachments

  • MF_Sickle2.jpg
    MF_Sickle2.jpg
    46 KB · Views: 838
Last edited:
/ HELP welding a stub shaft
  • Thread Starter
#42  
I'm back on this project. The grass is GROWING and I gotta get the sickle fixed!

I got the wobble crank out and have a plan to weld a new stub on. Before welding the shaft I need to get these bearings off so first these retaining rings come off.

373388d1399008071-help-welding-stub-shaft-mf_31snapring-jpg


Can somebody tell me whats the NAME of the spreader tool for these tough rings? I don't know the name to search for and all I can find is the little pliers for snap rings (with a hole in each end).
 

Attachments

  • MF_31snapring.jpg
    MF_31snapring.jpg
    93.8 KB · Views: 1,288
  • MF_31wobblecrank.jpg
    MF_31wobblecrank.jpg
    79.4 KB · Views: 178
  • MF 31 shaft keyway ruined-dims.png
    MF 31 shaft keyway ruined-dims.png
    421.5 KB · Views: 201
Last edited:
/ HELP welding a stub shaft #43  
I'm back on this project. The grass is GROWING and I gotta get the sickle fixed!

I got the wobble crank out and have a plan to weld a new stub on. Before welding the shaft I need to get these bearings off so first these retaining rings come off.

373388d1399008071-help-welding-stub-shaft-mf_31snapring-jpg


Can somebody tell me whats the NAME of the spreader tool for these tough rings? I don't know the name to search for and all I can find is the little pliers for snap rings (with a hole in each end).

I would think you could get a ring that large off with a screwdriver and a pick and perhaps a hammer.
 
/ HELP welding a stub shaft #44  
From the looks of what I can make out of the pix, I don't think any kind of spreader will help you.
There's nothing left on the ends to get a purchase on.

A couple of taps with a hammer and small punch on the ends to loosen the ring, a bit of heat to anneal the spring then pry it out with a pick and a couple of screw drivers.
 
/ HELP welding a stub shaft #45  
Just did a quick search and found some that look like the ones I use. Go to this page RETAINING RING PLIERS, RETAINING RING TOOL, SNAP RING PLIERS and scroll down until you get to "Lock Ring Pliers / Wire Ring Pliers". Those pliers or a similar pair should do what you need them to do.

I just reread what rsallen said and had a look and I agree that the one side looks like the edge is broken off. You might be able to get the pliers to do the job if you first loosen the ring by tapping it around with a punch. For sure replace it with a new one.
 
/ HELP welding a stub shaft
  • Thread Starter
#46  
Thanks guys. To get this crank out, I had to remove the 1st of the 3 lock rings (near the broken shaft end). It was a fight - I used 2 screwdrivers (and a little one). I gave up several times. It took a full hour because I only had 2 hands - if I had 3 it would have been off in a couple minutes. I've used a spreader tool before I guess my dad had one.

Thanks PM it looks like the tool name is "Lock ring plier", couldn't think of that name while I was searching. Got it ordered.

attachment.php


RS - the ring is perfect (eqpt has never been apart). To break the end off one of these rings would be impossible, just amazing how tough it is.
 

Attachments

  • lock ring plier.jpg
    lock ring plier.jpg
    42.6 KB · Views: 147
  • KDlock.jpg
    KDlock.jpg
    60.7 KB · Views: 720
Last edited:
/ HELP welding a stub shaft
  • Thread Starter
#48  
The internet may well be the most vulgar thing society has ever done but vulgarites of the hour-long fight were worse. Needed a helper, or the tool. Yes thats what the ring looks like.
 
/ HELP welding a stub shaft #49  
The internet may well be the most vulgar thing society has ever done but vulgarites of the hour-long fight were worse. Needed a helper, or the tool. Yes thats what the ring looks like.

Ah, a philophizer I presume!?:confused2::laughing:
Next time save yourself the hour and inquire, here....:D
So how do you plan on re-mating the broken pieces?
 
/ HELP welding a stub shaft
  • Thread Starter
#50  
OK Got it all apart. I found that I already had the tool. I have 3 "shops" and many more toolboxes, and even more with passing of my Father-in-law. It's a real problem remembering what tools you have when they're spread over the countryside.

Next time save yourself the hour and inquire, here….
So how do you plan on re-mating the broken pieces?

Ya know? Every time I read TBN it's 2 hours minimum. Plus I was out in the woods at the time.:laughing:

Here's my (current) welding plan. Aligning the shafts (to tackweld it) is going to be a challenge. Thinking of a slip-on pipe with welding holes to tack the cone(s) at the center. The 'tack' has to be bend-able, I might drill& insert a 3/16" rod but (with only hand tools) it will be difficult to get a good center. I have built a cradle to spin the shaft, will post a pic in a day or so. If I can get it true it seems easy from there on out. I don't think "deadnuts true" is worth the trouble, as it simply runs a pulley for a long (102 inch) belt.

Other option is to weld on a larger shaft with no keyway, then have a machine shop true it up and cut the keyway in. Probably a waste of time even to drive to the machine shop (and then waste his time too). But you guys on the internet enjoy it I know cuz you're not standing on the other side of a counter. Same here:D.

373417d1399048928-help-welding-stub-shaft-mf_31shaftc-jpg
 

Attachments

  • MF_31shaftC.jpg
    MF_31shaftC.jpg
    106.8 KB · Views: 732
  • MF_31wobblecrank_out.jpg
    MF_31wobblecrank_out.jpg
    74.8 KB · Views: 162
Last edited:
/ HELP welding a stub shaft #51  
FWIW, It seems to me that if you could mill a hole in the 'crankshaft' and center a threaded pin into it, then bore a hole in the broken off piece and thread that hole. Then attach broken off section, (with keyway), into main crank, and once flush and snug, weld the sections together?
I'm no machinist/welder or similar skillset person, so I don't know if it would work but it's worth considering as a solution, no?
 
/ HELP welding a stub shaft
  • Thread Starter
#52  
Yup CM I'm thinking along those lines, but not threaded, just a tight fit (pound it together)
Mill is not the right word. :D 18V DeWalt hand drill is how I'd have to do it.
 
/ HELP welding a stub shaft #53  
/ HELP welding a stub shaft
  • Thread Starter
#54  
Working this project again. I drilled (or "milled" with my 18v DeWalt :D) a hole in the ends of both shafts. Then ground the shafts to a point and inserted a 1/8 rod. Will shorten the 1/8 rod to less than 1/4" and then start to 'true' the assembly. When I get it true I will weld across the gap then straighten again, and start to fill it in with weld. The original shaft was 1" where it broke, this one is 1.25". It's 20 inches long, but will eventually be cut off to a 2 or 3" stub.
 

Attachments

  • MF_31shaftrepair3.JPG
    MF_31shaftrepair3.JPG
    40.2 KB · Views: 176
  • MF_31shaftrepair2.JPG
    MF_31shaftrepair2.JPG
    110.2 KB · Views: 182
  • MF_31shaftrepair1.JPG
    MF_31shaftrepair1.JPG
    165 KB · Views: 185
/ HELP welding a stub shaft #55  
Working this project again. I drilled (or "milled" with my 18v DeWalt :D) a hole in the ends of both shafts. Then ground the shafts to a point and inserted a 1/8 rod. Will shorten the 1/8 rod to less than 1/4" and then start to 'true' the assembly. When I get it true I will weld across the gap then straighten again, and start to fill it in with weld. The original shaft was 1" where it broke, this one is 1.25". It's 20 inches long, but will eventually be cut off to a 2 or 3" stub.

Nice work drimiling!:laughing: If you increase diameter of input shaft, what does it attach to? Go into? I take it the 'plan' is to ream out the piece the shaft mates to?
 
/ HELP welding a stub shaft #56  
You plan on removing that bearing before you commence with the welding, yes?
 
/ HELP welding a stub shaft
  • Thread Starter
#57  
Need the bearing in place until the shaft is trued. My plan is remove the bearing after the shaft is welded to appx 1/2" diameter (?) Then weld on out to the 1-1/4" diameter (with the bearing in a safe deposit box). That bearing is a discontinued special bearing ( Sealmaster SK-89 ), it's like GOLD.

Still planning the true-ing process. It will be "touch and go"…. hopefully advancing to "tried and true".
 
Last edited:
/ HELP welding a stub shaft #58  
Just a suggestion - cut yourself a piece of sheet metal with a hole just a tad larger than the shaft diameter to act as a shield so you don't get welding spatter on the bearing.

Actually, I'd consider taking the bearing off before doing any welding (cover the part of the shaft that the bearing ID is fit to).
Weld up the two pieces, focusing on getting a sound weld and not on keeping the resulting shaft straight.
After welding, use an OA torch to reheat the weld area cherry red and true up the shaft - may take several truing attempts.

The reason I say this is I don't see how you can get enough heat into that cross section to assure a good weld, that close to the bearing, without toasting the bearing. Just as you finish the last weld, it's going to cool & shrink & distort to whatever shape it wants to be, depending on residual stresses, regardless of how straight the first 1/2" of weld was.

I'd just assume it's going to be wonky and plan on a subsequent straightening operation to true it up.
Maybe I'm just being overly pessimistic, but I think you can do this and get a straight enough shaft with a competent weld and a happy bearing if you prepare for everything to go "wrong" and have a way to address each setback it as it occurs.

Maybe you (or someone else) already has a different plan that will work better than what I'm suggesting - let's hear it.

-Jim
 
/ HELP welding a stub shaft
  • Thread Starter
#59  
I'll cover the bearing and no-spatter areas with masking tape. I've welded enough on thick stuff to know that the bearing won't feel any heat during the initial welding (first 3/8 or 1/2")

Once I get the center tacked & trued (?) my hope is to weld in an "annular" motion, which I have not yet figured out the method. Regarding a torch, I forgot to bring one dangit. It seems like welding the circular buildup with the weld area preheated thru would be prudent.

The outer welds is where all the strength is, the inner 1/2 inch (the alignment zone with the crappy tacks) is not a factor for strength, it could be hollow, for example and the whole 1.25" shaft is still much stronger than a 1". Hollow might be preferable to a pile of crappy tacks actually, but this is what I have to work with.

It would be great to hear from someone experienced, who has done solid-shaft welding and alignment. Even those who haven't done it but have similar experience is useful.
 
/ HELP welding a stub shaft
  • Thread Starter
#60  
I don't see how you can get enough heat into that cross section to assure a good weld, that close to the bearing, without toasting the bearing. Just as you finish the last weld, it's going to cool & shrink & distort to whatever shape it wants to be, depending on residual stresses, regardless of how straight the first 1/2" of weld was.

OK Jim you've got me worried too. I'm gonna create some kind of contraption with (again) my DeWalt 18v drill, to turn the shaft slowly, so I can weld nonstop, with the idea that the whole joint will be hot as possible during the entire weld.
 

Marketplace Items

2014 PETERBILT 367 6X4 TRI/A  SLEEPER TRUCK TRACTOR (A59908)
2014 PETERBILT 367...
Ratchet Straps (A61569)
Ratchet Straps...
New/Unused Landhonor Quick Attach Backhoe (A61166)
New/Unused...
2004 Electric Club Car Cart (A61569)
2004 Electric Club...
2025 Swict 60in Bucket Skid Steer Attachment (A61567)
2025 Swict 60in...
LAND PRIDE CB1060-60" HYD 4N1 BUCKET (A62130)
LAND PRIDE...
 
Top