HELP welding a stub shaft

   / HELP welding a stub shaft #51  
FWIW, It seems to me that if you could mill a hole in the 'crankshaft' and center a threaded pin into it, then bore a hole in the broken off piece and thread that hole. Then attach broken off section, (with keyway), into main crank, and once flush and snug, weld the sections together?
I'm no machinist/welder or similar skillset person, so I don't know if it would work but it's worth considering as a solution, no?
 
   / HELP welding a stub shaft
  • Thread Starter
#52  
Yup CM I'm thinking along those lines, but not threaded, just a tight fit (pound it together)
Mill is not the right word. :D 18V DeWalt hand drill is how I'd have to do it.
 
   / HELP welding a stub shaft #53  
   / HELP welding a stub shaft
  • Thread Starter
#54  
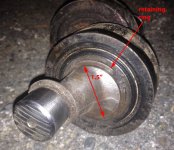
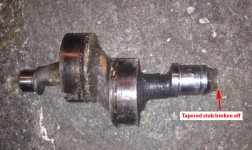
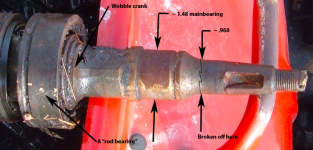
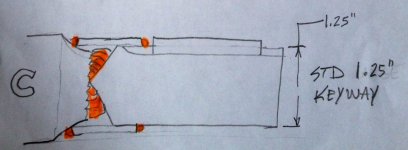
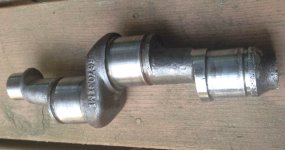
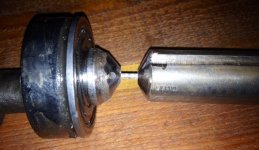
Working this project again. I drilled (or "milled" with my 18v DeWalt :D) a hole in the ends of both shafts. Then ground the shafts to a point and inserted a 1/8 rod. Will shorten the 1/8 rod to less than 1/4" and then start to 'true' the assembly. When I get it true I will weld across the gap then straighten again, and start to fill it in with weld. The original shaft was 1" where it broke, this one is 1.25". It's 20 inches long, but will eventually be cut off to a 2 or 3" stub.
 

Attachments

  • MF_31shaftrepair3.JPG
    MF_31shaftrepair3.JPG
    40.2 KB · Views: 162
  • MF_31shaftrepair2.JPG
    MF_31shaftrepair2.JPG
    110.2 KB · Views: 169
  • MF_31shaftrepair1.JPG
    MF_31shaftrepair1.JPG
    165 KB · Views: 173
   / HELP welding a stub shaft #55  
Working this project again. I drilled (or "milled" with my 18v DeWalt :D) a hole in the ends of both shafts. Then ground the shafts to a point and inserted a 1/8 rod. Will shorten the 1/8 rod to less than 1/4" and then start to 'true' the assembly. When I get it true I will weld across the gap then straighten again, and start to fill it in with weld. The original shaft was 1" where it broke, this one is 1.25". It's 20 inches long, but will eventually be cut off to a 2 or 3" stub.

Nice work drimiling!:laughing: If you increase diameter of input shaft, what does it attach to? Go into? I take it the 'plan' is to ream out the piece the shaft mates to?
 
   / HELP welding a stub shaft #56  
You plan on removing that bearing before you commence with the welding, yes?
 
   / HELP welding a stub shaft
  • Thread Starter
#57  
Need the bearing in place until the shaft is trued. My plan is remove the bearing after the shaft is welded to appx 1/2" diameter (?) Then weld on out to the 1-1/4" diameter (with the bearing in a safe deposit box). That bearing is a discontinued special bearing ( Sealmaster SK-89 ), it's like GOLD.

Still planning the true-ing process. It will be "touch and go"…. hopefully advancing to "tried and true".
 
Last edited:
   / HELP welding a stub shaft #58  
Just a suggestion - cut yourself a piece of sheet metal with a hole just a tad larger than the shaft diameter to act as a shield so you don't get welding spatter on the bearing.

Actually, I'd consider taking the bearing off before doing any welding (cover the part of the shaft that the bearing ID is fit to).
Weld up the two pieces, focusing on getting a sound weld and not on keeping the resulting shaft straight.
After welding, use an OA torch to reheat the weld area cherry red and true up the shaft - may take several truing attempts.

The reason I say this is I don't see how you can get enough heat into that cross section to assure a good weld, that close to the bearing, without toasting the bearing. Just as you finish the last weld, it's going to cool & shrink & distort to whatever shape it wants to be, depending on residual stresses, regardless of how straight the first 1/2" of weld was.

I'd just assume it's going to be wonky and plan on a subsequent straightening operation to true it up.
Maybe I'm just being overly pessimistic, but I think you can do this and get a straight enough shaft with a competent weld and a happy bearing if you prepare for everything to go "wrong" and have a way to address each setback it as it occurs.

Maybe you (or someone else) already has a different plan that will work better than what I'm suggesting - let's hear it.

-Jim
 
   / HELP welding a stub shaft
  • Thread Starter
#59  
I'll cover the bearing and no-spatter areas with masking tape. I've welded enough on thick stuff to know that the bearing won't feel any heat during the initial welding (first 3/8 or 1/2")

Once I get the center tacked & trued (?) my hope is to weld in an "annular" motion, which I have not yet figured out the method. Regarding a torch, I forgot to bring one dangit. It seems like welding the circular buildup with the weld area preheated thru would be prudent.

The outer welds is where all the strength is, the inner 1/2 inch (the alignment zone with the crappy tacks) is not a factor for strength, it could be hollow, for example and the whole 1.25" shaft is still much stronger than a 1". Hollow might be preferable to a pile of crappy tacks actually, but this is what I have to work with.

It would be great to hear from someone experienced, who has done solid-shaft welding and alignment. Even those who haven't done it but have similar experience is useful.
 
   / HELP welding a stub shaft
  • Thread Starter
#60  
I don't see how you can get enough heat into that cross section to assure a good weld, that close to the bearing, without toasting the bearing. Just as you finish the last weld, it's going to cool & shrink & distort to whatever shape it wants to be, depending on residual stresses, regardless of how straight the first 1/2" of weld was.

OK Jim you've got me worried too. I'm gonna create some kind of contraption with (again) my DeWalt 18v drill, to turn the shaft slowly, so I can weld nonstop, with the idea that the whole joint will be hot as possible during the entire weld.
 

Tractor & Equipment Auctions

2012 Tiger 130BBL Vacuum Trailer (A50860)
2012 Tiger 130BBL...
2002 Ford F-150 4x4 Ext. Cab Pickup Truck (A50323)
2002 Ford F-150...
2022 Chevrolet Tahoe SUV (A48082)
2022 Chevrolet...
UNUSED Woven Landscape Fabric Squares (A50860)
UNUSED Woven...
48in Forks Loader Attachment (A49346)
48in Forks Loader...
2015 John Deere 8345RT Track Tractor (A50657)
2015 John Deere...
 
Top