Buying Advice GCK60-BX Conversion to BX25

/ GCK60-BX Conversion to BX25 #1  

BX25 in DE

New member
Joined
Nov 7, 2011
Messages
16
Tractor
Kubota BX25
I recently purchased a new Kubota BX25 and retained my Kubota Grass Catcher GCK60-BX because my local dealer told me it would fit on my new BX25, previously I had the grass catcher mounted on my BX23 and it worked perfectly. Can anyone tell me if there is a way to retro-fit the GCK60-BX to a Kubota BX25? I understand the new grass catcher model number is GCK60-23BX AND that Kubota makes two conversion kits but these kits are designed for the newer grass catcher and not the older model GCK60-BX like I have. Any help would be greatly appreciated.

If I cannot retro-fit my grass catcher it will be for sale so email me if your interested in purchasing one that was used twice, looks like it is brand new, is SUPER clean, and works perfectly. I purchased the unit from the original owner who never used it and wow does this thing suck up the grass!

PLEASE HELP
 
/ GCK60-BX Conversion to BX25 #2  
I have that catcher for my BX23.

2 places attach to the 3PH lower links, and 1 place attaches to where the upper 3PH link mounts. So if you have a 3PH BX25 (and links and stuff) you should be OK there. (Tighten left link chain first to level.)

Then there is the drive - again, if you have 3PH PTO drive it should attach.

So that's the tractor part - it carries and drives the catcher!

The rest attaches, technically, to the mower - the mower boot. If you have a boot, and the boot is the same size as the hose you may need to just adjust the length a bit. I can't imagine they designed different size (diameter) hose systems. You may need to order a boot for your particular mower, from the more modern catcher book.
 
/ GCK60-BX Conversion to BX25
  • Thread Starter
#3  
Tshep,
Thank you for the information BUT the 3 point hitch arms are different lengths for the BX23 (shorter) than the BX25 (longer). Trust me when I say I've know it won't fit on the BX25. I've tried, measured, & because the lower arms of the 3 point hitch on the BX25 are longer, that changes the overall angle of the catcher's mounting. Even if I added a piece to the upper arm of the BX25's 3 point hitch the drive shaft will end up being too short for the catcher because the mounting arms push it too far back or rearward on the tractor.
Last night I had a thought about the possibility of using a 3 point hitch arm assembly from a BX23. Assuming of course if the lower arms will actully fit/mount up to my BX25. I'm going to call a friend today who bought my BX23 and see if I can borrow the lower 2 arms of his 3 point hitch to see if they will align/fit. I'm doubting this will work but I'm running out of options.
 
/ GCK60-BX Conversion to BX25 #4  
Let us know what you come up with the BX23 arms. I kept that same bagger from my BX1500 when I sold that tractor as my dealer also told me it should fit my BX25 with no problem. I am not sure if the arms from the BX25 are longer that the BX23 but I think I read on this forum somewhere that on the BX 50 and 60 series tractors the mounting location for the lower arms is higher to make the hitch a full cat 1. Therefore this throws the geometry for mounting the old style bagger way off.

I haven't done anything with mine yet but move it around the garage which is a PITA and takes up space. I contemplated making a bracket to bolt to the bagger that fits in the backhoe cradle but just haven't had any time. Either way let us know how you make out with the arms.
 
/ GCK60-BX Conversion to BX25
  • Thread Starter
#5  
Well the plot thickens as they say. I laid my BX25's lower 3 point hitch arms side-by-side the BX23 versus the BX25 and there is not one bit of difference between the center plate that goes between the lower arms, the linkage between that plate that connects to the lower arms both are the same, AND the lower arms themselves are identical in shape, size, length, width, thickness, bends, etc. The pieces are identical between the 2 tractors. So tomorrow I'm going to connect the BX25 lower arms and attempt to attach the old grass catcher to determine exactly why the dealers are telling me it will not fit. So far everything a dealer has told me is a lie. The latest crap that the BX25 lower 3 point hitch arms are longer is total bull!! I saw for myself today there is not one bit of difference. I did have the parts guy print out the parts manual for the newer GCK60-23BX and we priced a minimum of 3 pieces that I would/could possibly need/use to retrofit my GCK60-BX to the BX25. Sit down - we are talking nearly $700 just to start!!!!
I am thinking that I will end up removing the mounting plate itself from my BX23 grass catcher and then retrofit it with new steel. I read somewhere that if the grass catcher's lower links can be mounted in the lower hooks for the backhoe on the BX25 then the drive shaft will be fairly well aligned and it too should be long enough if mounted in that fashion. Problem is the width of the current mount on the GCK60-BX is considerably wider than the narrorer width of the lower cradle that holds the bottom of the backhoe mount on the BX25. This is where the redesign will need to come into play.
I also read that the new grass catcher for the BX25 is actually belt driven and it is not a solid drive shaft between the 2 differentials as in the older GCK60-BX grass catcher. All the more reason to try and make this work. I understand why the designed was changed, it is all about Kubota staying afloat and making as much $ as they can. If their product wasn't so darn good I'd probably have gone to a green machine by now. . . .
For now any help would be appreciated all I can say for now is stay tuned. . .
 
/ GCK60-BX Conversion to BX25
  • Thread Starter
#6  
Well where to begin . . . The RCK60-BX DOES indeed mount on the 3 point hitch of the BX25 WITHOUT ANY ADDITIONAL STEEL. The dealers are clearly not the sharpest tools in the shed . . . Having put this thing on my BX23 I will say however that it was much easier to mount on that unit than on the BX25. The geometry is different between the 2 BX models and it mounts higher off of the ground when on the BX25 than it did when mounted on the BX23. First trick to getting it to mount is buy or borrow a motor cycle jack. You will need it. I used a floor jack and it is not the best because as the GC is jacked up to align the top center link it must be tilted forward to insert the last pin. Mine actually slipped off of my jack and contacted the rear of my BX25 breaking one of my tail light lenses - yep you probably heard me cussing when that happened!

To mount the thing the first time, you will need to rotate your yellow rear mounted turn signals so that the larger round part of the light is down towards the ground and the small one is up. This is exactly the opposite of what Kubota has done when they installed them. The reason for this "adjustment" is because the blower shoot on the right side is so close it will actually hit the light if you don't rotate it 180 degrees. Just losen the nut and turn your light (I turned both so that they match and I honestly think they look better this way). Doing so will allow about 1/4" clearance between the GC shoot & the light once the GC is installed.

Mount the bottom arms on the tractor but DO NOT fasten the turn buckles to the lower arms. Just install the plate with the turnbuckles attched to it (only) to maintain or serve as a spacer between the 2 lower arms. Postion the GC behind the BX25 and align/secure the two lower arms - this is the easy part, very simple but get ready here comes the next and most difficult part of the operation - the top link alignment. GET THAT MOTORCYCLE JACK READY. It would be best to have a second pair of hands the first time you do this to prevent any cursing or broken tail lights. . . . Position the jack just under the RIGHT lower link so that you are jacking up the GC and not the lower link arm. This postion will be about mid-way on the GC from the left &/or right side. Jack slowly and that second pair of hands needs to be careful so that the jack operator doesn't sever any fingers. It will become obvious once you start jacking that the more you jack you will need to tilt the GC forward to align the top center link. IT WILL ALIGN TRUST ME. Once you get that 3rd pin in, the drive shaft is next. Do yourself a big favor and remove your GC's bags. This makes aligning that shaft a breeze if the bags are off, you can just reach right through that area of the GC and hook up the shaft. Install the drive shafts on one another and then the quick coupling on the rear PTO can be secured lastly. Don't forget to attach the turnbuckles to the lower arms and then level things up. REMEMBER, LOWER ARMS, NO TURNBUCKLES, TOP LINK, DRIVE SHAFT, & THEN TIGHTEN YOUR TURNBUCKLES.

I will have to update this one last time. Here is why - when I engaged my rear PTO the GC sheared the PTO shear pin/bolt on the GC drive shaft. I heard it but didn't know what it was at first. There was enough of the bolt still engaged that the GC shafts all continued to rotate. I eventually brought the RPMs up to 3300 and everything did seem like it was working as it should. When I turned off the tractor and walked around to the rear of the BX25, I noticed the shear pin/bolt on the ground and knew immediately what the noise was previously. The next 3 hours were spent trying to remove the rest of the sheared pin/bolt. The drive shaft coupler had turned ever so slightly on the GC shaft which prevented me from being able to drive out the rest of the broken shear pin/bolt. Getting the two shaft pieces realigned so that I could drive out the remaining damaged shear pin/bolt was a royal pain in the butt. Once that was done I called it a night and will need to invest in some new shear pins/bolts at my local dealer - I have gotten to really love my dealer -NOT!!! Plus I need to buy a new right rear tail light lens too - GET THAT MOTORCYCLE JACK, it will save you having to buy a tail light lense and it is much safer than a floor jack. The GC rear PTO drive shaft on the BX25 does have quite an angle to it when mounted. This might be why my shear pin/bolt snapped, I don't know for sure just yet, I'll try it again when I can locate some shear pins/bolts and update this then. The drive shaft angle didn't appear to be so great as to limit or prevent any movement. Hope this helps . . .
 
/ GCK60-BX Conversion to BX25 #7  
If possible could you post a picture or two of what it looks like mounted. I may have to give this a try in the next two days that I am off.
 
/ GCK60-BX Conversion to BX25
  • Thread Starter
#8  
I'd love to post some pics but I've got them on my phone and can't seem to get them to my PC so that I can post - tomorrow I'll use my camera and post some pics. The drive shaft to the GC looks like it is almost at a 45 degree angle - it might just be too much of an angle, I'm just not sure. Read the GC's owners manual and the bolt that goes through the drive shaft coupler on the GC isn't listed as a shear pin/bolt. It is listed as a standard 1/4" x 20 x 1.25" long standard bolt with a locking nut. I want to check with my local Kubota parts folks prior to putting in a regular 1/4" bolt where I really think a shear pin/bolt should go. I'll do the pics tomorrow.
 
/ GCK60-BX Conversion to BX25
  • Thread Starter
#9  
Just got 2 of the pics from my phone to my PC
 

Attachments

  • Drive shaft 45 degree angle.jpg
    Drive shaft 45 degree angle.jpg
    477.1 KB · Views: 1,888
  • Right light touching GC shoot.jpg
    Right light touching GC shoot.jpg
    499.9 KB · Views: 1,149
/ GCK60-BX Conversion to BX25
  • Thread Starter
#10  
Okay this is the last pic I have for tonight. This one shows the little bit of clearance that you will gain if you turn the right yellow light upside down.
 

Attachments

  • Right Light turned upside down for spacing.jpg
    Right Light turned upside down for spacing.jpg
    502 KB · Views: 1,153
/ GCK60-BX Conversion to BX25
  • Thread Starter
#11  
Good Morning All - Just got off the phone with my Kubota parts folks and as it turns out the bolt IS a shear bolt but as you might expect they don't have any in stock, & yes they don't have the right rear tail light lens in stock either!!! So I'll leave the catcher attached to the BX25 until I can get some new shear pins/bolts and fire the thing up again before I rule this a success or failure. If it snaps a new shear pin/bolt then the verdict is simple, the drive shaft angle is just too sever/great and short of lowering the entire mounting system and finding a longer drive shaft for the GC to PTO connection there is no other option but to buy the new model. The drive shaft for the BX2750 front mounted snow blower is just a little bit longer but the quick connect does not match up to the rear PTO of the BX25 (of course). This drive shaft could be retrofitted by changing out the yoke/PTO quick connect from the GC to PTO drive shaft but until the mounting configuration for the GC is lowered and aligned with the rear PTO a specific lenght is unknown. As short as the GC drive shaft is and given the nearly 45 degree angle that it is now sitting at as it is mounted on the BX25, the more I think about it the more I'm guessing the angle is just too great and hence the shear pin/bolt snapped for that very reason. If anyone out there has any experience and/or knowledge on the drive shaft "acceptable" angles for implements I'd appreciate your input. I'll include the Drive Shaft angle picture that I am referring to again for your review.
 

Attachments

  • Drive shaft 45 degree angle.jpg
    Drive shaft 45 degree angle.jpg
    477.1 KB · Views: 732
/ GCK60-BX Conversion to BX25 #12  
So close, yet so far, maybe. I believe I've read that Kubota raised up the 3PH on the BX24 and forward models to make it full Cat 1 vs limited Cat 1. This change allowed the BX to lift rear implements higher, so it would make sense the PTO angle is more severe on your BX25 vs the BX23. Still hope it works out for you. If not, the only other thought would be to fabricate a belt hook up with the PTO shaft going into some kind of gear box in the (near) horizontal plane (with the belt then driving the GC stub shaft).
 
/ GCK60-BX Conversion to BX25
  • Thread Starter
#13  
Well when I'm wrong I'll admit it contrary to what my wife says about me. . .

I HIGHLY RECOMMEND NOT INSTALLING THE DRIVE SHAFT AT THAT 45 DEGREE ANGLE. I spent a lot of time today talking with several mechanics who are some to the best in the business and EVERYONE I spoke with advised me NOT to run that drive shaft at the 45 degree angle. It needs to be as straight as possible.

Given the information above in this post this is what I did today to move forward - I don't give up very easily. Having disconnected the drive shaft I jacked up the GC and released the top center link and allowed it to rest on it's two storage legs while still attached to the two lower links/arms of the 3 point hitch. Resting in this position I determined that if I could add/weld exactly 6" of 1.5" tube stock (1/4" wall thickness tube stock) and drill a new hole for mounting that top link then things will align including the drive shaft BUT the original GC drive shaft will end up being too short. I then determined that the drive shaft from my front mounted snow blower is longer, it will actually go inside the other half of the GC's drive shaft, and it is a length that I really think will work. As I had mentioned in a previous post, the rear PTO coupler will need to installed on the end of the snow blower's longer drive shaft to allow the connection to be completed to the PTO & GC.

I just finished spray painting the part that I had welded today and will include 3 pictures. Tomorrow I plan on another visit to my Kubota parts folks to determine if the universals of the GC's drive shaft & my front mounted snow blower's drive shaft are interchangeable. If they are, I plan on ordering a second snow blower drive shaft (just the part that slides in and out of the fixed portion of the drive shaft). When I get that new piece I'll disassemble the GC's PTO universal coupling and hopefully install that universal & PTO coupling on the new snow blower drive shaft which will be used with the GC. The last piece now is getting the universals apart and swapped between the 2 drive shafts. Wish me luck
 

Attachments

  • Spray painted and ready for installation.jpg
    Spray painted and ready for installation.jpg
    470.3 KB · Views: 588
  • Make certain the shaft is straight when welded on all 4 plains.jpg
    Make certain the shaft is straight when welded on all 4 plains.jpg
    489.5 KB · Views: 683
  • Drill a new hole prior to welding.jpg
    Drill a new hole prior to welding.jpg
    353 KB · Views: 566
/ GCK60-BX Conversion to BX25
  • Thread Starter
#14  
DONE!!

Well after another day of leg work and trying different things, here is the dirt and bottom line is yes it works!

First thing today I went to my local Kubota Parts folks - man I hope they never promote their parts guys to sales postions! The parts folks are the best and most patient people in the world!! Plus if they don't know something they actually tell you and don't feed you a line of bull!

I started today with 2 drive shafts the original one from the GC GCK60--BX and my front mounted snow blower BX2750 snow blower which is approximately 1.5 inches longer than the original GC drive shaft. Problem was, as I mentioned before, the coupler ends are different. So my intent & reason for visiting with my parts folks today was to find out if the universals for the 2 drive shafts were interchangable. The parts numbers were completely different but they looked to be about the same size & shape. So I went home with the 2 shafts and proceeded to disassemble both universals with the intention of swaping the coupler ends. After hours of delicate manipulation w/o damage to any of the bearings, caps, or lost needles, it became obvious that they are identical. I did the swap and got the GC aligned now so that the drive shaft is 100% straight & level! The cost for this will yet to be determined because when I called down to the parts department to order a new half (drive) shaft for my snow blower they informed me that their computer system was down & I'd have to try back on Monday.

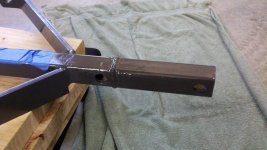
Recapping from everything above that I have done, there really isn't that much to do to make the GCK60-BX fit the BX 24 &/or BX25. The first thing is to weld 6 " of 1.5" tube stock onto the end of the top link of the GC and drill the top link hole for mounting. Some matching Kubota ROPS gray paint finished this modification very nicely and drill that mounting hole prior to doing the welding. The GC 3 point mounting arm can be unbolted from the GC in short order by unbolting the 2 lower mounting pins/bolts, and the four 1/2" bolts on top that afix or secure the top link arm to the GC (actully the 2 on the left side only have to be loosened because the holes are slots and hence the thing just slides out from under them. Next is to get a longer half drive shaft from your Kubota dealer. Both of these part numbers will work the first is 70060-03113 (the one I used) from which is for the older BX23 tractor series when mounting the snow blower. The second part number is for the BX24/BX25 tractor series when mounting the snow blower 70060-02182. Trust me when I say these 2 parts are identical in fit, size, & appearance. Price the 2 items at your local Kubota dealer and take the cheaper one. Once you get it you will need a good vise, some sockets, & a dose of serious patience to disassemble the 2 drive shafts. The c clips for the universal bearings are on the inside so be prepared to get greasy. Just use sockets in your vise to press the thing apart but be careful not to loose any of the needle bearings. Once you press the bearing caps out you will need a pair of visegrips to gently twist the caps to free them completely from the yoke - BE GENTLE BECAUSE YOU WILL BE REUSING THEM WHEN YOU REASSEMBLE THE DRIVE SHAFT. Oh yeah use the longer outter shroud or plastic cover for the new GC half drive shaft, the old shorter one will leave a gap between the two drive shafts when connected and this is dangerous. Use the longer drive shaft protector, it will come with either drive shaft/part number listed above.

When you hook up your GCK60-BX after making the modifications above there is only one way to do it. You MUST position the GC behind the BX and CONNECT THE DRIVE SHAFT FIRST. Next i used a floor jack (here is where the motor cycle jack would be a better option) to raise & tilt the GC forward just a little to align the top pin/link, once aligned insert the pin. I found it best to jack just below the right lower link on the GC which is about the middle of the GC. While the GC is still slightly elevated on the jack (having inserted the top mounting pin), I raised my GC fixed supports and stored them inward as they are designed to do. Now by either raising or lowering the jack in very small incremints I was able to install my lower two 3 point hitch arms on the GC. Once on and secured, I removed the jack, & I then attached my lower linkage and tightened them to level it up..

I've included some pictures to show the new drive shaft position which is now straight & level AND MUCH SAFER!!! There is one final picture that shows the GC on the BX25 - IT CAN BE DONE. Other than the cost of a new half drive shaft for my snow blower (I'm thinking it will be $200) the cost was just a $20 weld job and some paint to the top link of the GC. In the grand scheme of things this was a lot less hassle than having to sell my GCK60-BX only to replace it with a GCK60-23BX AND my solution was much cheaper! The new GC does have a belt driven system versus the solid shaft drive system of the older GCK60-BX which I prefer.

As long as it doesn't snow before my parts folks can get me a new half drive shaft for my snow blower I'll be okay. If nothing else I guess I could try and vacuum up the snow with my GC. My apoology for the length of this post prior to arriving at a solution. As you can tell I'm pretty determined to get something to work when I set my mind to it. This has been no exception. If anyone ever has to go through this like I did it should now be a lot less painful as long as they can read this information first. If anyone has any specific questions that I could be of assitance with feel free to email me directly at JosephGleason06@comcast.net.
 

Attachments

  • Straight drive shaft top view.jpg
    Straight drive shaft top view.jpg
    518.7 KB · Views: 899
  • Straight drive shaft side view.jpg
    Straight drive shaft side view.jpg
    457.7 KB · Views: 678
  • Grass Catcher Installed on a BX25.jpg
    Grass Catcher Installed on a BX25.jpg
    420.1 KB · Views: 1,126
/ GCK60-BX Conversion to BX25
  • Thread Starter
#16  
Well I'm wishing this would work just for the $ savings!!! The description indicates that it is for a 6 spline shaft, the snowblower quick connect probably has a shaft with 20 splines or groves on it (I'll admit I haven't counted them but I can tell you for sure it is a lot more than 6 groves around that shaft). I greatly appreciate the idea and input, thank you. If this is the only cost I end up with having to buy a new snow blower half drive shaft to get my grass catcher to work then I got off easy. Sure beats the $2k-$3k price tag to replace the old GC with that new model. Thank you again for your help.
 
/ GCK60-BX Conversion to BX25 #17  
I appreciate the post as I plan on doing the same modification that you made this spring. One last question I have is is the tube from the boot to the GC long enough or will a longer one have to be purchased?

:thumbsup::thumbsup:
 
/ GCK60-BX Conversion to BX25 #18  
I also just went on my local dealer's website and entered both part numbers for the shaft you listed. Both had the same list price of $227.65.
 
/ GCK60-BX Conversion to BX25
  • Thread Starter
#19  
Good question on the hose & boot. Given the fact that mine was actually a bit too long for my BX23 and in reality the GC now sits in about the exact same position on the BX25 (since my recent modifications) as it did on the BX23 the boot should not be an issue. I just eyeballed the mower deck shoot fitting but didn't actually install the deck shoot duct on the mower or the hose. It appears to be the same 54" deck design even the hole on top of the deck is there to mount the shoot to it for the hose you are speaking about. That hose can be stretched a little if I'm not mistaken. I really cannot confirm the hose & shoot fitting right now because I've removed the GC from the BX25 yesterday and my deck is off the tractor because my quick hitch has been installed for winter. These two items are the least of your worries (mine too) when it comes to the actual installation. For storage I use a pair of the smaller wooden furniture dollies Harbor Freight sells. Simply lift up one side at a time and roll the dolly under each of the storage legs, then it rolls around very easily. What I went through the past few days was the worst of it (other than having to buy that new half drive shaft for my snow blower). But again that $227 part has made this modification one of the cheapest that I know of to get some extra mileage out of a GC that was virtually brand new. I purchased my GC used from an owner who never used it. It worked 100% for me, the 2 or 3 times I used it with my BX23 before I upgraded to the BX25. A lot of folks have complained about it's performance but I have found that a good dose of common sense and mowing when your lawn is DRY (there is some of that common sense) solves 99.9% of the GC's performance issues. Given all of this, maybe I should take this blog down because when my old GC goes I'll likely want to buy another one of this vintage & style. My modification will simply unbolt from my current unit and can be rebolted to the new/used one and of course my drive shaft modification is interchangable. Now that I think about it if anyone wants to sell their GCK60-BX because it won't fit their new BX24 or BX25 emial me and maybe we can work out a deal? :)
 
/ GCK60-BX Conversion to BX25 #20  
Well I'm wishing this would work just for the $ savings!!! The description indicates that it is for a 6 spline shaft, the snowblower quick connect probably has a shaft with 20 splines or groves on it (I'll admit I haven't counted them but I can tell you for sure it is a lot more than 6 groves around that shaft). I greatly appreciate the idea and input, thank you. If this is the only cost I end up with having to buy a new snow blower half drive shaft to get my grass catcher to work then I got off easy. Sure beats the $2k-$3k price tag to replace the old GC with that new model. Thank you again for your help.

Not sure I follow as I thought this extender would go on your tractor side rear PTO to extend it 3". That shaft is already a 1 3/8", 6-spline shaft. Your existing GC PTO shaft must attach to the standard rear PTO stub now. What am I missing?
 

Marketplace Items

2013 CATERPILLAR 299D SKID STEER (A60429)
2013 CATERPILLAR...
25 TANDEM DUAL GOOSENECK TRAILER (A58214)
25 TANDEM DUAL...
2018 PJ TRAILER 32FT GOOSENECK TRAILER (A58214)
2018 PJ TRAILER...
11' CONTAINER (A60432)
2016 HAMM H7i SMOOTH DRUM ROLLER (A60429)
2016 HAMM H7i...
2018 ALLMAND MAXI-POWER 45 GENERATOR (A58214)
2018 ALLMAND...
 
Top