Engine Overhaul Kama 554

/ Engine Overhaul Kama 554 #221  
After writing down all those details, I finally lifted the crank out.
Shees, it was heavier than I thought. . . . I wore my best flannel for that picture. :D


Loretta and I spent the rest of the day removing old torn gaskets.
Tomorrow we'll start cutting out new ones. When the new rod bearings arrive, I can install them and the main bearings.

Glad to see the show's Producer(s) are taking care of your wardrobe!:D -Ed
 
/ Engine Overhaul Kama 554 #223  
Nice shirt, Rob! And still clean, too. :)

Uhhhhh...do you have a separate bag of clubs for every hole you play, or every course, or just every day of the week and twice on weekends? **** - I managed to get by with just one bag of clubs for years. Maybe that's why my handicap was in three digits, huh?

Rich
 
/ Engine Overhaul Kama 554
  • Thread Starter
#224  
Got a little more progress today.
I did manage to get those thrust washers going the right directions. I didn't take any photos, but Loretta and I got the new crankshaft installed ... sitting on the new main bearings in the block. I had to play golf today, so I didn't get much else done on the engine. Tomorrow I'll torque up the mains and rod caps and see if the crank still turns freely. Then finish up making the rest of the gaskets for further assembly.
Thanks for all the comments guys.

Rich, about those bags in the background...
Yeah, I used to play a little before I moved up here. Some are just old sets of clubs (and bags) that I've collected over the years. I play with one set now ... mostly hybrids. There was a time where I played at scratch for many years. Even thought about trying the senior tour, but that went out the door when I managed to get into a pretty good crash on my Harley. Now I just play on Fridays with a group of other old dudes.
 
/ Engine Overhaul Kama 554 #225  
Not only that, but every gasket is destroyed so you have to make or buy a new one every time.
Your suggestion would save a lot of time and effort for future endeavors.

Anybody have other suggestions about that?

I use silicone RTV for most things now. Years ago, I met a racing exhaust
system fabricator and he said you should go to the hi temp RTV for even
the exhaust manifolds. I have run into only a few cases where the extra
thickness of a gasket was necessary to avoid interference.

I think that RTV sealants are not used too often on assembly lines because
it takes longer to apply.
 
/ Engine Overhaul Kama 554
  • Thread Starter
#228  
Loretta spent a great deal of time helping me clean off the parts and making new gaskets.


We used 1/64" thick general purpose gasket material for the front and rear and main oil sump.
The oil pump used 1/32" thick material and the oil pan has a new rubber gasket. Below are photos of gasket making. Some of you might do it differently, but this is how we did it. We traced around the perimeter and cut out using either scissors or a razor blade (or both). Then for clearance holes, we used a large ball bearing and pushed it into the screw clearance hole. Then tapped it with a hammer to outline or punch out the hole. The line up of holes turns out excellent using that method.
Here are some of the gaskets made that way.

 
/ Engine Overhaul Kama 554
  • Thread Starter
#229  
In that third photo above, you might have seen the new rubber gasket for the oil pan?
We again traced the outline and cut that out first. We also traced each hole with a maker. Then we used a set of hole punches from Harbor Freight and a hammer to punch in the holes. Then cut the middle out, leaving about 1" wide gasket.


While Loretta was busy doing that, installed the new oil pump.
I had to prime the pump before I installed it by pouring oil into the intake tube. I used a drill motor to spin the shaft to see the oil working it's way through. After that, a new pilot gear and 12 x 40mm dowel into the flywheel end of the crankshaft. When she had the bottom end gaskets completed, I was able to button up the entire bottom half of the engine.

 
/ Engine Overhaul Kama 554
  • Thread Starter
#230  
Once the bottom half was done, we spun the engine upright.
Next was to install the gear housing (with new gasket) and the injector pump and cam shaft gear. I lined each gear up so the idler gear and others all fell exactly to the teeth that were marked before dis-assembly. I installed the front front pulley, and then the alternator and also a new fan belt. Finally installed the power steering hydraulic pump and connected up the fuel injector pump lines.
Here's what it looks like now.

 
/ Engine Overhaul Kama 554 #231  
Loretta spent a great deal of time helping me clean off the parts and making new gaskets.

Rob, you better hang on tight to that gal and tell her every day how special she is. They sure don't make 'em like that any more!
 
/ Engine Overhaul Kama 554 #232  
Anyone else feel that we're being had here? That engine looks way to clean and shiny to be used. Even the oil pan looked new! LOL

It looks really good Rob. I bet it even purrs like a kitten after its back in.
 
/ Engine Overhaul Kama 554 #233  
Hi Rob,
I've been following all along from the start of all this. I must say it's pretty much left me speechless. What an incredible amount of work in such a short period of time. Making the gaskets alone takes an incredible amount of patients and a steady hand making all those inside and outside curved cuts. Loretta is a real trouper sticking by your side and helping out through all the phases of this amazing engine rebuild story. I must say I really like the new two tone paint job on the engine, it looks really sharp like that.

Whew! your on the home stretch now! I bet your chomping at the bit to try it out. The anticipation wanting to see what the oil pressure is going to be has got to be tremendous. Cant wait to see her back together and your smiling face behind the wheel.

Larry
 
/ Engine Overhaul Kama 554 #234  
I too have been following the thread but having never rebuilt a diesel I don't have much to contribute but encouragement. Great job and I look forward to high oil pressure and low blood pressure. By the way, thats not a flannel shirt, that is a country dinner jacket:eek:
 
/ Engine Overhaul Kama 554 #235  
Rob
1st I like the "Gone fishing magnet"
2nd You got a keeper there my wife wouldn't be cough dead cleaning any parts let alone sitting on the ground doing it!!!!!
3rd Too bad you couldn't hook the engine stand on the front of it and roll it right back on to the transmission.

tom
 
/ Engine Overhaul Kama 554
  • Thread Starter
#236  
Thanks a bunch guys!
Yeah, I hope nobody ever has to go through what went through ... twice!
But I'm hoping it's gonna be worth it. The engine sure does look nice though. I had the opportunity, so I changed out those other things like the fan belt (my 2nd Napa one), the pilot bearing, all new "O" rings where needed, new banjo bolt rubber coated washers called "Stat-O-Seals", new fuel and oil filter, new air filter last time around, and new motor components of course. Figured might as well get it 100%. While everything is easily accessible.
You know my Kama is going on 5 years old already.

And you guys are right about Loretta.
She works her butt off without complaining. She knows how important it is to me. She is a real trooper and knows I miss my tractor.

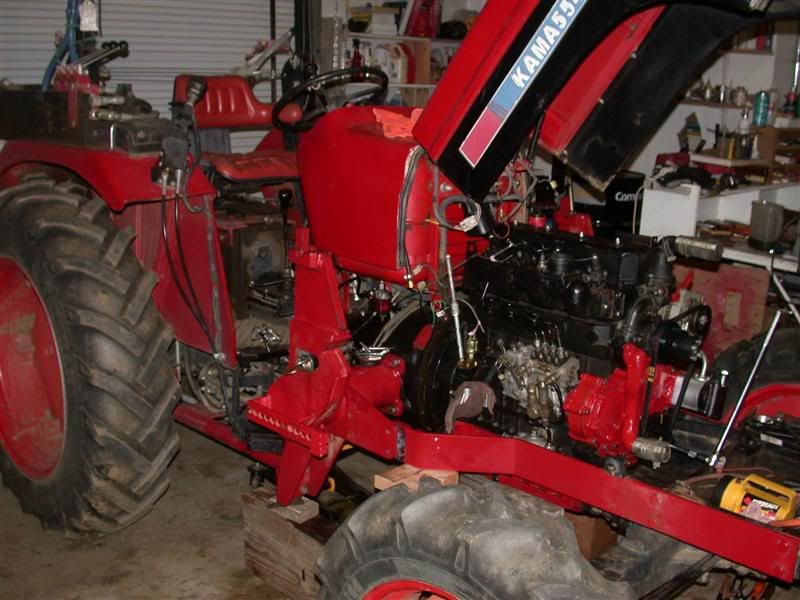
Today, we took it off the engine stand and mounted the engine on the front wheel half of the tractor.
I tried to get the motor onto the rear half by itself, hanging from the engine stand, but no go. I could never get it line up or tilted correctly. Bet we spent the whole morning trying to do that. Finally gave up and mounted it to the front half. Then we spent the entire afternoon trying to get the 2 tractor halves together ... no go there either. We made several attempts but just couldn't get it closer than 1". I think we have to make a couple more little adjustments, right or left or up and down? We gave up just now and will try again tomorrow. I took the week off to complete it. I really thought I'd be hooking up all the electrics, hydraulics and put the radiator back on, but that didn't happen.
I'm a little disappointed for the moment.
Thanks for all the encouragement!

Here are a few snapshots.
First one is the motor off the engine stand. Second one is the motor bolted to the front half. Third one shows the tractor almost together again except that last part as shown in the last 2 photos below. You can see the flywheel and gap.
Tomorrow is another day!

 
/ Engine Overhaul Kama 554 #237  
Rob, sometimes you have to just walk away. Tomorrow it will just fall together on its own. :rolleyes: Well maybe with a little coaxing. :D
 
/ Engine Overhaul Kama 554 #238  
Rob, sometimes you have to just walk away. Tomorrow it will just fall together on its own. :rolleyes: Well maybe with a little coaxing. :D

That's a fact. Can't tell you how many times after stopping and going to get a cup of coffee and presto! Experience is when you know you are only digging yourself a deeper hole. Walk away. . . tomorrow it will fall right into place. Good luck Nice work! -Ed
 
/ Engine Overhaul Kama 554 #239  
Did pressure plate allow the clutch too slip? You may have to use the "Clutch Alignment" tools again to insure the clutch is still in proper alignment to allow the transmisson drive shaft to properly slide into the pilot bearing.
 
/ Engine Overhaul Kama 554 #240  
In the few tractor split repair and reassemble projects I have been involved in it always helped to rotate the engine a little when you get to the point where it should drop into place, the splines may not be aligned. I have seen people destroy the pressure plates trying to force it. I have had someone on the front with a breaker bar turning the crank pulley bolt to align the splines. In a pinch I have even inched around the flywheel with a bar.
 

Marketplace Items

2017 CATERPILLAR 120M2 MOTORGRADER (A52709)
2017 CATERPILLAR...
Case CX75C (A62177)
Case CX75C (A62177)
500 BBL FRAC TANK (A58214)
500 BBL FRAC TANK...
2019 FREIGHTLINER WATER TRUCK (A58214)
2019 FREIGHTLINER...
2025 Polaris Ranger XP1000 (A60462)
2025 Polaris...
Unused SDL-4000 10,000lb. Two Post Auto Lift (A61568)
Unused SDL-4000...
 
Top