OP
You are using an out of date browser. It may not display this or other websites correctly.
You should upgrade or use an alternative browser.
You should upgrade or use an alternative browser.
Creating a Coffee Table for Steph
- Thread starter EddieWalker
- Start date
- Views: 10205
More options
Who Replied?
/ Creating a Coffee Table for Steph
#21
Egon
Epic Contributor
Eddie; whats in the plan for when the new coffee/storage table gets filled up.
By the way - Nice work
By the way - Nice work
3RRL
Super Member
- Joined
- Oct 20, 2005
- Messages
- 6,931
- Tractor
- 55HP 4WD KAMA 554 and 4 x 4 Jinma 284
Eddie,
Just another interesting post showing your many talents! We are interested in what it will look like finished too. I'll bet Steph is really pleased with you.
Just another interesting post showing your many talents! We are interested in what it will look like finished too. I'll bet Steph is really pleased with you.
JazzDad
Gold Member
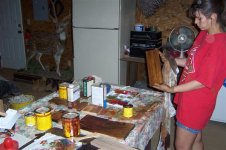
OK, I have to know: is Steph wearing a glove, or did she fish out the stirring stick from the gallon jug of stain?
scott_vt
Super Member
- Joined
- Oct 5, 2004
- Messages
- 8,040
- Location
- east wells,vt
- Tractor
- 1986 MF 1040, 1942 Farmall A, 1949 Farmall Super A
Good Evening Guys,
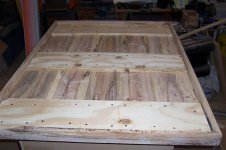
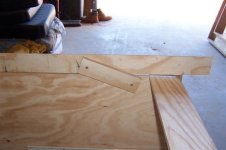
I PMed Eddie earlier today and expressed my concern on his table design. For all of you that am wondering what Im talking about go back to page 2 and look at oictures 044 & o45.
The problem is that he glued up a solid wood top and then used edging around the entire edge of the table. That looks great rather than looking at end grain. You have a nice looking edging and it makes the top look thicker. Unfortunately, its not quite that simple ! His table will look fine tommorrow and next week and probablly next month. The problem will rear its ugly head when that Texas humidity kicks in around next April or May. Those boards are going to expand and push those nicely mitered corners apart, creating gaps or worse I was content to just PM Eddie and tell him of this flaw, but being the type of guy he is, he told me to post my opinion !
Im sure many of you guys have seen tables that look similar to Eddies. The difference is that those tables more than likely have a plywood top or MDF that has had a veneer laminated onto it, subsequently it will not move as I say, actually expand and contract is what Im getting at. And then of course you can use the type of edging that Eddie used and get away with it!
There is also one other way to hide end grain when using a solid wood top with an edging board on the ends but it requires much more work than just biscuit joining the edging. You need to dado the ends of the table to create a tongue and then router a matching slot in the edging just slightly longer than the dadoed tongue. Thats over simplifying the process because you have to calculate how much expansion potential you have for your particular table top. When the edging is fitted onto the tongue, you drill through both the edging and the tongue. Remove the edging and then elongate the holes in the tongue for your expansion. Glue only the center section of the tongue and reassemble. By doing this your glued up top will not seperate at your glue joints.
Back to Eddies problem : 1 He can live with it and hope the gaps are not objectionable
2 He could remove the edging, but unfortunately he would still have to cut an additional 1/2" off each side to remove the biscuit slots.
3 He could leave it as is and make another top when he has the time.
My thought is to leave it as is for now and make another top when he can.
Another item is attaching the top to his base. Same principle, if he screws it from underneath, he needs to elongate the screw holes for expansion.
One more thing and then I will fade away Whenever I make a coffee table or such, I dado a 1/4" slot in the support rails running between the legs and then use L shaped clamps that fit into the dadoed slot and screw through those to attach the top. This way the table can expand and contract all it wants and I never worry about having the top pull apart on me.
Hopefully I have saved someone from making a similar mistake.
I PMed Eddie earlier today and expressed my concern on his table design. For all of you that am wondering what Im talking about go back to page 2 and look at oictures 044 & o45.
The problem is that he glued up a solid wood top and then used edging around the entire edge of the table. That looks great rather than looking at end grain. You have a nice looking edging and it makes the top look thicker. Unfortunately, its not quite that simple !
His table will look fine tommorrow and next week and probablly next month. The problem will rear its ugly head when that Texas humidity kicks in around next April or May. Those boards are going to expand and push those nicely mitered corners apart, creating gaps or worse I was content to just PM Eddie and tell him of this flaw, but being the type of guy he is, he told me to post my opinion !Im sure many of you guys have seen tables that look similar to Eddies. The difference is that those tables more than likely have a plywood top or MDF that has had a veneer laminated onto it, subsequently it will not move as I say, actually expand and contract is what Im getting at. And then of course you can use the type of edging that Eddie used and get away with it!
There is also one other way to hide end grain when using a solid wood top with an edging board on the ends but it requires much more work than just biscuit joining the edging. You need to dado the ends of the table to create a tongue and then router a matching slot in the edging just slightly longer than the dadoed tongue. Thats over simplifying the process because you have to calculate how much expansion potential you have for your particular table top. When the edging is fitted onto the tongue, you drill through both the edging and the tongue. Remove the edging and then elongate the holes in the tongue for your expansion. Glue only the center section of the tongue and reassemble. By doing this your glued up top will not seperate at your glue joints.
Back to Eddies problem : 1 He can live with it and hope the gaps are not objectionable
2 He could remove the edging, but unfortunately he would still have to cut an additional 1/2" off each side to remove the biscuit slots.
3 He could leave it as is and make another top when he has the time.
My thought is to leave it as is for now and make another top when he can.
Another item is attaching the top to his base. Same principle, if he screws it from underneath, he needs to elongate the screw holes for expansion.
One more thing and then I will fade away
Whenever I make a coffee table or such, I dado a 1/4" slot in the support rails running between the legs and then use L shaped clamps that fit into the dadoed slot and screw through those to attach the top. This way the table can expand and contract all it wants and I never worry about having the top pull apart on me.Hopefully I have saved someone from making a similar mistake.
OP
EddieWalker
Epic Contributor
Scotty,
Thanks for the detailed explination. I now understand how I should have done it, but what's done is done. I'm not sure how bad the damage will be with it inside the house and I'm kind of curious to see what happens. Obviously it's a good thing I'm not trying to make a living with my woodworking. hahahahha
In our PM's I mentioned screwing some plywood to the underside to help hold the top together. If it doesn't hold the table together, it will give me a good mounting point for my bracket.
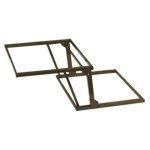
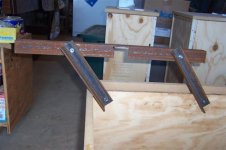
The second picture shows a picture of a bracket I'm going to make so we can lift the table top up to eat off of it. Our home is very small and we don't have a dinning room or even a diner table. The kids eat at the breakfast bar and we eat at the coffee table. My goal is to be able to lift the top up and eat without bending over the coffee table. hahahaha
Eddie
Thanks for the detailed explination. I now understand how I should have done it, but what's done is done. I'm not sure how bad the damage will be with it inside the house and I'm kind of curious to see what happens. Obviously it's a good thing I'm not trying to make a living with my woodworking. hahahahha
In our PM's I mentioned screwing some plywood to the underside to help hold the top together. If it doesn't hold the table together, it will give me a good mounting point for my bracket.
The second picture shows a picture of a bracket I'm going to make so we can lift the table top up to eat off of it. Our home is very small and we don't have a dinning room or even a diner table. The kids eat at the breakfast bar and we eat at the coffee table. My goal is to be able to lift the top up and eat without bending over the coffee table. hahahaha
Eddie
Attachments
Egon
Epic Contributor
Not to fear Eddie; some of your wifes work will quickly cover anything that does happen!
Bird
Rest in Peace
Scotty, I think I understand your concern, but when you say
, I have a question. I would understand if the problem showed up if the table were in a non-climate controlled building such as a shop building, but will you have the same thing in an air-conditioned home?when that Texas humidity kicks in around next April or May
scott_vt
Super Member
- Joined
- Oct 5, 2004
- Messages
- 8,040
- Location
- east wells,vt
- Tractor
- 1986 MF 1040, 1942 Farmall A, 1949 Farmall Super A
Bird said:Scotty, I think I understand your concern, but when you say , I have a question. I would understand if the problem showed up if the table were in a non-climate controlled building such as a shop building, but will you have the same thing in an air-conditioned home?
Mornin Bird,
When I PMed Eddie I told him it may not be quite as big a problem in a climate controlled building but IMHO eventually it will show up. Whether it shows up when they lose power or next year, or at some point down the road it will happen. Obviously the larger the table top, the greater amount of potential expansion that you have. Even though Eddie refers to this as a small table, its size is fairly significant. I unfortunately dont have my reference material handy on expansion cofficients handy but will look it up when I get a chance.
I failed to mention in last nights post that he can minimize the amount of moisture that the top picks up by sealing the entire table top after he has settled on his stain color and it has been lightly sanded.
I was hoping some other woodworkers like Cliff and Jeff would jump in here to echo my sentiments but maybe they have not seen this post yet. In any event I will be happy to help in any way I can !
Michael_E_Tx
Silver Member
Hey Eddie and Scott. I've been following along here and would like to contribute to the discussion. Scott I defer to your experience building new tables, I have not done much in that way, especially this type of tabletop construction. I am a retired woodworker, but my career was almost entirely focused on major repairs to valuable antiques. I understand and agree with your ideas about how to deal with expansion, however in this case, I will predict exactly the opposite.
I think your tabletop will shrink Eddie. This is because you've fabricated your top from planks that you've just cut from a log. It doesn't really matter how long that log has been sitting, in my eyes, you have green wood. Green wood shrinks. How much spalted cedar will have a will to move, I can't really predict, but I would say that I believe spalted wood of any kind will have less will to move. Spalt, by definition is rot, and rot, even partial, absorbs some of the movement of solid portions of the wood.
So I think you may get away with it, the top glued up in the manner you have done. I agree with Scott about staining the underside the same as the top. In fact, I would go a step farther and suggest you remove your plywood braces if they are not glued on, and apply not only the stain but whatever other finish you apply to the top. Then reattach your cross braces.
Clever idea with the bracket and adjustable height tabletop.
Mike
scott_vt
Super Member
- Joined
- Oct 5, 2004
- Messages
- 8,040
- Location
- east wells,vt
- Tractor
- 1986 MF 1040, 1942 Farmall A, 1949 Farmall Super A
Mornin Mike,
Thats a very good point and one I didnt fully take into account ! I was so focused oon the table design that I forgot that he rescently milled these boards from logs. Talk about tunnel vision
In any event, with your experience you understand what Im talking about.
Im sure that Mike understands that a moisture meter can be used to find out what the moisture content is any particular board. But this tool isnt something that the average Joe would have in his garage.
Back track to the milled boards. My friend milled up some 2 1/2" thick oak for me a couple of years ago. I let it sit out in my screen house for over a year and last fall I moved the planks into my basement to dry the rest of the way. I also have my wood stove in my basement. I feel that Im finally ready to start rough milling the legs for an oak kitchen extension table that my wife has been after me to make. So as Mike stated, my boards have shrunk durring the drying process.
Im sorry about the tunnel vision guys, and thanks for the heads up Mike ! I was just so focused on the design that I forgot about the rest of the thread !
OP
EddieWalker
Epic Contributor
Thanks Scotty and Mike,
Seems I have a few potential issues to worry about. The plywood is glued and screwed, so it's not coming out. LOL Can I just seal the entire bottom, plywood and all?
I'm definiately over my head here in what I'm doing, but since I'm learning, this is a good thing. hahaha
It's raining outside, freezing cold with snow predicted. I don't feel like dealing with it, so I'm thinking about being lazy.
It's days like today that TBN sure is nice to have around.
Eddie
Michael_E_Tx
Silver Member
Hey Eddie.
I'd definitely just proceed to seal the entire bottom. The most important aspect is to seal the bottom as well as the top gets sealed.
Looking forward to the final product. What are you going to seal over the stain with?
Mike
I'd definitely just proceed to seal the entire bottom. The most important aspect is to seal the bottom as well as the top gets sealed.
Looking forward to the final product. What are you going to seal over the stain with?
Mike
OP
EddieWalker
Epic Contributor
Hey Mike,
I'm using Minwax stain and Minwax Polycrilic finish. I have most of a gallon of it and have had good luck with it in the past. Of course, this is a little unique for me as I've never milled my own wood before. I don't know what that will do to the overall finish.
Thanks,
Eddie
I'm using Minwax stain and Minwax Polycrilic finish. I have most of a gallon of it and have had good luck with it in the past. Of course, this is a little unique for me as I've never milled my own wood before. I don't know what that will do to the overall finish.
Thanks,
Eddie
Michael_E_Tx
Silver Member
Hi Eddie.
If you haven't stained the top yet, you might try this test on a piece of scrap. Just wet the piece, or part of it with water and let it dry. This is called raising the grain. Now sand until uniform and compare to your tabletop. The grain will probably be a little crisper, but more importantly, the surface will not be subject to grain swelling if moisture should ever seep through your finish (such as a water glass sitting too long).
If there is very little difference then you've done a good job sanding and you don't have much hammered-in grain from your planing. If that's the case, just proceed with your finishing.
If the grain you raised is pretty fuzzy, I'd raise the grain on the whole table top and re-sand it. It's a cheap thrill, doesn't take very long and lasts a long while. I think you'll find the table top will take stain much more uniformly and the result will be more visually pleasing.
Mike
OP
EddieWalker
Epic Contributor
Hey Mike,
Thanks for the tip. I'll be sure to do that.
One of the goals of this coffee table is for the top to be able to raise and convert into a table to eat off of while sitting on the sofa watching TV. I priced brackets from various online sources and thought they were way too much money.
Being cheap and a do-it-yourselfer, I decided to make my own bracket. My brain always starts out on these things in the most complicated way to accomplish it. There is a process that I have to go through to get to a practical, working design that will work and do the job.
Once I cut out all the extra BS in my deisign, I realized I only needed three pieces for each side. Then I cut some scrap plywood to size that I guessed would workd and started to test my plan.
When I knew how long the metal had to be and where the holes needed to be, it was pretty simple to cut some angle iron to size and drill holes for the bolts.
Eddie
Attachments
hilld
Gold Member
Eddie,
in picture 53, it looks like you are going to have some interference. Are you going to notch the wood or cut down the angle iron so the top doesn't touch the moving part of the hinge?
Derek
in picture 53, it looks like you are going to have some interference. Are you going to notch the wood or cut down the angle iron so the top doesn't touch the moving part of the hinge?
Derek
OP
EddieWalker
Epic Contributor
Derek,
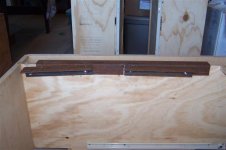
Thanks for mentioning that. I thought I took the picture after I cut the ends down and rounded off the edges. I didn't even look at them very closely when I posted them, but now I remember that I didn't take a picture of it after that.
Now the brackets are painted and ready to be put together, but the box and drawers are waiting for Steph to prime and paint them.
Eddie
scott_vt
Super Member
- Joined
- Oct 5, 2004
- Messages
- 8,040
- Location
- east wells,vt
- Tractor
- 1986 MF 1040, 1942 Farmall A, 1949 Farmall Super A
EddieWalker said:Derek,
Thanks for mentioning that. I thought I took the picture after I cut the ends down and rounded off the edges. I didn't even look at them very closely when I posted them, but now I remember that I didn't take a picture of it after that.
Now the brackets are painted and ready to be put together, but the box and drawers are waiting for Steph to prime and paint them.
Eddie
Mornin Eddie,
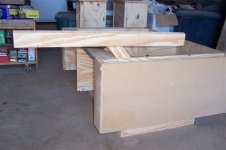
Your gonna need your brother over your place to lift that thing up into position
I mean a big strong guy like your self to move that monster Lookin good !
OP
EddieWalker
Epic Contributor
Morning Scotty,
I've been wondering about that. How hard will it be to lift? Two of us will be able to do it easy, but can Steph lift it by herself?
On the ones they sell for $150, the metal is much thinner and they seem sort of flimsy overall, but they have springs on them. I'm wondering if some heavy duty springs might help?
I'm just confused on how to do it right now. I know that it's something I can add at any time, so it's not a rush, but it is something I'm thinking about.
Thanks,
Eddie