Barn to workshop

   / Barn to workshop #11  
Are you going to attempt a restoration? If so start figuring out time and cost and even viability of the project.

If the bottom has rot and ants and there is no proper foundation It may become a horrendously frustrating undertaking with the end results far from what is now envisioned.

It could be suggested that the structural integrity of the barn has been seriously comprized.

Think I'm trying to say -- tear down -- salvage -- start on proper foundation and reuse matterials if possible.

Egon
 
   / Barn to workshop #12  
Larry,

Welcome to TBN and thanks for the kind words.

After looking at that barn, I'm very curious how your going to go about saving it. I think Egon has the right aproach when he says to salvage what you can, but start from a good foundation.

Price to build compared to restoring is usually cheaper, and it's always faster!!! Especially on a major project like that.

Those old beams and siding could be used again to create a truly unique, and impressive structure. It would add tremendous value to your land and be something that will be around long after you're gone.

Trying to fix the unknown means years of discovery and comprimise. It will never be as good as brand new. The best you can hope for is makeing it secure and enjoying the old time feel of having an old barn that has been modified to a less then desirable level.

Those trees have probably done more damage then is first apparant. Even after you cut them down, you still have the roots underneath, which will now rot out over the next ten to twenty years.

But after saying all that, I realize that building a brand new barn costs quite a bit of money, and since you already have one standing, there is the challange of fixing it over time and still being able to use it.

Should be an interesting post to follow and I'm looking forward to seeing your progress.

Eddie
 
   / Barn to workshop #13  
Hello Larry, welcome and thanks for deciding to post. I'm not at all qualified when it comes to old barn restorations, but it sure looks like you could have quite a project on your hands! Repairs are one thing, but restoration is altogether different. If you decide it's viable and desirable to restore, I think that's great. I really apppreciate the hard work and dedication some put into these projects... much harder than putting up new. And sometimes the technology and pure ingenuity used to make it happen simply astounds me. Out my way, more and more New England barns are being cabled and attended to after years of neglect and I for one love to see them saved if at all possible. It's a piece of our area heritage and the landscape just doesn't look the same without them. If you go ahead, you have my best wishes for smooth sailing and I look forward to watching the progress. Thanks!
 
   / Barn to workshop #14  
Larry,
I agree on the spending time evaluating the existing structure. I made the mistake of growing fond of an old structure on my place and now have more money tied up into the old structure than I have in the basic 30'x40' pole barn that I had built. I still have the old structure and it pretty much looks like it did when I purchased the property with the exception of the inside which is now structurally sound, water proof, insulated and still has the charm of a home made Tamarack pine log and rough cut lumber walls. Wish I had destroyed the old and started over.
Welcome aboard. Don't you just love Tractorbynet? Sure beats going to college.
Farwell
 
   / Barn to workshop #15  
Welcome Larry and here's to another great TBN project /forums/images/graemlins/laugh.gif Looks like you've got your work cut out for you but it should be worth it in the end. Be sure to document your progress for the rest of us, we enjoy watching as well as doing ourselves /forums/images/graemlins/smile.gif
 
   / Barn to workshop #16  
Larstan, HI and welcome to TBN /forums/images/graemlins/smile.gif,

Yes this site is as close as you can get , To getting a pop and sittin out front of the general store shooting the breeze with folks that do most everything themselves and try to help their Buddy's with whatever they can ..... /forums/images/graemlins/cool.gif Very friendly and informative and encouraging , I'm sure you will enjoy being a part of it!!!

Keep us posted on your project /forums/images/graemlins/grin.gif
 
   / Barn to workshop
  • Thread Starter
#17  
Thanks for the warm welcome everyone, It's nice to have one person that is interested in what your doing let alone a whole group. The wife tries to hide the yawn when I call her out to show her how clever I was getting that base beam replaced by myself /forums/images/graemlins/smirk.gif. Anyway thanks again I really respect the wealth of knowledge you have and are so willing to share with everybody else.....

So, let me answer a couple of questions that came up in your replies.

This is not a restoration, to be blunt I have neither the money nor the talent to restore a historical building. That Don't mean I wouldn't giver the ole college try, but I think you would probably have to have a barn full of C-notes you were willing to feed to the sheep. I don't.... But if anyone else does I can pick up /forums/images/graemlins/grin.gif

Another thing is, I do think it is a pretty cool piece of history (I know, don't let my emotions get in the way of practical considerations /forums/images/graemlins/tongue.gif) Number one, the interior structure is actually in quite good condition from the base beams up. Don't know the proper terminology here, it appears that the original structure was laid out on top of 6" x 8" 16' rough cut beams. They were laid end to end in 4 rows, laying east and west. That is the 32' front to back. North and south base beams I am unsure of as those only ran on the outside walls and neither survived completely from side to side on either wall. The total length is 48', the east wall had the large opening I shot the pictures through (my 4th post attachment) for the interior shots before beginning the project. On the 4 rows of horizontal beams they set 5 rows of vertical supports, all of the vertical supports except for the south west corner were in great condition.

I apologize if I am being long winded, hard to tell what will be interesting and what sounds like Blah,Blah,Blah......

So the major hurdles so for have been clearing the sheep stuff "ugh" /forums/images/graemlins/mad.gif, ripping out decades of patches, add-ons and fixes (that were not). Then jacking it out of the mud and getting it level while replacing the rotten base beams. Also the trees encroaching the East wall were a major pain.

I started this around April, I dug out the pictures I posted above so I could lay a foundation to bring everyone interested to where I am now. I may have a couple of intermediary pictures but before TBN I really had not thought about documenting the whole process so big jump from then til now.

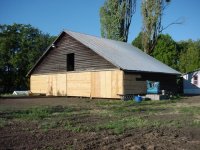
Again this is a Great old barn I am turning into hopefully a pretty cool workshop for all my accumulated, errr, treasure /forums/images/graemlins/wink.gif Attached is a current photo of my progress taken of the South West walls of the BarnShop /forums/images/graemlins/laugh.gif "I now Dub thee 'Ye ole BarnShop'". The structure is now sitting level, I have replaced all but 2 of the bad base beams. I have replaced alot of the siding that absolutely could not be saved(still have a bunch to do but making progress). I rebuilt the whole west wall and nailed the siding flat in order to hang the sliding doors. I made 2 bays with entrances from the west side. The south bay can be driven completely through east to west. The reason I have approached the project from this direction(not working the foundation and floor) is that I have an enormous amount of tools that I needed to get under cover(it rains up here, ALOT!) And also since the structure was already standing that was always going to be the hardest part to figure out and most cash intensive /forums/images/graemlins/smirk.gif. Amazingly the roof is in great condition, dry as bone inside.

Again thanks for the welcome and I hope you enjoy the pics...
 

Attachments

  • 696761-BarnafterWall_doors2a.jpg
    696761-BarnafterWall_doors2a.jpg
    71.7 KB · Views: 604
   / Barn to workshop
  • Thread Starter
#18  
Same angle doors closed.
 

Attachments

  • 696762-BarnS_Ecloseddoorsa.jpg
    696762-BarnS_Ecloseddoorsa.jpg
    72 KB · Views: 512
   / Barn to workshop
  • Thread Starter
#19  
Inside shot of sliding door,
 

Attachments

  • 696764-Barn_newdoora.jpg
    696764-Barn_newdoora.jpg
    41.7 KB · Views: 482
   / Barn to workshop
  • Thread Starter
#20  
Inside looking up over loft, this gives you an idea of the general structure. Loft was originally made from ripped 2"X4" rough cut, kind of on the springy side. I will be replacing that down the road.
 

Attachments

  • 696766-loftraftersa.jpg
    696766-loftraftersa.jpg
    64.7 KB · Views: 530

Tractor & Equipment Auctions

More info coming soon! (A49346)
More info coming...
2013 Doyle Dry Fertilizer Tender Trailer - Kubota Diesel, 3 Stainless Compartments, Side Discharge (A51039)
2013 Doyle Dry...
2022 CATERPILLAR CS44B SMOOTH DRUM ROLLER (A51242)
2022 CATERPILLAR...
2000 ADDCO DH1000 Message board (A49461)
2000 ADDCO DH1000...
2012 MACK CHU613 (A50854)
2012 MACK CHU613...
CAT 420F2 IT (A50854)
 
Top